When Heavenly Housewife (of From Donuts to Delirium) and Stevie (of Weird Combinations) announced that their cooking challenge this month was croissants, I immediately knew I wanted to participate. Even though they’re time-consuming and more than a little intimidating (at least for me!), I’ve wanted to try my hand at making them for quite some time.

Sweet Croissants (above)
Everyone participating in this challenge started with Julia Child’s basic croissant recipe. (Gabi at Mamaliga has an incredible tutorial here. Also, Angie at Angie’s Recipes gives a great explanation of the method for making croissants.) My version of the recipe is below, but first I wanted to share a few of my tips and observations:
- Since you’re working with butter, don’t make these on a day that’s too hot/humid.
- Give yourself ample time to make these…it really is a full day affair.
- Try to measure flour by weight if possible. One cup of all-purpose flour (which is what I used for this recipe) weighs 4.5 ounces or 128 grams.
- A little bit of rough kneading (including Julia’s recommended lift-and-throw motion) really turn this into a very smooth dough with only a minimum sprinkling of flour on your hands and work surface for help.
- Rolling the butter out isn’t as hard as I thought it would be. Keep the butter completely chilled until you’re reading to work with it. Place it between 2 long pieces of plastic wrap (parchment paper would probably work too, but I like to be able to see the butter). Beat it with a rolling pin until it’s soft enough to roll out, then roll it into a 5-inch square. Wrap it up in the plastic wrap that you rolled it out in, and transfer to the fridge to chill before incorporating it into the dough.
- When you’re rolling out the dough for the first time after you’ve added the butter, go easy so you don’t tear the dough and have the butter spurt out. If this does happen, just pinch the dough together as best you can to seal it up.
- While rolling out the dough, if at any point it becomes too difficult to work with, wrap it in parchment paper and put it in the fridge to chill a bit.
- Double the batch, because although croissant-making is a labor of love, really, who wants to do all that work for 12 measly croissants? (Ok, I didn’t mean to call croissants measly, I take that back…but still, it is a lot of work for just a few pastries if you don’t double the recipe!)
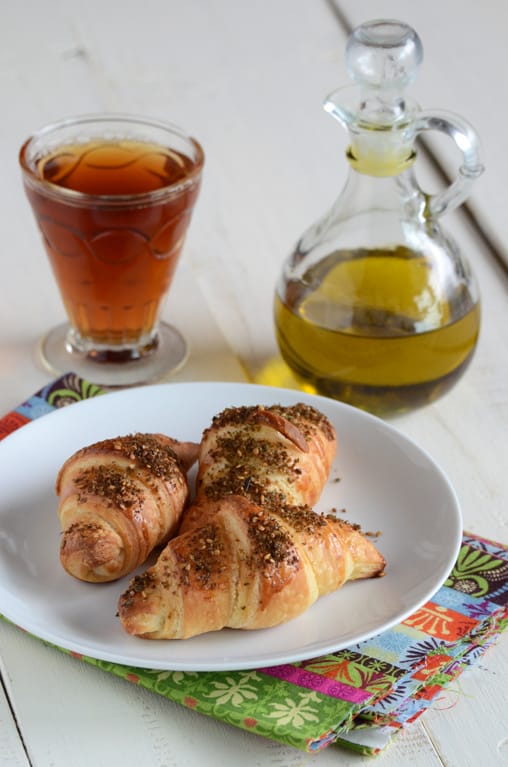
Savory Croissants (above)
Croissants (Adapted from Julia Child’s recipe, as seen on Mamaliga)
Yields 12 croissants
1 teaspoon instant yeast
1 teaspoon salt
1 ½ tablespoons sugar
¼ cup warm water
2 cups (9 oz/256 g) all-purpose flour, plus a little more for kneading and rolling out.
2 tablespoons canola oil, plus a little more to oil the bowl
⅓-1/2 cup milk, room temperature
1 (¼ lb) stick of butter, chilled
1 egg, lightly beaten with 1 teaspoon of water (for eggwash)
1. In a small bowl, mix together the yeast, ¼ teaspoon salt, ½ tablespoon sugar, and ¼ cup water; let it sit for a couple minutes until foamy.
2. In a large bowl, whisk together the flour, remaining 1 tablespoon sugar, and remaining ¾ teaspoon salt. With a wooden spoon, stir in the yeast mixture, then the oil, and then enough milk to form a dough.
3. Lightly flour your hands and work surface; turn the dough out and knead, being a bit rough with it (Julia’s lift-and-throw works well), until it is smooth and elastic, about 3 to 5 minutes.
4. Transfer the dough to a large, lightly oiled bowl; cover the bowl with a damp towel and let it rise until doubled in size, about 1 to 2 hours, depending on the weather.
5. Gently punch down the dough, wrap it in parchment paper, and chill 30 minutes.
6. Place 1 stick of butter between 2 long pieces of plastic wrap (parchment paper would probably work too, but I like to be able to see the butter). Beat it with a rolling pin until it’s soft enough to roll out, then roll it into a 5-inch square. Wrap it up in the plastic wrap that you rolled it out in, and transfer to the fridge to chill before incorporating it into the dough.
7. Lightly flour your rolling pin and work surface. Remove the dough from the fridge and roll it out to a circle about 10 inches in diameter. Place the butter in the center of the dough; wrap the opposite sides of dough over onto the center so they overlap, and then pinch them together to seal in the butter; it should look like a little parcel. With the seam side up, gently roll the dough out to a rectangle about 15 inches long by 5 inches wide. If the dough tears at all, pinch it together to seal it back up.
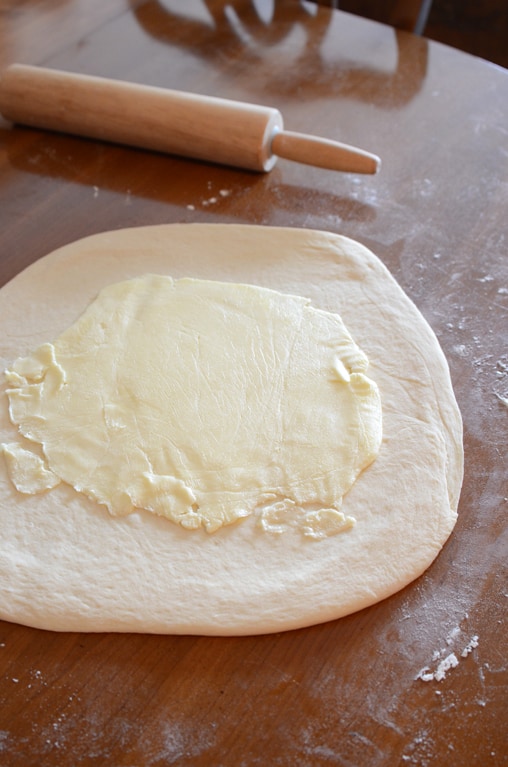

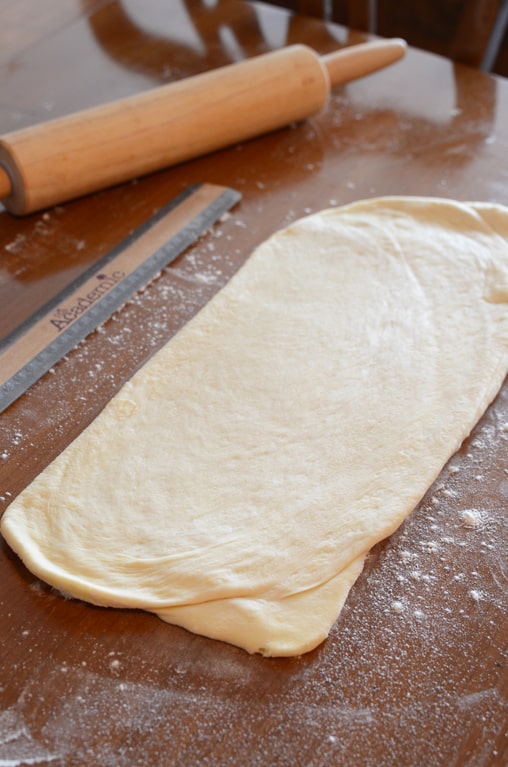
(Haha, do you like my *super cool* ruler? I think I've had it since the 7th grade! :) )
8. Turn #1 (simple fold): You’re basically folding the dough as you would fold a business letter; fold the bottom third of dough up over the center, then fold the top third down over the center. Wrap in parchment paper and chill 1 hour.
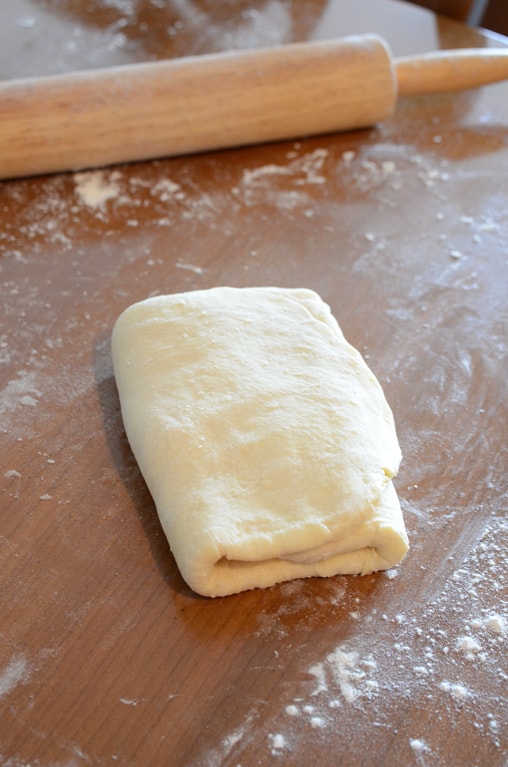
9. Turn #2 (simple fold): Roll the dough out on a lightly floured surface to a rectangle about 15 inches long by 5 inches wide; fold the bottom third of dough up over the center, then fold the top third down over the center. Wrap in parchment paper and chill 1 hour.
10. Turn #3 (double fold): Roll the dough out on a lightly floured surface to a rectangle about 15 inches long by 5 inches wide; fold the top and bottom in so they meet at the center and then fold the dough in half again (you will end up with 4 layers). Wrap in parchment paper and chill 1 hour.
Steps 10 & 11: Double Fold (above)
11. Turn #4 (double fold): Roll the dough out on a lightly floured surface to a rectangle about 15 inches long by 5 inches wide; fold the top and bottom in so they meet at the center and then fold the dough in half again (you will end up with 4 layers). Wrap in parchment paper and chill 1 to 2 hours.
12. Roll the dough out on a lightly floured surface to a rectangle about 20 inches long by 8 inches wide. Cut the dough into 2 equal pieces; wrap 1 in plastic wrap and chill until ready to use.
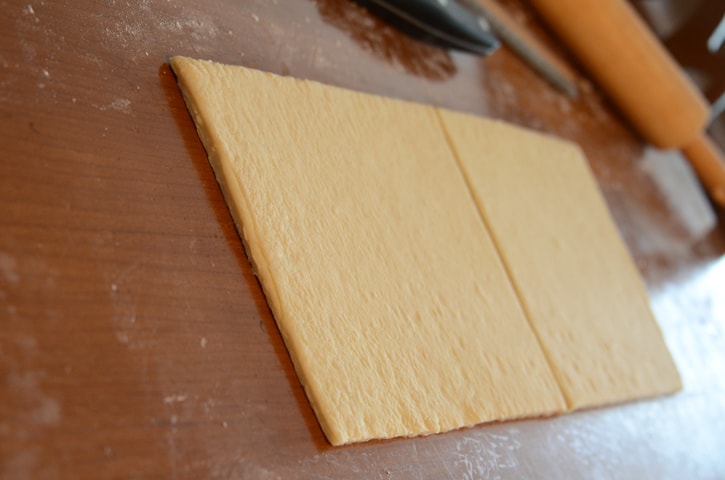
13. Roll 1 half out to a rectangle about 12 inches long by 7 inches wide; use a straightedge or ruler to trim the edges. Cut the dough into 3 equal pieces, then cut each piece along the diagonal; you will end up with 6 triangles.
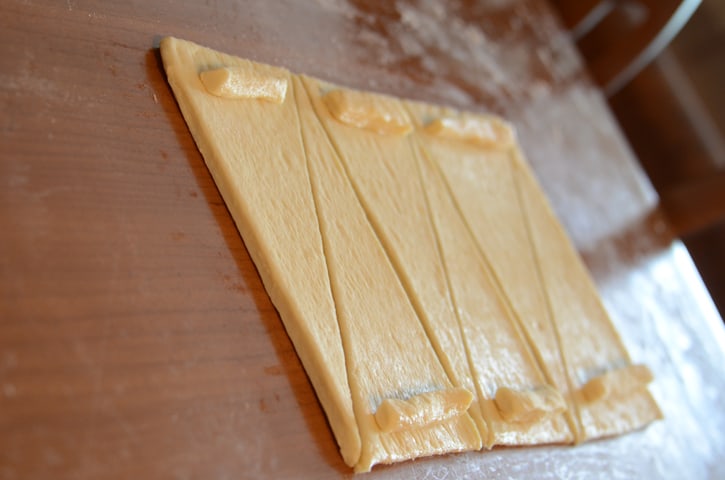
14. Place a piece of dough trimming at the base of each dough triangle. Start at the base and roll each triangle up, gently bending the 2 outer edges inward so you end up with a crescent shape.
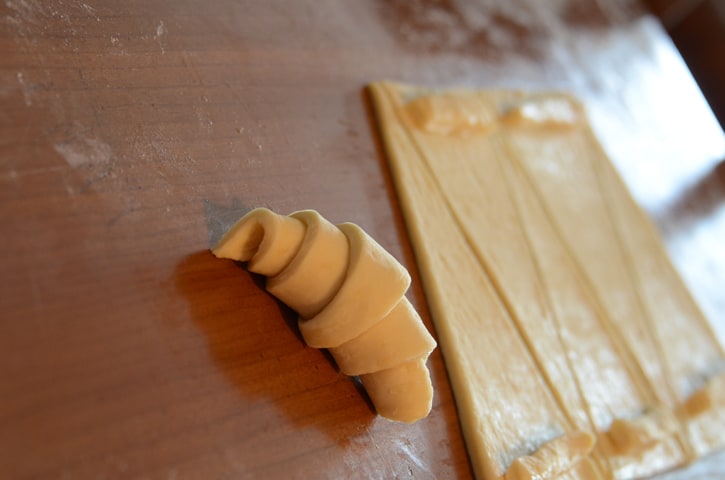
15. Transfer the pastries to baking sheets (with the tip of the triangle on the bottom so it doesn’t come undone while baking) lined with parchment paper or silpat liners, leaving 2 to 3 inches between each pastry. Drape a piece of plastic wrap on top, and let them sit at room temperature 1 to 2 hours, or until about doubled in size.
16. Preheat oven to 425F; lightly brush the tops of the pastries with eggwash (you will not need all the eggwash). Before you put the pastries in the oven, spritz the oven with water; close the door and leave it for 1 minute.
17. Bake the pastries until golden, about 14 to 16 minutes, rotating the pans once halfway through.
Customized Croissants
In addition to regular croissants, I made two special flavors: one sweet (marzipan-filled with orange blossom glaze and almonds) and one savory (cheese-filled topped with za’atar, which is a Middle Eastern thyme spice mix).
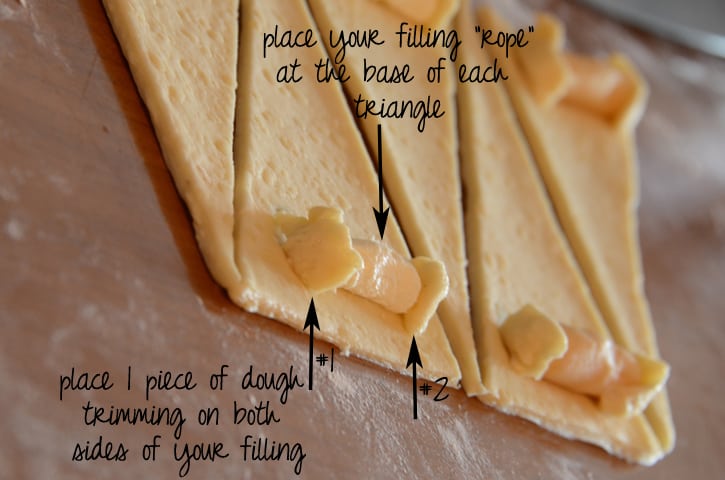
Each croissant needs 1 teaspoon of filling (yup, that’s all!); avoid the temptation to over-stuff…it will always backfire in the end. Roll the filling into a ball and then into a small rope. Instead of putting the dough trimming at the base of the triangle, place the filling “rope” at the base. I was worried about the filling leaking out as they bake, so I had the idea to put two small trimmings of dough on either end of the filling to help seal it in, which luckily worked like a charm. Then roll your croissants up as normal.
Here’s what you’ll need:

Marzipan filling for 1 batch of croissants (12 croissants total):
12 teaspoons (¼ cup) marzipan
Orange Blossom Glaze for 1 batch of croissants (12 croissants total):
¾ cup powdered sugar
4 ½ teaspoons water
½ teaspoon orange blossom water
Other:
6 teaspoons (2 tablespoons) flaked almonds
Fill the croissants with marzipan as described above (be sure to put a small piece of dough trimming on each side of the filling so it doesn’t leak out) and bake as normal; cool completely.
Whisk together all ingredients for the glaze in a small bowl; drizzle over cooled croissants and immediately sprinkle almonds on top.

12 teaspoons (¼ cup) cream cheese
2 teaspoons za’atar
Fill the croissants with cheese as described above (be sure to put a small piece of dough trimming on each side of the filling so it doesn’t leak out); continue with the recipe, but after brushing with eggwash sprinkle the za’atar on top. Bake as normal.
And here are the other lovelies who participated in this challenge:





Trix says
This is an AMAZING result, not just for your first time - for any time!! I am hopeless at this sort of thing ... I am simply not precise enough and my hands are so warm that the butter starts to melt if I touch the dough!!
Sara (The Veggie Eco-Life) says
They look incredible! I wouldn't succeed in making a first batch so handsome ;)
LeQuan says
Faith,
This is really your first time making croissants? Wow wow wow! These look professional and uber yummy. I love both flavours, but if I had to choose one, it'd have to be the Marzipan-filled croissants with orange blossom glaze. I've never made croissants before, but after reading this post, I totally agree on doubling the recipe. Thank you for the great tutorial! You never cease to amaze me with your cooking talents, Faith! Wonderful, lovely job with these croissants.
grace says
this is your croissant debut? THIS? i'm most impressed, faith. sweet ones for me, thanks. :)
Simply Life says
WOW! I am SO impressed by this!
Nutmeg Nanny says
Yum! I totally want to make croissants when I come to visit...can we stuff them with chocolate...yum! :)
Susan says
Gorgeous croissants, Faith! I love your photos and instructions too. I've never tried making homemade croissants and with Grammie's butter horns in the freezer, I'll probably have to wait a while to try making them but I would love to at some point.
The sweet croissants look especially delicious to me!
Michele | Cooking At Home says
Wow. Perfectly done!
sophia says
Faith, I'm amazed at your talent. Man! They look stunning!! I've tried making these multi-layered pastry once, but they turned out like glue. A perfect croissant is impossible to achieve without many many practice, but yours is so close to it!
Dzoli says
Yes it requires patience and practice.But reward is accordingly fanatstic nice soft tasty with one word delicious goodness :)
Lisa says
Maybe your first attempt wasn't as flaky as a bakery...but they are pretty, and that sure counts too :)
Laz says
Faith,
What a well-written and fantastically shot tutorial. You did a fantastic job. Even I could follow those directions!
Savory or sweet, I'd eat a bunch of these beauties.
Bravo!
kankana says
I am super intimidated to make these at home and I can see that you have done such an amazing job. They really look perfect .. like those professional bakery. :)
Lucy says
I've never made croissants because they seem so complicated but yours look straight out of a patisserie! I love the idea of the marzipan filling - what a treat.
Glamorous Glutton says
Your croissants look amazing, and the hints and photos on your post make me think that it might be worth another go. The cheese filled croissant with za'atar are really tempting. It was a fun challenge. GG
Kalie says
Buttery and flaky yum!
Mimi says
Beautiful! Light and flaky just the way they should be.
Mimi
Veronica Miller says
The exclamation point in your title is well-deserved. This is something I NEVER thought about making in my own kitchen until I saw you do it. You go girl, this is so impressive! I'm drooling over the marzipan filled ones! I die! I had to Google za'atar-thanks for teaching me something new. But now I really want to know how it tastes! Only one way to find out...
Mythreyi says
Faith, You have very well done job to make me drool over those croissants. even after knowing how much butter is involved, i can not resist these croissants. first click with the cup of coffee and croissants is enough to make me wake up for every morning.
-Mythreyi
Yum! Yum! Yum!
zerrin says
Faith, these look superb! You are such a talented cook that you didn't fail in your first trying. Savory one is my favorite, must try it!
FOODESSA says
Faith...as you already know...I'm a fan of your skills in the kitchen. This time...you really wowed me.
So much dedication and love was put into this post...much appreciated.
I'm certainly going to refer back to this tutorial if ever I get the itch to challenge myself on these delights as well ;o)
You really shine!
Have a great week and flavourful wishes,
Claudia
Jay says
so totally impressive, i'm all over the recipe...awesome cliks..
Tasty Appetite
Lorraine @ Not Quite Nigella says
They look perfect Faith! There's nothing quite like home made puff pastry is there? :)
Kalyani says
hi .. first time here, drawn in by your stunning post on Croissants !! loved ur space and do join me in a 100 day global food fest at my space !!
Cheers
Kalyani
Join me in a 100-day Global Food Festival here
Chiara says
Wow, I'm incredibly impressed. I wish I had time to try and make croissants like yours, they look sooooo good!
Linda says
Genius! I naively had no idea that croissants take so much work and effort. I think yours are absolutely gorgeous, and would simply love a marzipan-filled one now for breakfast... the orange blossom glaze sounds heavenly!
Sanjeeta kk says
This is what I was postponing for quite a long time..but your croissants are tempting me to bake my soon, Faith! What a lovely explanation and clicks.
Angie's Recipes says
How pretty and tasty!
Carolyn Jung says
I always gasp a little when I see that huge layer of butter that gets folded into the dough. But then again, that IS why croissants are so irresistible. Bravo to you for making such gorgeous ones on your first try.
Monet says
You brave soul! Croissants are fun to eat...but they do take some work! Thank you for sharing this delicious experience! I'm hungry again (we just finished dinner a couple of hours ago). Yummy..as always. Much love from Austin!
BeadedTail says
Oh I love croissants! Yours look so delicious! I will have to try these!
Magic of Spice says
Love the ruler :) These are amazing Faith...wow!
Tanvi@SinfullySpicy says
Oh MY gosh...Faith...you are a pastry chef or what? Those babies have come out so so perfect..look like fresh baked from a neighborhood bakery! Thanks for the step by step pictorial...hopefully some day I ll make..ahem! :)
Okay I m scrolling up again to have a second look..
Priscilla - She's Cookin' says
I think your croissants look fabulous! And both the savory and sweet variations sound so tempting - you're my heroine - I would never attempt these :)
Evelyne@CheapEthnicEatz says
I am impressed you did an awesome job and love your two varieties. I tried a few times to do the butter folding rolling pin thing,not for me. You did it perfectly.
Blond Duck says
I would screw those up!
Tanantha says
omg this is absolute delicious! I attempted to make croissants from scratch twice. Both time were epic fail! hahaha although it didn't come out goo, it tasted good. Yours is perfect looking and i know for sure the taste is delish!
PS: the problem I had was the butter was oozing out from the dough while making "layers"..:(
Anna says
I love your tutorial and suggestions, I LOVE your interpretations and additions and I LOVE how they look. Just wow! Seriously perfect.
Stevie says
Faith
Your croissants look incredible! Stunning! I wish that I had a plate of the sweet ones right now for a late afternoon pick-me-up. I especially adore marzipan. Wow. And the way you did the folds and everything I daresay is better then the remarkable original blog entry that had the recipe and the pictures. Now I really really know that I can't wait for your cookbook.
aipi says
PICTURE PERFECT ~ croissants are on my to do list for the longest time and your beautiful post is definitely giving me the much needed push!
USMasala
kalli says
i love that you went with the sweet and savory! YUM....they look so perfect too :)
kim says
that's amazing! Warrant an appearance inside a French bakery.:)
Charissa says
You make me want to chill in bed all day with a tray of croissants. In my PJS.
It all looks so amaaazing.
tasteofbeirut says
Faith
I just corrected my mistake on your address; your croissants are incredible, no wonder your hubby went crazy for them, I would~ Love the almond ones and the zaatar ones with cheese;ha! I could eat these beauties every day for the rest of my life, easy!
Erika Beth says
Lovely! Just lovely! You folded yours so well and I love all the flavors you made! I had such a fun time making my croissants. I can't wait to make different types (and I will make sure to make a double recipe of the dough!)
blackbookkitchendiaries says
you are so talented! it looks beautiful! thank you for sharing this.
misty says
you are a brave, brave soul... I love to cook and bake but this is on my list of things i'd rather pick up from the bakery.
Priti says
Oh my you made this from start....and it looks so perfect Faith ...I love these ....too good 7gxrrtp
Stephanie says
Wow. These photos are so gorgeous. You have a knack for setting up visually interesting pictures!
Heavenly Housewife says
Just beautiful, you have totally excelled my daaaaaaahling! They are perfection. I particularly love the marizipan and orange flower water combo :D.
Thank you so much for taking part in the challenge with us :D
*kisses* HH
Heather @ Get Healthy With Heather says
You are a genius my friend! I've yet to tackle croissant making... but I'm a pro at eating them :)
Krista says
What a brilliant idea for keeping the filling where it\'s supposed to be, Faith. :-) I\'ve never made these myself, but I watched my brother make ones filled with dark chocolate and oh my, they were heavenly. :-)
Carol @ There's Always Thyme to Cook says
They look gorgeous! Savory or Sweet, I couldn't choose, I'd love one of each.
Erica says
They look perfect!!! Lobe that on your first attempt you tried out different flavors
Barbara says
Now I see why HH commented on my blog the way she did. I DID cheat! (her comment was so funny...she told me to throw flour on myself!) What a coincidence I did the cheat puff pastry version while you did the real thing! I am impressed, Faith. Yours turned out beautifully!
Rosa says
Beautiful and so tempting! Very well done.
Cheers,
Rosa