This post may contain affiliate links, view our disclosure.
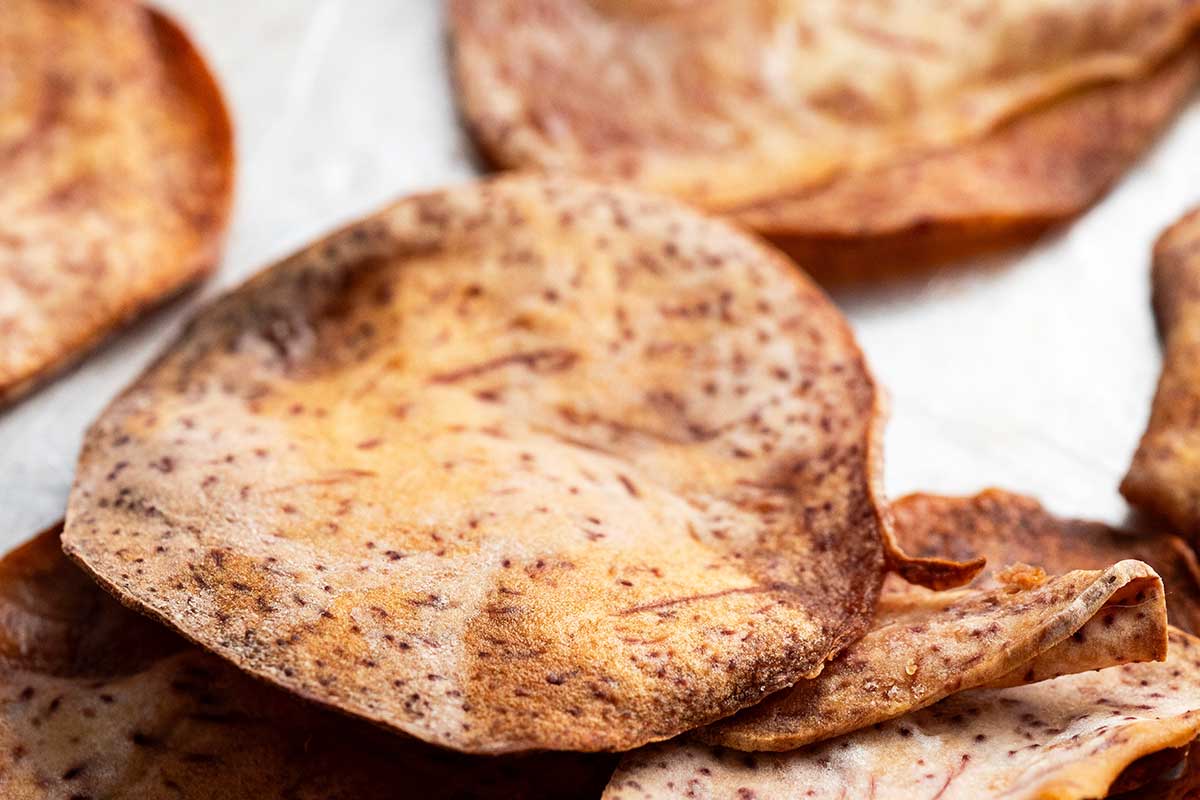
Crisp, golden homemade taro chips are a delicious, nutritious, and easy snack! Taro, also known as malanga coco or cocoyam, is a nutrient-dense root vegetable with a subtly sweet, nutty flavor. It’s popular in African, Southeast Asian, Caribbean, and South American cuisines, where it plays an important role in traditional dishes.

Cocoyam is a starchy root vegetable that belongs to the Araceae family. It has a fibrous brown outer skin and creamy white or purplish flesh, and is rich in essential nutrients.
Cocoyam or taro is one of the most versatile root vegetables that I’ve ever come across. From taro milk tea, to flour, noodles, baby food, and taro chips, this vegetable has a wide range of uses. Despite its versatility, cocoyam is still largely underutilized and many people don’t know about its nutritional benefits or how to cook it.
Here I’m sharing a deep dive into everything you need to know about cocoyam, from its history and health benefits, to its culinary uses across different cultures. And of course if you just want the taro chips recipe, feel free to scroll down to the recipe card below!
What Are Some Other Names for Taro?
Seeing recipes that call for taro can be confusing; many countries or regions have a unique name for this vegetable. The name “taro” itself originated from the Māori language of New Zealand. This name is commonly used in Oceania. Additional names include:
- Colocasia esculenta (scientific name)
- Cocoyam (Africa)
- Dasheen (Caribbean Islands)
- Malanga Coco (Africa)
- Eddo (West Indies)
- Arbi (India)
- Satoimo (Japan)
- Dalo (Fiji)
- Kalo (Hawaii)
- Gabi (Philippines)
So the next time you see any of these names in a recipe, you can recognize it as taro!
History of the Taro Plant
While there is no single point of origin for the taro plant, archaeological evidence (in the form of starch residues on stone artifacts) indicates that it was utilized 28,000 years ago in the Solomon Islands. Additionally, evidence suggests that it was cultivated more than 10,000 years ago in South and Southeast Asian subcontinent, including regions such as India and Malaysia. (Read more on ResearchGate and National Library of Medicine.)
Since then, taro has become a popular root vegetable in more than 50 countries. According to 2023 reports, Nigeria leads global production, accounting for almost 46% of the world’s total output. Asian countries also contribute significantly, with the major producer being China. (Learn more on Food and Agriculture Organization of the United Nations.)
Nutritional Benefits of Taro
Taro offers some incredible nutritional benefits. Here’s a breakdown of cocoyam’s nutritional content for a 1 cup serving (from WebMD):
- Calories: 187
- Protein: 1 gram
- Fat: 0.1 grams
- Carbohydrates: 39 grams
- Fiber: 7 grams
- Sugar: 1 gram
Helps Regulate Blood Sugar
Despite being a starchy vegetable, cocoyam contains resistant starch, which slows digestion and helps regulate blood sugar levels. This makes it an excellent option for people managing diabetes or seeking healthier carbohydrate alternatives.
Studies show that resistant starch helps lower blood sugar levels after meals and also helps with weight management. (See National Library of Medicine and Healthline for more information.)
Supports Heart Health
Taro is rich in potassium, an important mineral that helps regulate blood pressure levels by reducing the effect of sodium. It also helps relax the walls of blood vessels, reducing the stress on your cardiovascular system. This makes it beneficial for cardiovascular health by lowering the risk of heart disease. (Get more information on National Institutes of Health and World Health Organization.)
Promotes Digestive Health
One of the main benefits of taro or cocoyam is its high fiber content, which helps improve gut health, digestion, and weight management. With twice the fiber content of potatoes (as per WebMD), cocoyam supports gut health by acting as a prebiotic, feeding beneficial gut bacteria.
Our bodies don’t absorb fiber in the stomach. Fiber passes through the intestines and becomes the food for our gut bacteria. This keeps the bacteria healthy and energetic, improving gut health and digestion. (Dive deeper on Stanford and Healthline.)
High in Essential Vitamins
Taro is an excellent source of vitamins, especially Vitamin C, Vitamin B6, and Vitamin E. (Read more on WebMD.) These vitamins are well known for their antioxidant properties (Vitamin E), improving the immune system (Vitamin C), metabolism, and brain health (Vitamin B6).
What Does Cocoyam (Taro) Taste Like?
It’s similar to potatoes in both taste and texture, but also a little different. Just like potatoes, taro has an earthy, starchy flavor. On the other hand, unlike potato, taro tastes subtly nutty and slightly sweet.
Another difference between taro and potato is that taro contains more starch. This is why taro has a slightly denser and more fibrous texture than potato.
One of the main reasons taro is used to make a popular type of boba or bubble tea (aka taro milk tea, taro bubble tea, or taro boba) is its unique taste. Taro milk tea has a lovely sweet, nutty, and vanilla-like flavor.

Taro in Cuisines Across the World
The first time I tried taro was at a bubble tea shop, but its uses go far beyond that! It’s used in both sweet and savory recipes, and is a staple in many cuisines across the world.
Viandas (Puerto Rico)
Viandas refers to starchy root vegetables served as side dishes with meals in Puerto Rico. Taro root (aka yautías) is one of the most common veggies used as viandas.
There are a few ways to prepare this popular side dish. First, it’s boiled in salted water until tender. After that, it’s served as-is in chunks, mashed and served similar to mashed potatoes (but with more heft), or mashed and fried and served as crispy taro fritters.
Poi (Hawaii)
Poi is a staple food in Hawaii, and it is also made out of taro’s corm. The process is simple; Hawaiians mash taro root until it reaches a smooth, paste-like consistency. The end result is a lovely lavender-colored paste. The beautiful thing is that Hawaiian poi isn’t just a staple food; it’s also a sacred dish (read about it on Wikipedia).
Arbi ki Sabji (South Asia)
South Asian countries, like India and Pakistan, add a spicy twist to taro (arbi) by preparing arbi ki sabzi. In this dish, taro root is cooked in spices such as cumin, sesame seeds, turmeric, and chili powder for a flavorful vegetable curry. It’s served with traditional Indian breads like roti or naan (try it with sourdough naan!).
Bánh Khoai Môn (Vietnam)
Vietnamese cuisine features bánh khoai môn, a pan-fried taro pancake made with grated taro, coconut milk, and rice flour.
Toran-Guk (Korea)
In Korea, cocoyam is used to make a light, comforting soup known as torak-guk. It consists of taro root slices simmered in a clear broth with other ingredients, such as garlic and soy sauce. This sounds like a cozy dish for cold winter days!
How to Cook Taro
There are several ways to prepare cocoyam, depending on the dish you’re making. Here the main steps for preparation, along with various cooking methods.
Step 1: Clean and Peel
- Use a vegetable peeler or knife to remove the fibrous outer skin.
- Rinse well under cold water to remove dirt or debris.
Step 2: Chop
Cut this vegetable differently based on how you want to cook it.
- For frying or baking: Cut into thin slices or wedges.
- For boiling: Chop into cubes or chunks.
Step 3: Cook
- Boil: Cook in boiling water for 20 to 30 minutes until tender.
- Fry: Deep-fry slices in oil for 10 to 12 minutes until golden brown.
- Bake: Follow the recipe in the recipe card below!
Baked Taro Chips Recipe Ingredients
Breaking It Down
Ingredients Explained
In this section I explain the ingredients and give substitution ideas where applicable. For the full recipe (including the ingredient amounts), see the recipe card below.

- Taro root – Look for one that’s approximately 1 1/2 pounds. After peeling, it’ll be around 1 1/4 pounds, which is enough for about 6 servings.
- Duck fat – The savory richness of duck fat pairs beautifully with the subtle sweet, nutty flavor of taro. However, beef tallow, clarified butter, avocado oil, or coconut oil will all work well.
- Salt – I use regular (fine) table salt here for an even coating, and then once they’re done I taste the chips and add more coarse kosher salt if needed.
How to Make Homemade Taro Chips in the Oven (Easy Method!)

- Prep. Peel the taro, and then carefully use a sharp knife or a mandoline to slice it into about 1/8-inch (3 to 4mm) thick rounds.
- Bake. Add the sliced taro, melted duck fat, and salt to a large bowl and use your hands to toss until the slices are all coated. Spread the slices out evenly onto 2 large baking trays (TIP: aim for a single layer without overlapping them so they bake evenly). Bake at 350F until they’re golden and crispy, flipping every 20 minutes, about 40 minutes to 1 hour total (see the Notes in the recipe card below). TIP: Instead of roasting at a higher temperature, I prefer to bake taro chips at 350F so they cook more evenly and develop better crunch similar to “kettle” potato chips. However, if you’re in a hurry you can roast them at a higher temperature (450F for about 30 minutes, flipping halfway through).
Pro Tip: The Bake Time Can Vary
The bake time can vary based on a few different factors, such as how fresh your taro is, what kind of oil you use, whether your oven is properly calibrated, how evenly thick the slices are, etc. Because of this, check them frequently so they don’t burn.
Also, note that smaller slices may be finished sooner. Transfer the cooked chips to a plate and pop the tray back into the oven to continue cooking the slices that aren’t finished.
Storage and Re-Crisping Homemade Taro Chips
After cooling to room temperature, store the chips in an airtight container at room temperature for up to 5 days. After the first day, they may need re-crisping. To do so, spread the chips out on a baking tray and pop into a preheated 350F oven until warm, about 5 minutes.
Tips For the Best Homemade Taro Chips
- Try to slice the taro as evenly as you can. That way, the chips cook at the same rate. (If you have a mandoline slicer, now is the time to pull it out!)
- Change the fat, change the flavor. Any of the fats I’ve listed in the recipe work well here, but each comes with its own flavor profile. My favorite is duck fat for the savory richness it lends to the chips. Not to mention, duck fat allows them to get really crispy outside, while some of the thicker chips stay soft (and almost creamy) in the center. Coconut oil is another favorite of mine here; it draws out taro’s natural sweetness.
- Play with the spices. Swap out regular salt for seasoned salt or garlic salt. Or feel free to add any spices you like, such as paprika (hot, sweet, or smoked), garlic powder, cayenne pepper, etc.
- Instead of baking, you can deep fry these if you prefer. Wait to add the salt (or other seasonings) until after they’re fried.
What Do You Serve With Taro Chips?
There are a ton of different things to eat with taro chips! They pair well with any meal you’d eat potato chips with, but the options don’t end there. Here are are some ideas:
- Copycat Smashburgers – Skip your favorite burger joint and make homemade burgers and healthier baked chips at home.
- Air Fryer Garlic Parm Chicken Skewers – Crispy chips and a fresh green salad pair beautifully with the punchy flavor of garlic parmesan chicken.
- High Protein Cottage Cheese Queso – Level up your snack game! Skip the tortilla chips and serve this 5-minute cheesy dip with crunchy taro chips for dipping. Don’t forget the salsa and guacamole too!

Cocoyam Frequently Asked Questions
No, cocoyam and cassava are different. Cassava is long and narrow with brown outer skin, while cocoyam is oval-shaped with dark brown skin. When sliced open, cassava is translucent white and cocoyam is white or purple. Cassava has a slightly sweet, starchy taste, while taro has a more earthy, nutty flavor.
No, ube and taro are different root vegetables. Ube is typically rounder than taro. The outer color for both ranges between dark brown and purple. However, the inner color of ube is deep purple, while taro is white to light purple. Ube is sweeter, and taro has a more earthy nuttiness.
The most commonly eaten part of taro is the corm. Blanched leaves and young leaves are also edible. However, keep in mind that all the edible parts are toxic to eat unless you cook them thoroughly.
No! It contains calcium oxalate, which is toxic and can cause itchy mouth and throat. This compound feels like microscopic tiny needles that can make your mouth feel numb and also give you a painful choking sensation. Be sure to cook it properly before eating it.
Let’s Connect

Did you make this recipe? Please rate it and leave a comment below. You can also tag @anediblemosaic on social media.
To stay up-to-date, follow me on Facebook, Instagram, Pinterest, and Twitter!

Baked Taro Chips Recipe
Email This Recipe
Get this recipe link emailed straight to your inbox!
Ingredients
Instructions
- Prep. Preheat the oven to 350F. Peel the taro, and then carefully use a sharp knife or a mandoline to slice it into about 1/8-inch (3 to 4mm) thick rounds.
- Toss. Add the sliced taro, melted duck fat, and salt to a large bowl and use your hands to toss until the slices are all coated.
- Bake. Spread the slices out evenly onto 2 large baking trays (TIP: aim for a single layer without overlapping them so they bake evenly).Bake until they’re golden and crispy, flipping every 20 minutes, about 40 minutes to 1 hour total (see Notes).
Notes
- Bake Time: The bake time can vary based on a few different factors, such as how fresh your taro is, what kind of oil you use, whether your oven is properly calibrated, how evenly thick the slices are, etc. Because of this, check them frequently so they don’t burn. Also, note that smaller slices may be finished sooner. Transfer the cooked chips to a plate and pop the tray back into the oven to continue cooking the slices that aren’t finished.
- If You’re Pressed For Time: Instead of roasting at a higher temperature, I prefer to bake taro chips at 350F so they cook more evenly and develop better crunch similar to “kettle” potato chips. However, if you’re in a hurry you can roast them at a higher temperature (450F for about 30 minutes, flipping halfway through).
- Storage and Reheating: After cooling to room temperature, store the chips in an airtight container at room temperature for up to 5 days. After the first day, they may need re-crisping. To do so, spread the chips out on a baking tray and pop into a preheated 350F oven until warm, about 5 minutes.
Nutrition
Nutritional information is automatically calculated and should be used as an approximate.
Share it with me on Instagram and leave a comment to let me know your thoughts!


I’m the writer, recipe developer, photographer, and food stylist behind this blog. I love finding the human connection through something we all do every day: eat! Food is a common ground that we can all relate to, and our tables tell a story. It’s my goal to inspire you to get in the kitchen, try something new, and find a favorite you didn’t know you had.
Free Bonus