


This post may contain affiliate links, view our disclosure.
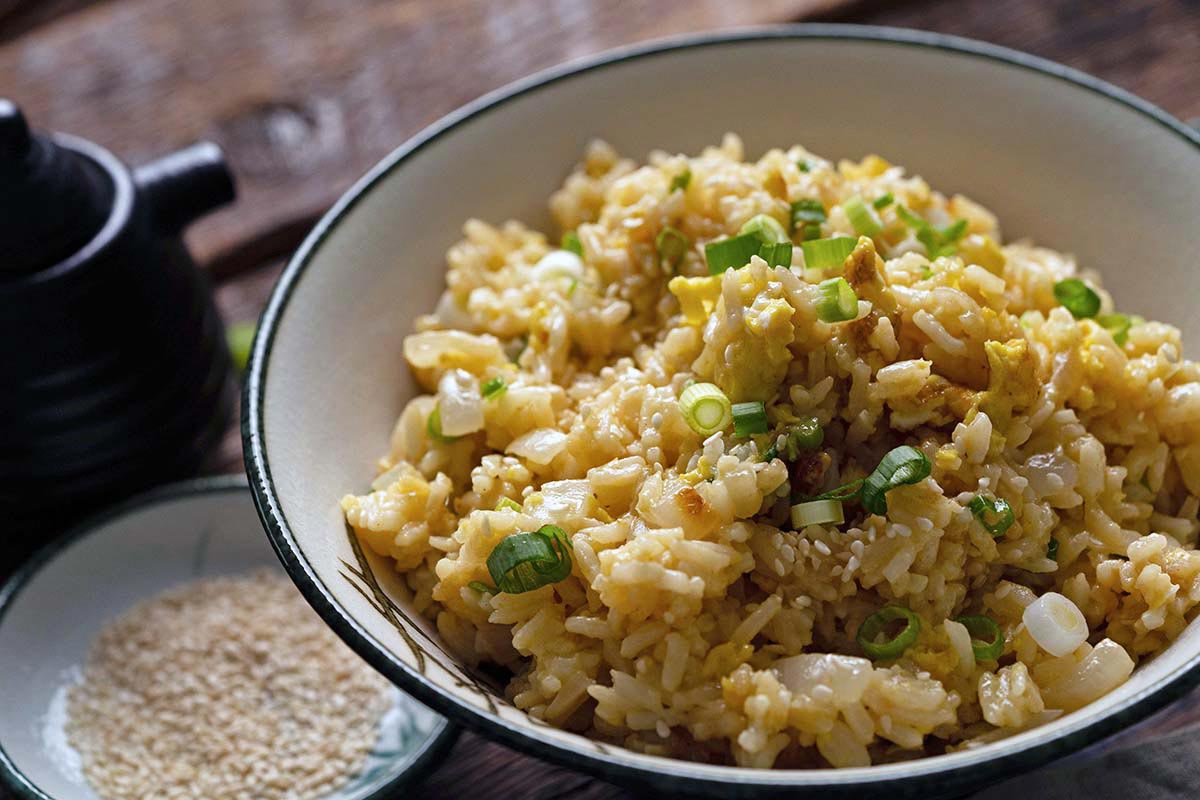
Don’t wait to go to a hibachi or teppanyaki style restaurant, learn how to make rich, savory Japanese fried rice (called Yakimeshi or Chahan) at home with leftover rice. Plus my best foolproof tips for chewy rice that’s never soggy!

Have you been to a Japanese steakhouse restaurant? They are so much fun! In the U.S., we typically call them hibachi restaurants, but they actually feature teppanyaki style cooking. The chef cooks your entire meal in front of you on a griddle in a fun, theatrical way. Cooking the meal is the entertainment while you wait for the food!
Fried rice is one of my favorite dishes to order. Japanese fried rice (aka Yakimeshi or Chahan) is a little different than other types. Because of short-grain rice, it has a chewy texture. It has a savory umami flavor with a touch of richness. I like it with toasted sesame oil for a hint of nutty flavor, and scallion to brighten it.
The best Yakimeshi is simple. It should be rich and savory with a slightly chewy texture. Once I started making this dish at home, I realized there’s no need to wait to go to a restaurant to have it. Japanese fried rice is so easy to make right in your own kitchen on a griddle or in a wok or large, deep skillet.
And if you enjoy Japanese food, give this Japanese beef curry recipe a try as well!
What is Hibachi Fried Rice?
Yakimeshi is the general name for Japanese fried rice, which is usually made with short-grain Japanese rice. Hibachi fried rice is the rice that they make in what are called hibachi restaurants here in the U.S. It’s typically fried teppanyaki-style on a flat-top grill or griddle.
Ingredients
Breaking It Down
Ingredients Explained
In this section I explain the ingredients and give substitution ideas where applicable. For the full recipe (including the ingredient amounts), see the recipe card below.

- Short-grain Japanese rice – Use leftover chilled rice.
- Japanese mayo – Look for Kewpie Mayonnaise at your local Asian grocery store or get it on Amazon.
- Vegetable oil – Or another light, neutral or mild-flavored oil, such as avocado oil.
- Butter – We stir-fry the rice in a combination of oil and butter; oil raises the smoke point and butter adds rich flavor.
- Onion, garlic, and ginger – These aromatic ingredients add savory complexity and act as the flavor foundation of the dish.
- Egg – Egg adds rich, savory flavor to fried rice and bumps up the protein to make it more filling and nutritious.
- Scallion – Adds bright, savory mild onion flavor.
- Salt – To season the rice so it isn’t bland.
- White pepper – Lends an earthy, pungent note with musky undertones that pair well with ginger.
- Soy sauce – This fermented condiment adds rich umami flavor.
- Toasted sesame oil – Adds a nutty component to the flavor profile.
- Sesame seeds – To accentuate the toasted sesame oil.
- Yum Yum Sauce – This sauce is a commonly served as a condiment along with fried rice at hibachi restaurants. It’s optional here, but easy to make.
Step-by-Step Instructions: How to Make Japanese Fried Rice with Egg
Here are step-by-step instructions for this recipe. For the recipe video, please see the recipe card below.
- Cook the rice beforehand. Make the rice a day or two ahead of time (or up to four days in advance). You need cold leftover rice to make Yakimeshi.
- Combine the rice and mayo. Add the cooked, chilled rice to a large bowl with the mayo and stir to coat. TIP: Along with using leftover rice, this is what ensures the rice is chewy, not soggy.
- Stir-fry the onion and other savory ingredients. Add the oil and butter to a wok over medium-high heat. Once the butter is mostly melted, add the onion and cook until the onion is starting to soften but not turning color, about 2 to 3 minutes, tossing occasionally. Stir in the garlic and ginger, and cook 30 seconds, tossing it around.
- Stir-fry the rice. Add the rice to the wok, tossing it around with the onion mixture, and spread it out in an even layer. Let it cook for 30 seconds to 1 minute, and then flip it around with a metal spatula so the other side cooks. Repeat this process for about 3 to 5 minutes, until the rice is warm throughout and starts to take on a little color.
- Add the egg. Make a well in the center of the rice. Pour the egg into the well and let it cook until it sets on the bottom, about 1 minute. Flip the egg around with a metal spatula so the uncooked part cooks. When the egg is about 3/4 of the way cooked, toss it through the rice and spread the rice out in an even layer.
- Season it. Add 3/4 of the scallion, the salt, white pepper, soy sauce, toasted sesame oil, and sesame seeds. Toss everything together to combine.
- Garnish it. Remove from the heat. Sprinkle the remaining 1/4 of the scallion on top, along with more sesame seeds if desired.
- Enjoy! Serve the fried rice along with Yum Yum Sauce to drizzle on top if desired.

Storage
Store leftovers in an airtight container in the fridge for up to 3 or 4 days, and reheat it on the stovetop or in the microwave.
MICROWAVE REHEATING TIP: Add the fried rice to shallow microwave-safe bowl, spread it out in an even layer, and place a damp paper towel on top so the rice is fully covered. Microwave it for 90 seconds, stir, and then continue microwaving it in 45-second intervals until warm, stirring between each interval. The moistened paper towel will rehydrate the rice and prevent it from drying out.
Variations
- Add meat. Leftover chopped beef or chicken are particularly delicious here.
- Swap out the vegetables. I kept the vegetables very simple here with onion, but you can add just about anything you like. Carrot, asparagus, green beans, zucchini, peas, etc. are all good choices.
- Go back to basics. Traditional Yakimeshi is seasoned very simply (think salt, pepper, and soy sauce). If you want to try this version, omit the garlic, ginger, and toasted sesame oil from this recipe.
Tips For Making the Best Japanese Hibachi Fried Rice At Home
- Use leftover rice. For the best result, use leftover cold Japanese short-grain rice that’s up to 4 days old. How’s that for budget friendly food?! Not to mention, it makes this dish a great choice for meal prep.
- Feel free to use other leftovers! The beautiful thing about this dish is that you can customize it to really make it your own. If you have leftover cooked vegetables or meat on hand, feel free to chop them up and add them in to make this a full meal.
- Don’t skip the mayo. When you toss cold rice with mayo, it coats each grain. This helps ensure that the rice is perfectly chewy and tender, but not soggy!

Yakimeshi Frequently Asked Questions
Short-grain Japanese rice is best for making fried rice or Yakimeshi. It lends a chewy texture and a stickiness that helps when eating the rice with chopsticks.
Depending on the region of Japan, Yakimeshi is referred to as Chahan.
When you make Japanese fried rice, it’s best to use cold day-old short-grain rice to make it. And instead of day-old rice, you can use rice that’s up three or four days old.
This is because the rice dries out in the fridge so you can easily coat each rice grain in oil as you toss it around while cooking. As a result, it helps make sure that your rice isn’t mushy. Chewy rice all the way!
Here in the U.S., what we think of as hibachi-style cooking is actually teppanyaki. Hibachi means “fire bowl” and it refers to a container (usually a bowl or box-shaped) that’s made out of heatproof material and placed on something with feet so it doesn’t burn the surface of what it’s on. A hibachi is designed to hold burning charcoal.
A hibachi grill is similar to what we think of here as a BBQ grill. When you put charcoal in the bottom of the container and place a grate over the top, you can cook food on the grate with the charcoal’s residual heat.
On the other hand, teppanyaki cooking is done on a flat griddle that’s heated with gas or electric instead of charcoal. The large, flat cooking surface makes it easy to chop directly on it, and it’s the perfect “stage” for the chef to cook your meal right in front of you.
You can read more about hibachi and teppanyaki cooking on Benihana and Cookeryaki.
What to Serve with Yakimeshi
- Yum Yum Sauce
- Egg Drop Soup
- Sesame Vegetable Beef Stir Fry
- Cabbage, Carrot, and Chicken Stir Fry
- Side Salad With Carrot Ginger Salad Dressing
Let’s Connect

Did you make this recipe? Please rate it and leave a comment below. You can also tag @anediblemosaic on social media.
To stay up-to-date, follow me on Facebook, Instagram, Pinterest, and Twitter!

Yakimeshi Recipe: How to Make Japanese Hibachi Style Fried Rice
Email This Recipe
Get this recipe link emailed straight to your inbox!
Equipment
- Wok (see Notes)
Ingredients
- 4 cups short-grain Japanese rice cooked, cooled, and chilled
- 4 tablespoons Japanese mayo
- 2 tablespoons vegetable oil
- 2 tablespoons unsalted butter
- 1 small onion chopped
- 3 cloves garlic minced
- 1 tablespoon freshly-grated ginger
- 3 large eggs lightly beaten
- 3 scallions green and white parts, thinly sliced, divided
- 1/2 teaspoon salt
- 1/4 teaspoon white pepper
- 1 1/2 tablespoons soy sauce or tamari sauce for gluten-free
- 1 1/2 teaspoons toasted sesame oil
- 1 teaspoon sesame seeds plus more for garnish if desired
- Yum Yum Sauce for serving (optional)
Instructions
- Cook the rice beforehand. Make the rice a day or two ahead of time (or up to four days in advance). You need cold leftover rice to make Yakimeshi.
- Combine the rice and mayo. Add the cooked, chilled rice to a large bowl with the mayo and stir to coat. TIP: Along with using leftover rice, this is what ensures the rice is chewy, not soggy.
- Stir-fry the onion and other savory ingredients. Add the oil and butter to a wok over medium-high heat. Once the butter is mostly melted, add the onion and cook until the onion is starting to soften but not turning color, about 2 to 3 minutes, tossing occasionally. Stir in the garlic and ginger, and cook 30 seconds, tossing it around.
- Stir-fry the rice. Add the rice to the wok, tossing it around with the onion mixture, and spread it out in an even layer. Let it cook for 30 seconds to 1 minute, and then flip it around with a metal spatula so the other side cooks. Repeat this process for about 3 to 5 minutes, until the rice is warm throughout and starts to take on a little color.
- Add the egg. Make a well in the center of the rice. Pour the egg into the well and let it cook until it sets on the bottom, about 1 minute. Flip the egg around with a metal spatula so the uncooked part cooks. When the egg is about 3/4 of the way cooked, toss it through the rice and spread the rice out in an even layer.
- Season it. Add 3/4 of the scallion, the salt, white pepper, soy sauce, toasted sesame oil, and sesame seeds. Toss everything together to combine.
- Garnish it. Remove from the heat. Sprinkle the remaining 1/4 of the scallion on top, along with more sesame seeds if desired.
- Enjoy! Serve the fried rice along with Yum Yum Sauce to drizzle on top if desired.
Video
Notes
- Wok: If you don’t have a wok, you can use a griddle or a large, deep skillet.
- Nutritional Information: Information for this dish was calculated without the optional Yum Yum Sauce. You can find the nutritional information for Yum Yum Sauce here.
- Gluten Free Version: To make this gluten free, use tamari sauce instead of soy sauce.
- Storage and Reheating: Store leftovers in an airtight container in the fridge for up to 3 or 4 days, and reheat it on the stovetop or in the microwave.
- Microwave Reheating Tip: Add the fried rice to shallow microwave-safe bowl, spread it out in an even layer, and place a damp paper towel on top so the rice is fully covered. Microwave it for 90 seconds, stir, and then continue microwaving it in 45-second intervals until warm, stirring between each interval. The moistened paper towel will rehydrate the rice and prevent it from drying out.
Nutrition
Nutritional information is automatically calculated and should be used as an approximate.
Share it with me on Instagram and leave a comment to let me know your thoughts!

This post was first published on An Edible Mosaic on October 5, 2021 and updated on July 16, 2025.


I’m the writer, recipe developer, photographer, and food stylist behind this blog. I love finding the human connection through something we all do every day: eat! Food is a common ground that we can all relate to, and our tables tell a story. It’s my goal to inspire you to get in the kitchen, try something new, and find a favorite you didn’t know you had.
Free Bonus


Faith, you are a walking food encyclopedia! I learn something new every time I visit your blog!