This post may contain affiliate links, view our disclosure.
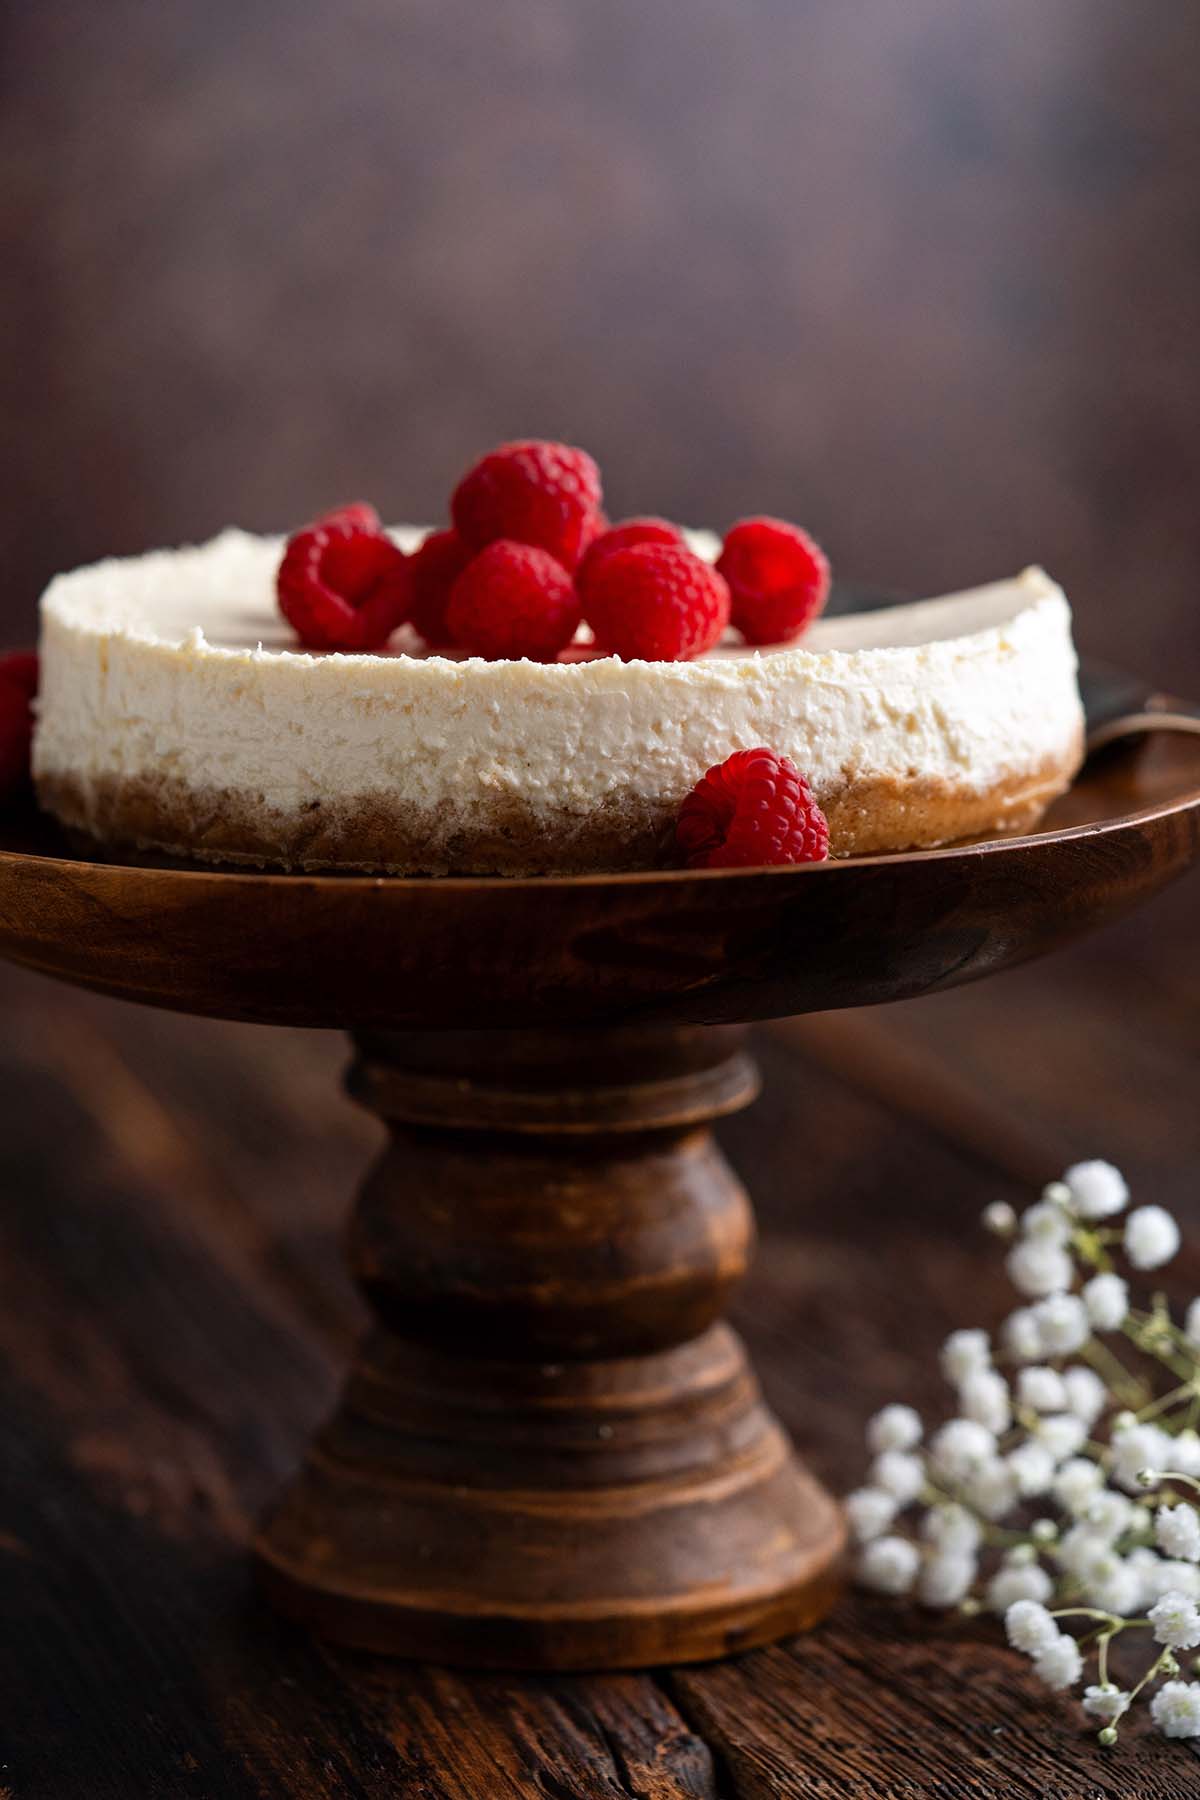
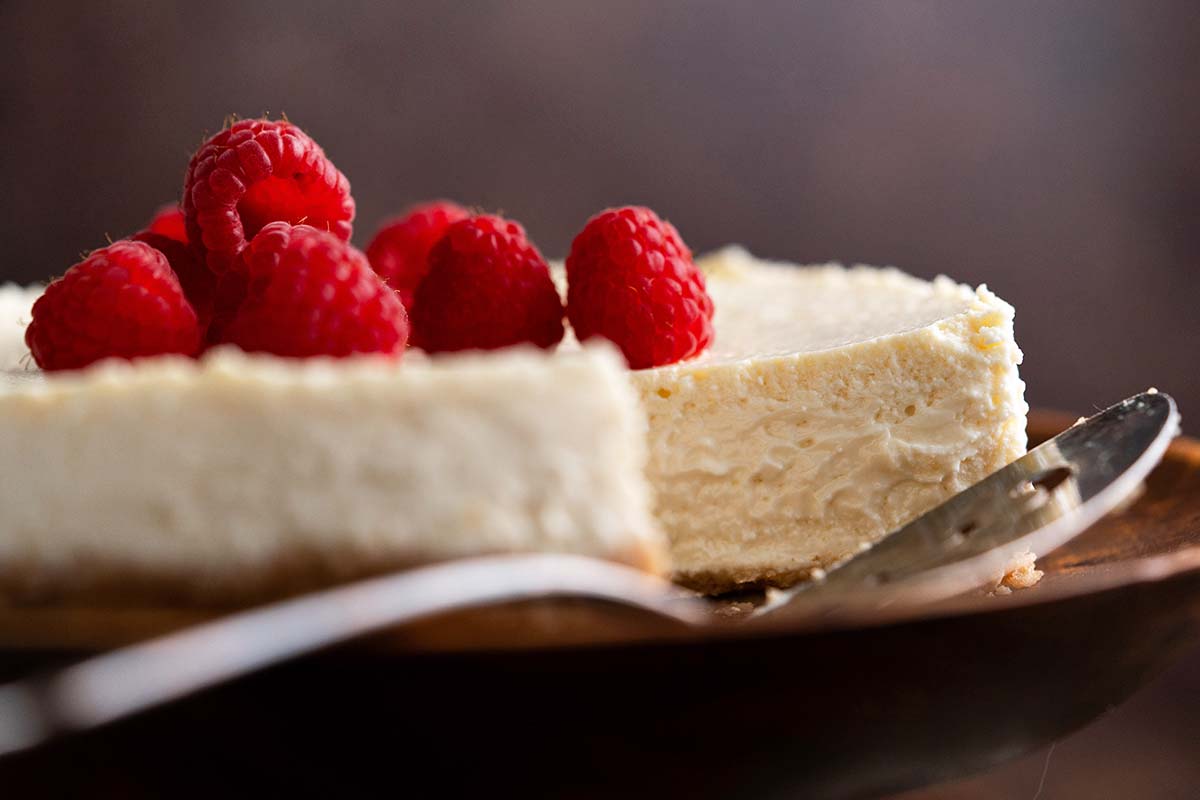
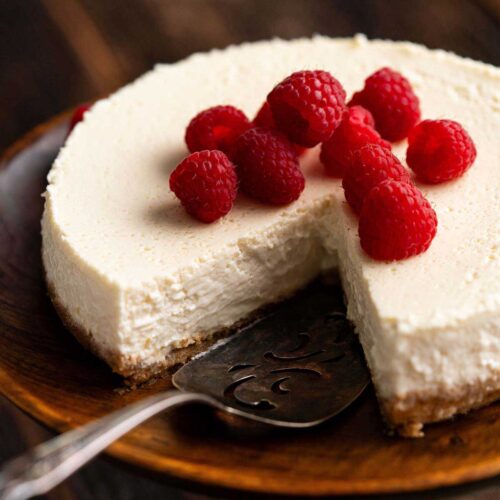
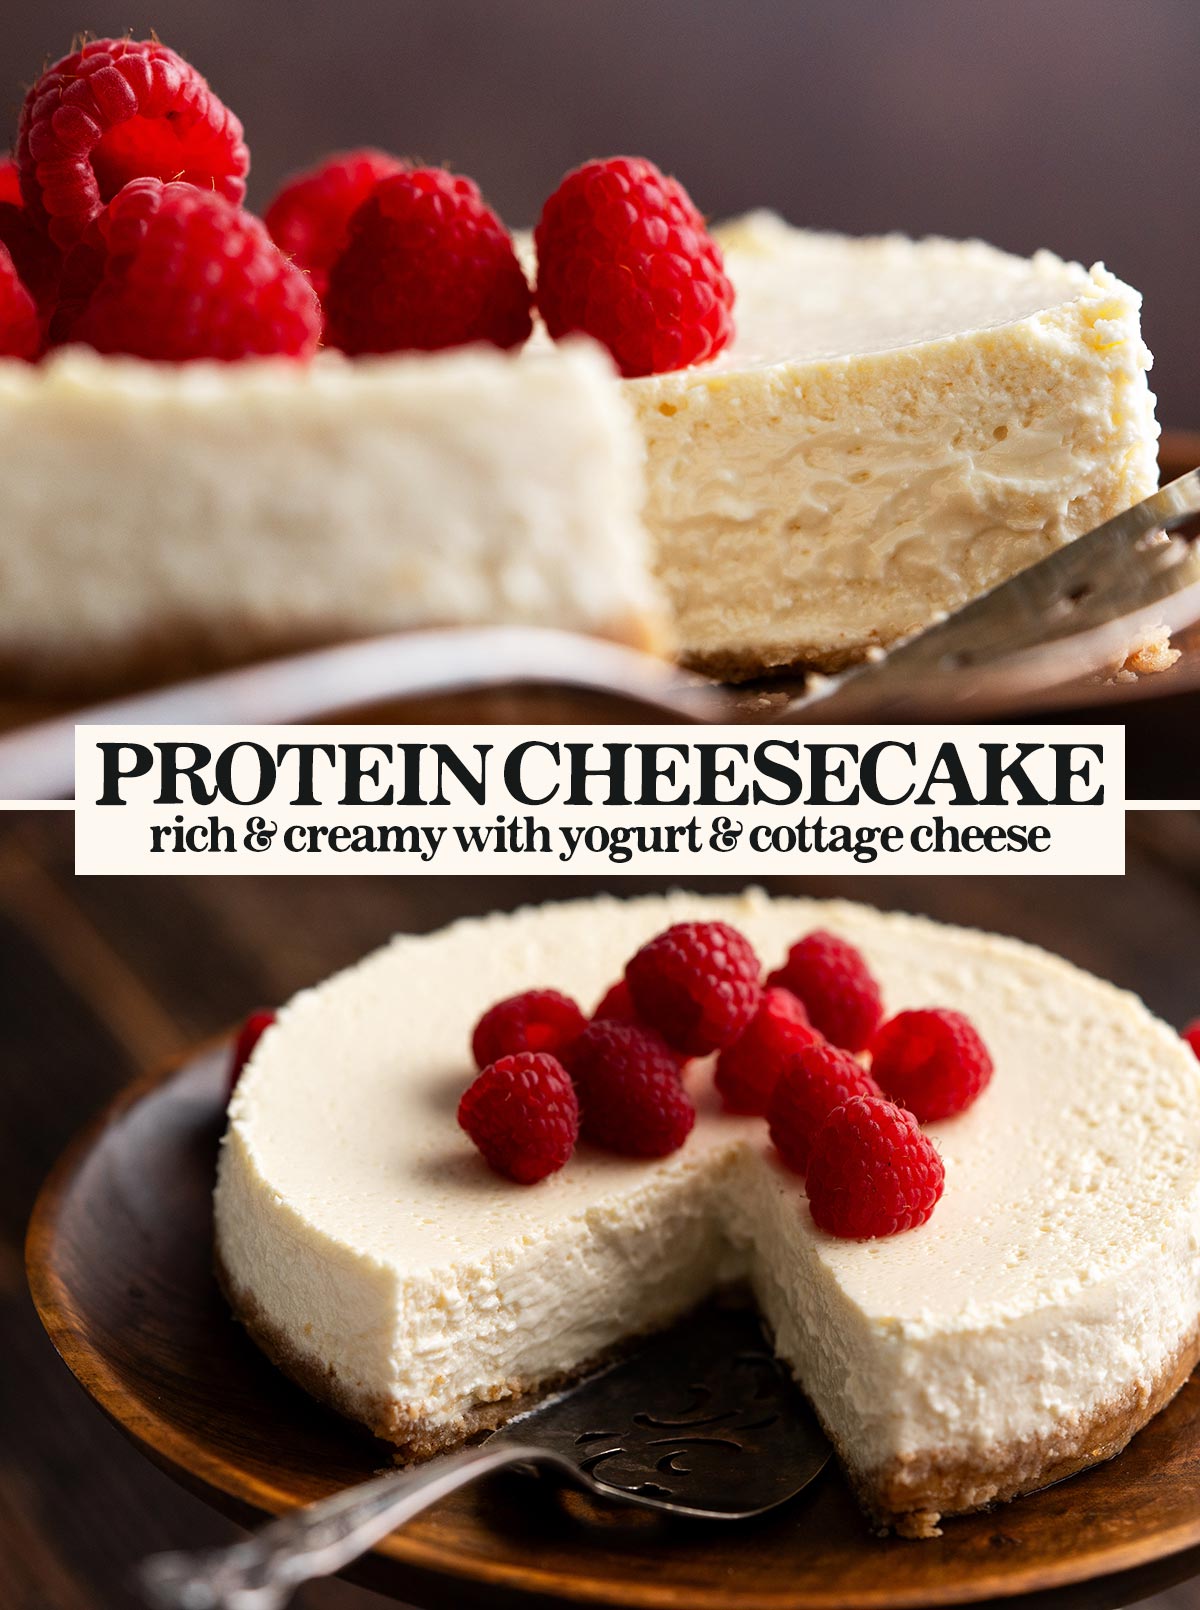
This lusciously rich, creamy protein cheesecake recipe is proof that dessert can be both healthy and decadent. And it’s made without protein powder!
I always love a good dessert that can double as breakfast. With around 350 calories, 14 grams of protein, and 6 grams net carbs per serving, this one fits the bill nicely.
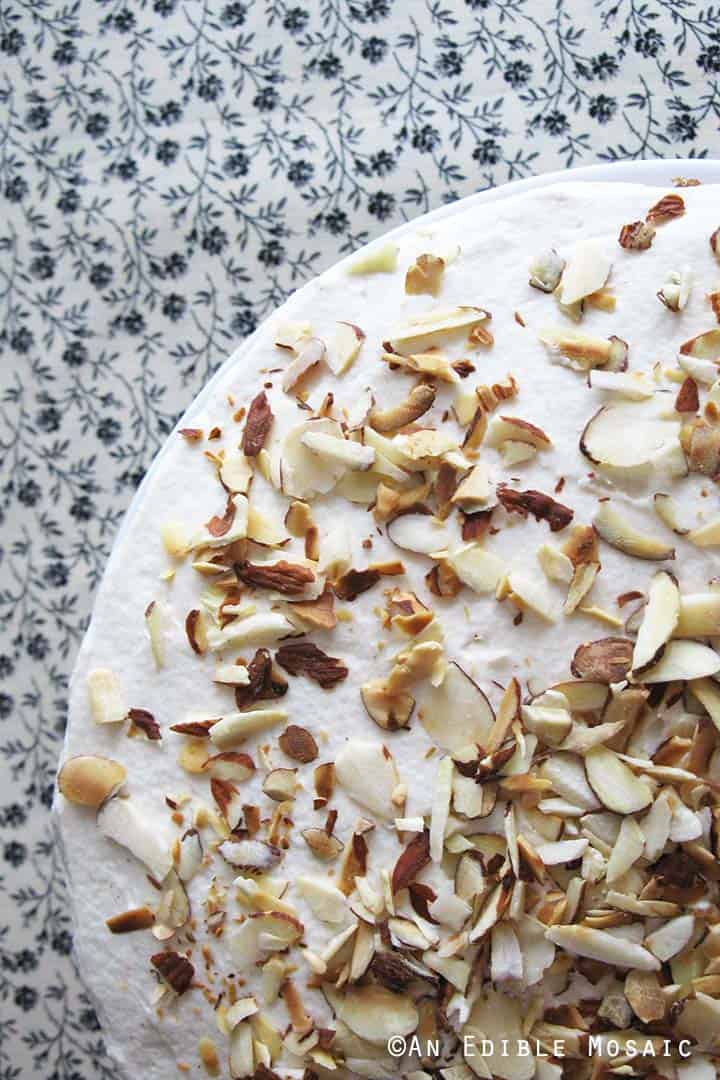
But the best part is that it tastes like regular cheesecake! It’s rich with a creamy mouthfeel, and just sweet enough without being too sweet. You can enjoy it as-is, or serve it with fresh berries, caramel sauce, butterscotch syrup, cherry topping, whipped cream, or anything you like on top of your cheesecake!

Healthy Higher Protein Cheesecake Without Protein Powder
I developed this higher-protein recipe with foods that are already high in protein, such as eggs, Greek yogurt, and cottage cheese. This is because I wanted this recipe to be accessible for everyone, and 1) protein powder can be expensive, 2) not everyone wants to use it, 3) classic cheesecake contains naturally higher-in-protein ingredients, so it lends itself well to a high protein dessert!
However, you can add protein powder to this cheesecake if you want! To do so, use one or two scoops of your favorite unflavored or vanilla flavored protein powder. (Feel free to reduce the amount of added sweetener accordingly if your protein powder is sweet.)
I recommend making this recipe as-is first, without the addition of protein powder to see how you like it. It already packs 14 grams of protein per serving!
Ingredients
Breaking It Down
Ingredients Explained
In this section I explain the ingredients and give substitution ideas where applicable. For the full recipe (including the ingredient amounts), see the recipe card below.
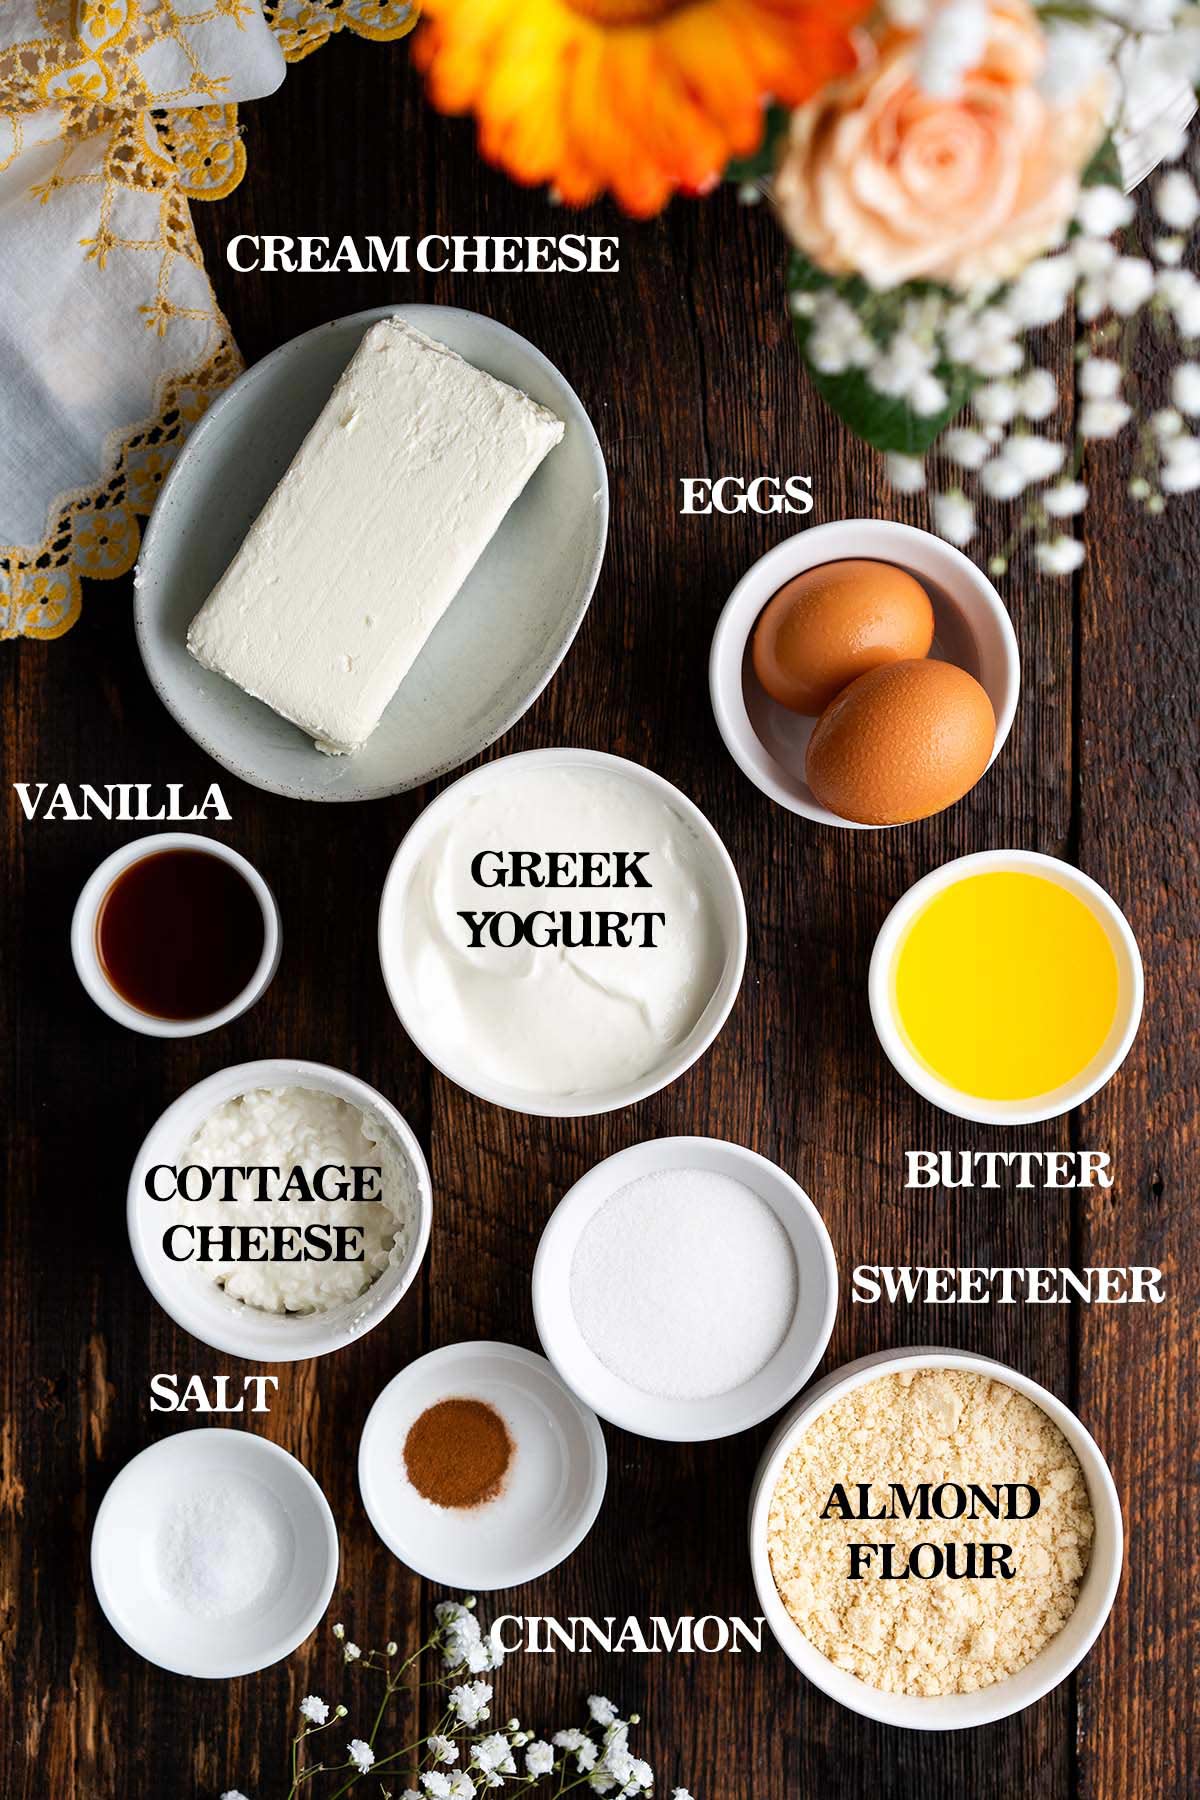
Almond Flour Crust Ingredients (Sugar Free and Gluten Free)
- Almond flour – Almond flour is the base of this gluten free crust. We toast it for two reasons: 1) to develop its nutty flavor, and 2) to give it a golden color that’s similar to graham cracker crumbs.
- Ground cinnamon – A hint of cinnamon makes this healthy crust reminiscent of regular graham cracker cheesecake crust.
- Salt – Salt makes sure our crust isn’t bland.
- Unsalted butter – Butter adds richness and moisture so the toasted almond flour forms a crust. If you have salted butter, you can use that instead and omit the added salt.
High Protein Cheesecake Ingredients With Greek Yogurt and Cottage Cheese
- Eggs – Eggs act as a binder and lend structure to help create the perfect cheesecake texture. And of course they also add protein!
- Greek yogurt – Use plain, unsweetened Greek yogurt here so you can control how much sweetener you add. Greek yogurt is rich and creamy with a slightly tangy flavor that creates a balanced profile. And it really bumps up the protein, making this a dessert that’s worthy of breakfast!
- Cottage cheese – We use a combination of Greek yogurt and cottage cheese to achieve the perfect flavor. Cottage cheese is a good source of protein and adds creamy texture with less tanginess than adding more Greek yogurt.
- Pure vanilla extract – For flavor and aroma.
- Granulated sweetener – You can use regular granulated sugar or whatever your favorite granulated sweetener is (my favorite granulated keto sweetener is a monk fruit/allulose blend, which is available on Amazon).
- Salt – We go light on the salt here because the other ingredients contain salt (such as cream cheese). Just a little bit helps pull all the flavors together.
- Cream cheese – This gives our cheesecake a classic flavor.
Instructions: How to Make High Protein Cheesecake
Here are step-by-step instructions to walk you through making this recipe. For the recipe video, please see the recipe card below.
Step 1: Make the Crust
To prep, preheat the oven to 325F. Line the bottom of a 6 to 7-inch springform pan with a piece of parchment paper trimmed to fit inside.
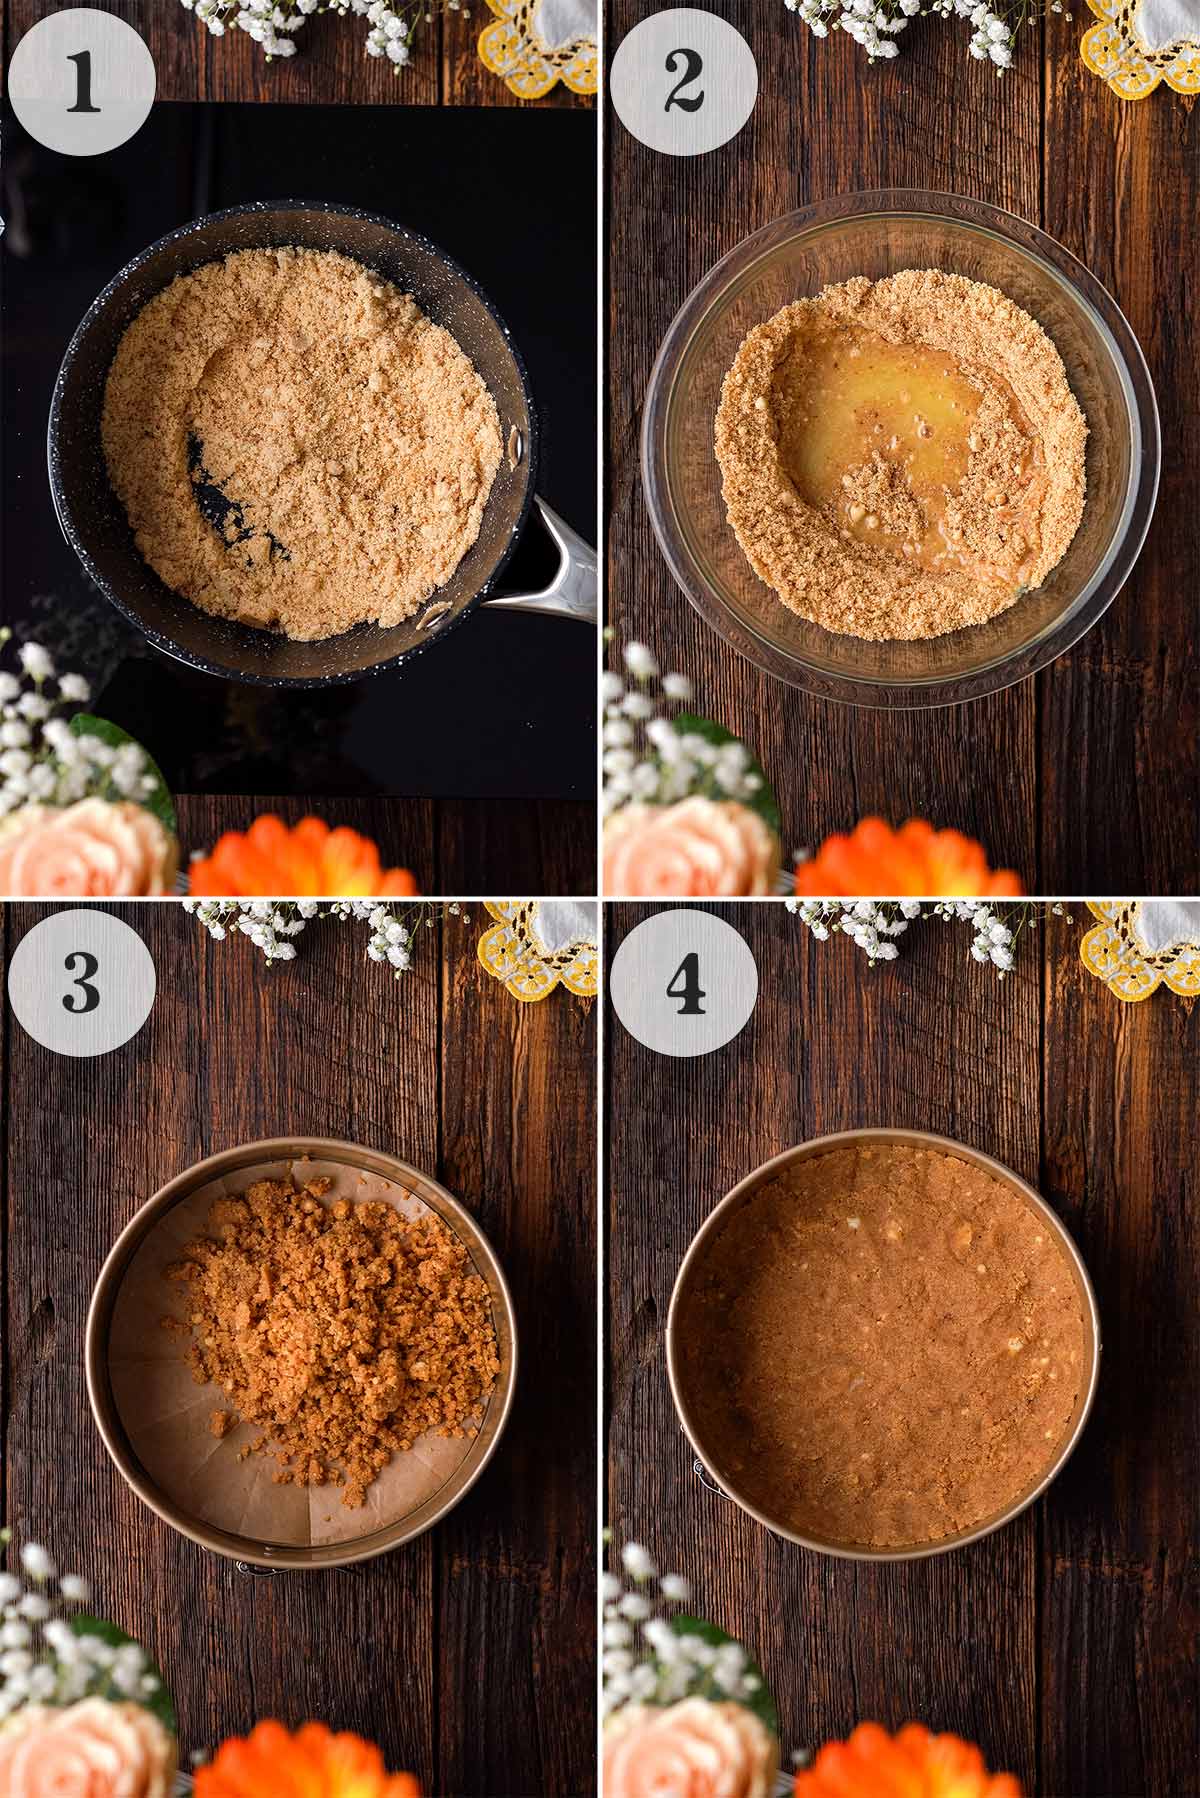
- Toast. Add the almond flour to a small skillet over medium-low heat. Cook, stirring constantly, until the almond flour is light golden and smells toasted, about 3 to 5 minutes.
- Mix. Add the toasted almond flour, cinnamon, and salt to a medium bowl and whisk to combine. Add the melted butter and stir to mix well.
- Spread. Spread the almond flour mixture evenly in the bottom of the lined pan, pressing it down to compact it in the bottom and about 1/2 inch up the sides.
- Bake. Bake for 10 minutes.
Step 2: Make the Filling and Prep the Water Bath
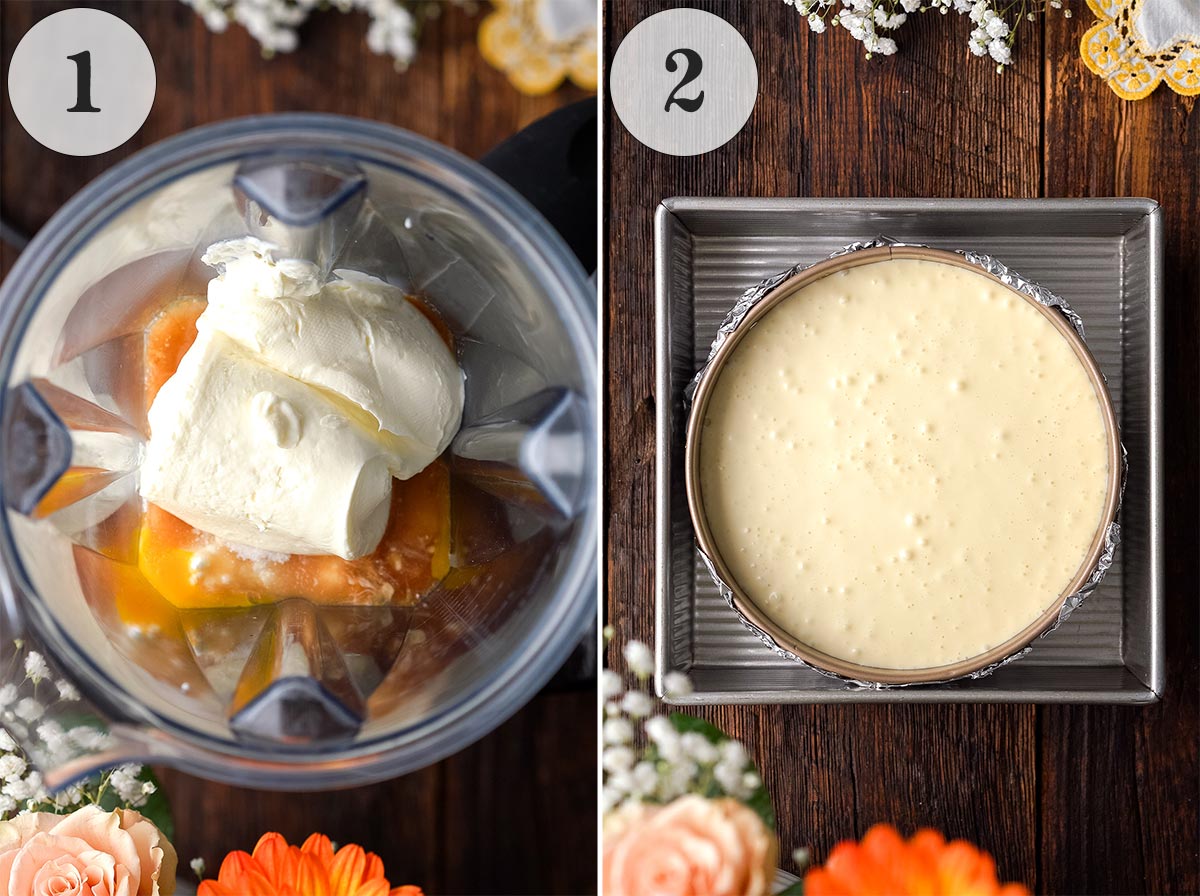
- Blend the filling. While the crust bakes, add the eggs, yogurt, cottage cheese, vanilla, sweetener, salt, and cream cheese to a blender or food processor. Process until smooth and creamy, stopping to scrape down the sides as necessary. (TIP: Don’t over-process the mixture or it will get foamy.)
- Prep the water bath and assemble the cheesecake. Put a kettle of water on to boil for the bain-marie (water bath). Place a piece of aluminum foil under the pan with the pre-baked crust, and wrap the foil up the sides of the pan. Put the pan into a 9-inch square baking dish or casserole dish. Pour the cheesecake filling into the pre-baked crust.Carefully pour the hot water into the square baking dish on the outside of the cheesecake pan so that the water comes about halfway or 3/4 up the sides of the cheesecake pan (this is the water bath).
Step 3: Bake and Chill
- Bake. Bake until the cheesecake is set along the outside but still wobbles in the center when you jiggle the pan, about 35 to 40 minutes.
- Chill. Let the cheesecake cool (still in the water bath) to room temperature, about 2 hours. Remove it from the water bath (removing the foil on the bottom of the pan), and refrigerate until fully chilled, about 8 hours. (TIP: For the best texture and flavor, don’t skip the chill time!)

Storage Tips
Store leftovers in an airtight container in the fridge for up to 4 days.
My Best Tips For Low Carb High Protein Cheesecake
- To help this cheesecake blend up super smooth and creamy, make sure your eggs, yogurt, cottage cheese, and cream cheese are all at room temperature.
- I like my sweets on the less-sweet side and I enjoy the contrast of the slightly salty crust paired with the sweet, creamy filling. However, if you have a die-hard sweet tooth, feel free to add up to 2 tablespoons of your favorite sweetener to the crust.
- It can be tempting, but don’t rush the chill time. Both the flavor and texture of this cheesecake are better after it sets in the fridge for 8 hours.

Special Diet Friendly
As written, this recipe is naturally gluten free. If you use a diabetic friendly sweetener, it’s also low carb and keto friendly.
Variations
- Skip the crust – Between you and me, my favorite version of this cheesecake is without the crust! Just make sure to line your pan with parchment paper to make it easy to remove the cheesecake.
- Nut butter swirl – To increase the protein even more, you can swirl in a generous dollop of your favorite nut butter into the batter right before baking. Peanut butter, almond butter, hazelnut butter (oooh, or Nutella!) would all be great. Make sure to use unsweetened nut butter if you want to keep the carbs down.
- Serve it saucy – Top it with your favorite fruit sauce (or a spoonful of preserves), caramel, butterscotch, or hot fudge. One of my favorite cheesecake toppings is sugar free strawberry jam!

Protein Cheesecake Frequently Asked Questions
Yes! To do so, use a regular-sized muffin pan. Line the wells with paper or silicone liners, and fill each 3/4 of the way full with batter. Bake at 325F until the mini cheesecakes are set along the outside, but jiggle just a touch in the center, about 15 to 20 minutes.
Note that there’s no need for a water bath if you’re making this into mini cheesecakes. However, if you want to help prevent cracking, you can fill a baking tray about halfway full with water and put in on the rack right below the cheesecakes as they cook.
If you want to omit the Greek yogurt, you can increase the cottage cheese to 1 1/2 cups and add 2 tablespoons fresh lemon juice.
However, keep the cream cheese the same. This is what makes this protein cheesecake taste like a regular cheesecake!
Each serving of this high protein cheesecake has a whopping 14 grams of protein.
Yes, technically you can make cheesecake without a water bath. But using a water bath helps create the best cheesecake for a couple reasons.
Let’s start with the outside. If you don’t use a water bath, your cheesecake is more likely to crack or have an uneven surface instead of a smooth, flat top. And inside, the texture is more likely to have a lumpy, curdled mouthfeel instead of the velvety-smooth texture of cheesecake baked with a water bath.
PRO TIP: If you don’t have pans for making a water bath, at least put a pan of hot water on the bottom rack of the oven to provide humidity as the cheesecake bakes.
More Protein Dessert Recipes to Try
- Fudgy Double Chocolate Protein Bars
- Easy Protein-Packed Cottage Cheese Ice Cream Bars
- Almond Croissant Protein Baked Oatmeal
- Protein Chocolate Fudge
Let’s Connect

Did you make this recipe? Please rate it and leave a comment below. You can also tag @anediblemosaic on social media.
To stay up-to-date, follow me on Facebook, Instagram, Pinterest, and Twitter!
Protein Cheesecake Recipe
Email This Recipe
Get this recipe link emailed straight to your inbox!
Equipment
- High speed blender (or food processor)
Ingredients
Crust:
- 1 cup almond flour
- 1/4 teaspoon ground cinnamon
- 1/4 teaspoon salt
- 3 tablespoons unsalted butter melted
Cheesecake:
- 2 large eggs at room temperature
- 1 cup plain unsweetened Greek yogurt at room temperature
- 1/2 cup cottage cheese at room temperature
- 1 tablespoon pure vanilla extract
- 6 tablespoons granulated sweetener such as sugar or monk fruit/allulose blend
- 1/8 teaspoon salt
- 8 ounces cream cheese at room temperature
Other:
- Hot water for a water bath
- Fresh berries such as raspberries, strawberries, or blueberries (optional; for serving)
Instructions
Make the Crust:
- Prep. Preheat the oven to 325F. Line the bottom of a 6 to 7-inch springform pan with a piece of parchment paper trimmed to fit inside.
- Toast. Add the almond flour to a small skillet over medium-low heat. Cook, stirring constantly, until the almond flour is light golden and smells toasted, about 3 to 5 minutes.
- Mix. Add the toasted almond flour, cinnamon, and salt to a medium bowl and whisk to combine. Add the melted butter and stir to mix well.
- Bake. Spread the almond flour mixture evenly in the bottom of the lined pan, pressing it down to compact it in the bottom and about 1/2 inch up the sides. Bake for 10 minutes.
Make the Filling:
- While the crust bakes, add the eggs, yogurt, cottage cheese, vanilla, sweetener, salt, and cream cheese to a blender or food processor. Process until smooth and creamy, stopping to scrape down the sides as necessary. (TIP: Don’t over-process the mixture or it will get foamy.)
Assemble and Bake:
- Prep the water bath and assemble the cheesecake. Put a kettle of water on to boil. Place a piece of aluminum foil under the pan with the pre-baked crust, and wrap the foil up the sides of the pan. Put the pan into a 9-inch square baking dish or casserole dish. Pour the cheesecake filling into the pre-baked crust.Carefully pour the hot water into the square baking dish on the outside of the cheesecake pan so that the water comes about halfway or 3/4 up the sides of the cheesecake pan (this is the water bath).
- Bake. Bake until the cheesecake is set along the outside but still wobbles in the center when you jiggle the pan, about 35 to 40 minutes.
Chill:
- Let the cheesecake cool (still in the water bath) to room temperature, about 2 hours. Remove it from the water bath (removing the foil on the bottom of the pan), and refrigerate until fully chilled, about 8 hours. (TIP: For the best texture and flavor, don't skip the chill time!)
Serve:
- Cut the cheesecake into slices and serve with fresh berries if desired.
Video
Notes
- Nutrition Information: The nutritional information for this recipe was calculated using a keto sweetener (granulated monk fruit/allulose blend). However, you can use regular granulated sugar if you prefer. Also, note that the nutritional information doesn’t include the optional berry topping.
- Sweetener in the Crust: I like my sweets on the less-sweet side and I enjoy the contrast of the slightly salty crust paired with the sweet, creamy filling. However, if you have a die-hard sweet tooth, feel free to add up to 2 tablespoons of your favorite sweetener to the crust.
- Net Carbs: 6g per serving if you use keto sweetener (each serving is 1/6 of the cheesecake).
- Storage: Store leftovers in an airtight container in the fridge for up to 4 days.
Nutrition
Nutritional information is automatically calculated and should be used as an approximate.
Share it with me on Instagram and leave a comment to let me know your thoughts!
This post was first published on An Edible Mosaic on May 15, 2024 and updated on December 31, 2025.


I’m the writer, recipe developer, photographer, and food stylist behind this blog. I love finding the human connection through something we all do every day: eat! Food is a common ground that we can all relate to, and our tables tell a story. It’s my goal to inspire you to get in the kitchen, try something new, and find a favorite you didn’t know you had.
Free Bonus