This post may contain affiliate links, view our disclosure.
Try this recipe, and you might be surprised how easy it is to make Brazilian cheese bread (pão de queijo) at home! With just a handful of ingredients, these are naturally gluten-free, cheesy, and perfect as a snack or side dish.

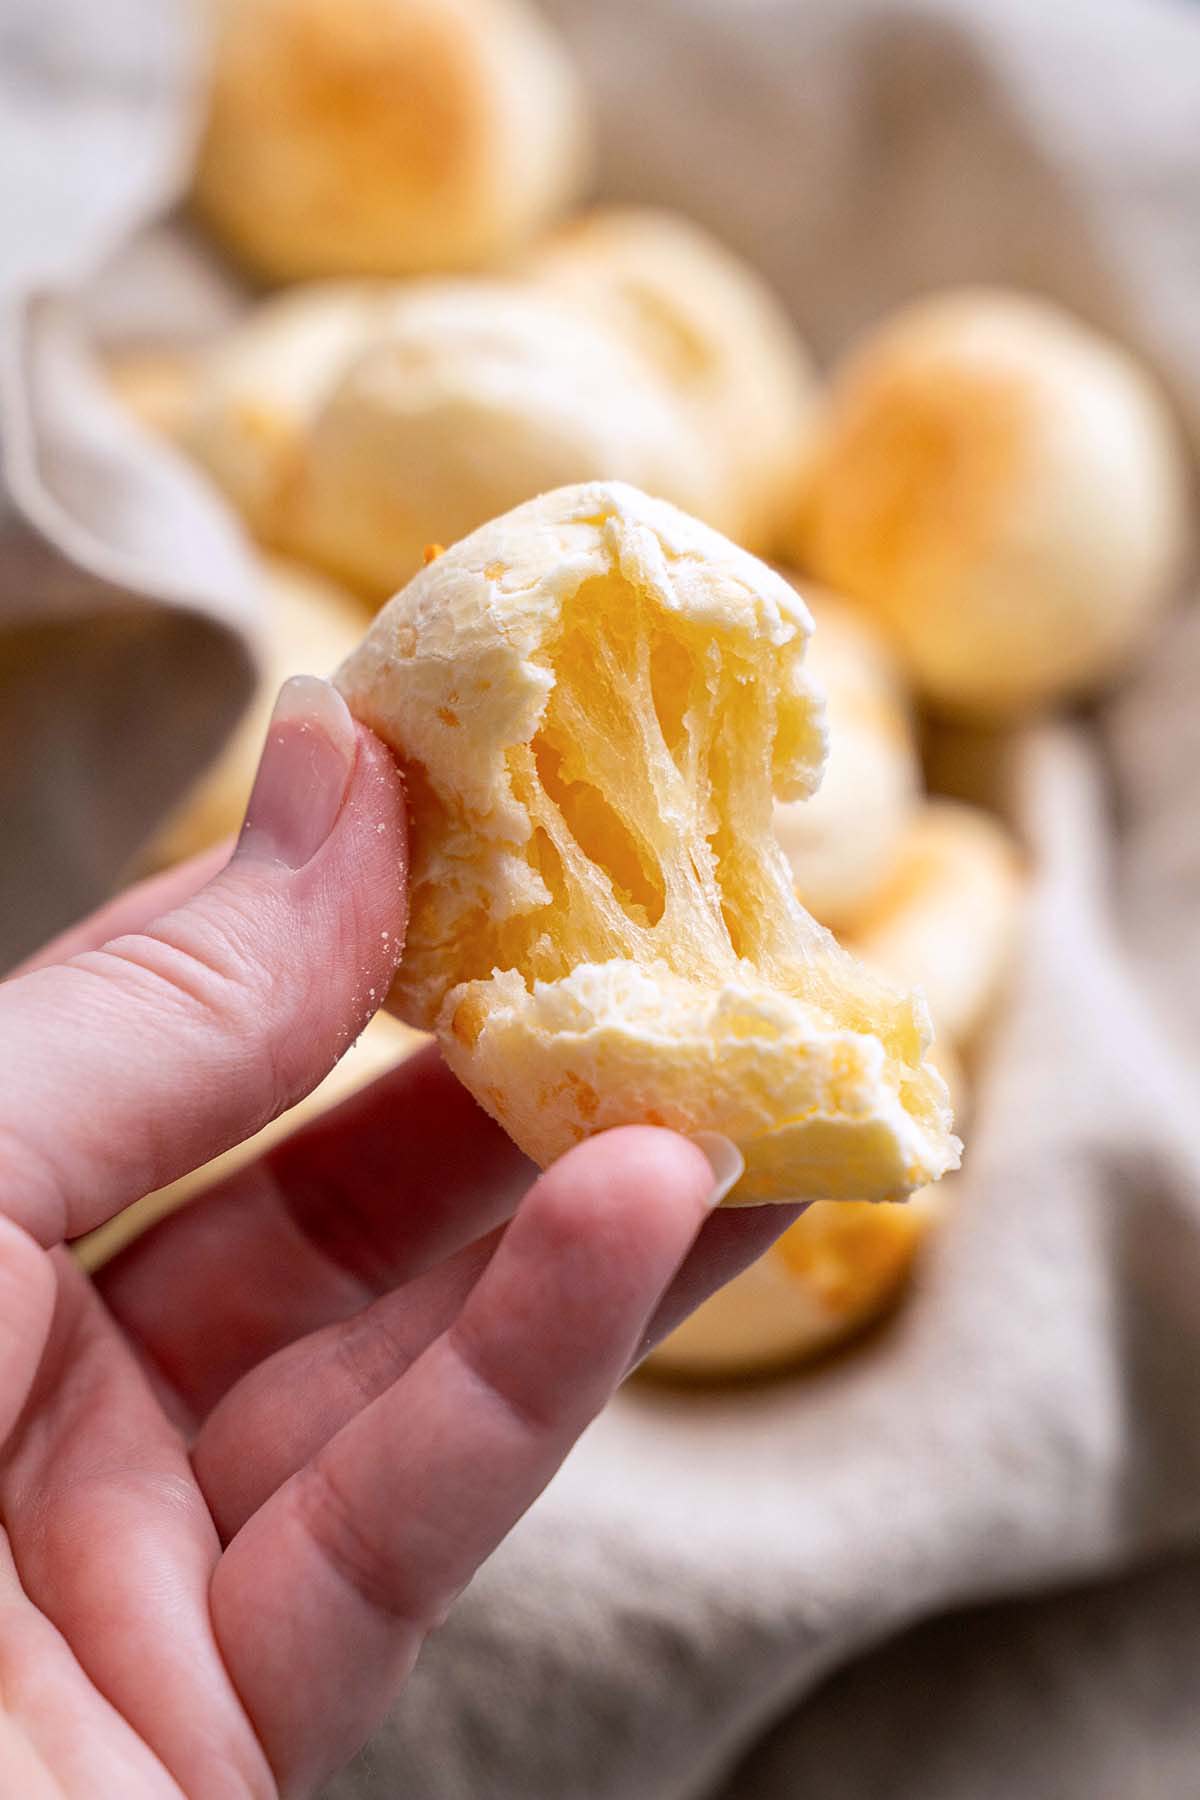
If you’ve ever bitten into a warm, chewy, cheesy puff of Brazilian cheese bread, you know it is hard to stop at just one. Known in Brazil as pão de queijo, this naturally gluten-free bread is a popular snack and breakfast staple in many South American households, and for good reason. They’re also one my favorite reasons to dine at a Brazilian steakhouse! So why not make them at home, right? They’re a great addition to a homemade churrasco style meal.
These Brazilian cheese puffs are crisp outside and chewy inside with just the right amount of savory flavor and only a handful of ingredients. Pair it with a hot cup of coffee to enjoy it as a snack like they do in Brazil. Or have it as an appetizer or side dish with your favorite grilled meats. It’s also delicious along with soup and/or salad. You can eat any way you’d eat bread!
What Is Pão de Queijo?
Pão de queijo translates to “cheese bread” in Portuguese. It’s a popular Brazilian snack made from tapioca flour, eggs, milk, oil, and cheese. The result? A crisp outer shell with a stretchy, chewy interior that’s totally addictive.
Unlike traditional bread recipes, pão de queijo doesn’t use wheat flour, so it’s a great gluten free bread option.
Ingredients
Breaking It Down
Ingredients Explained
In this section I explain the ingredients and give substitution ideas where applicable. For the full recipe (including the ingredient amounts), see the recipe card below.
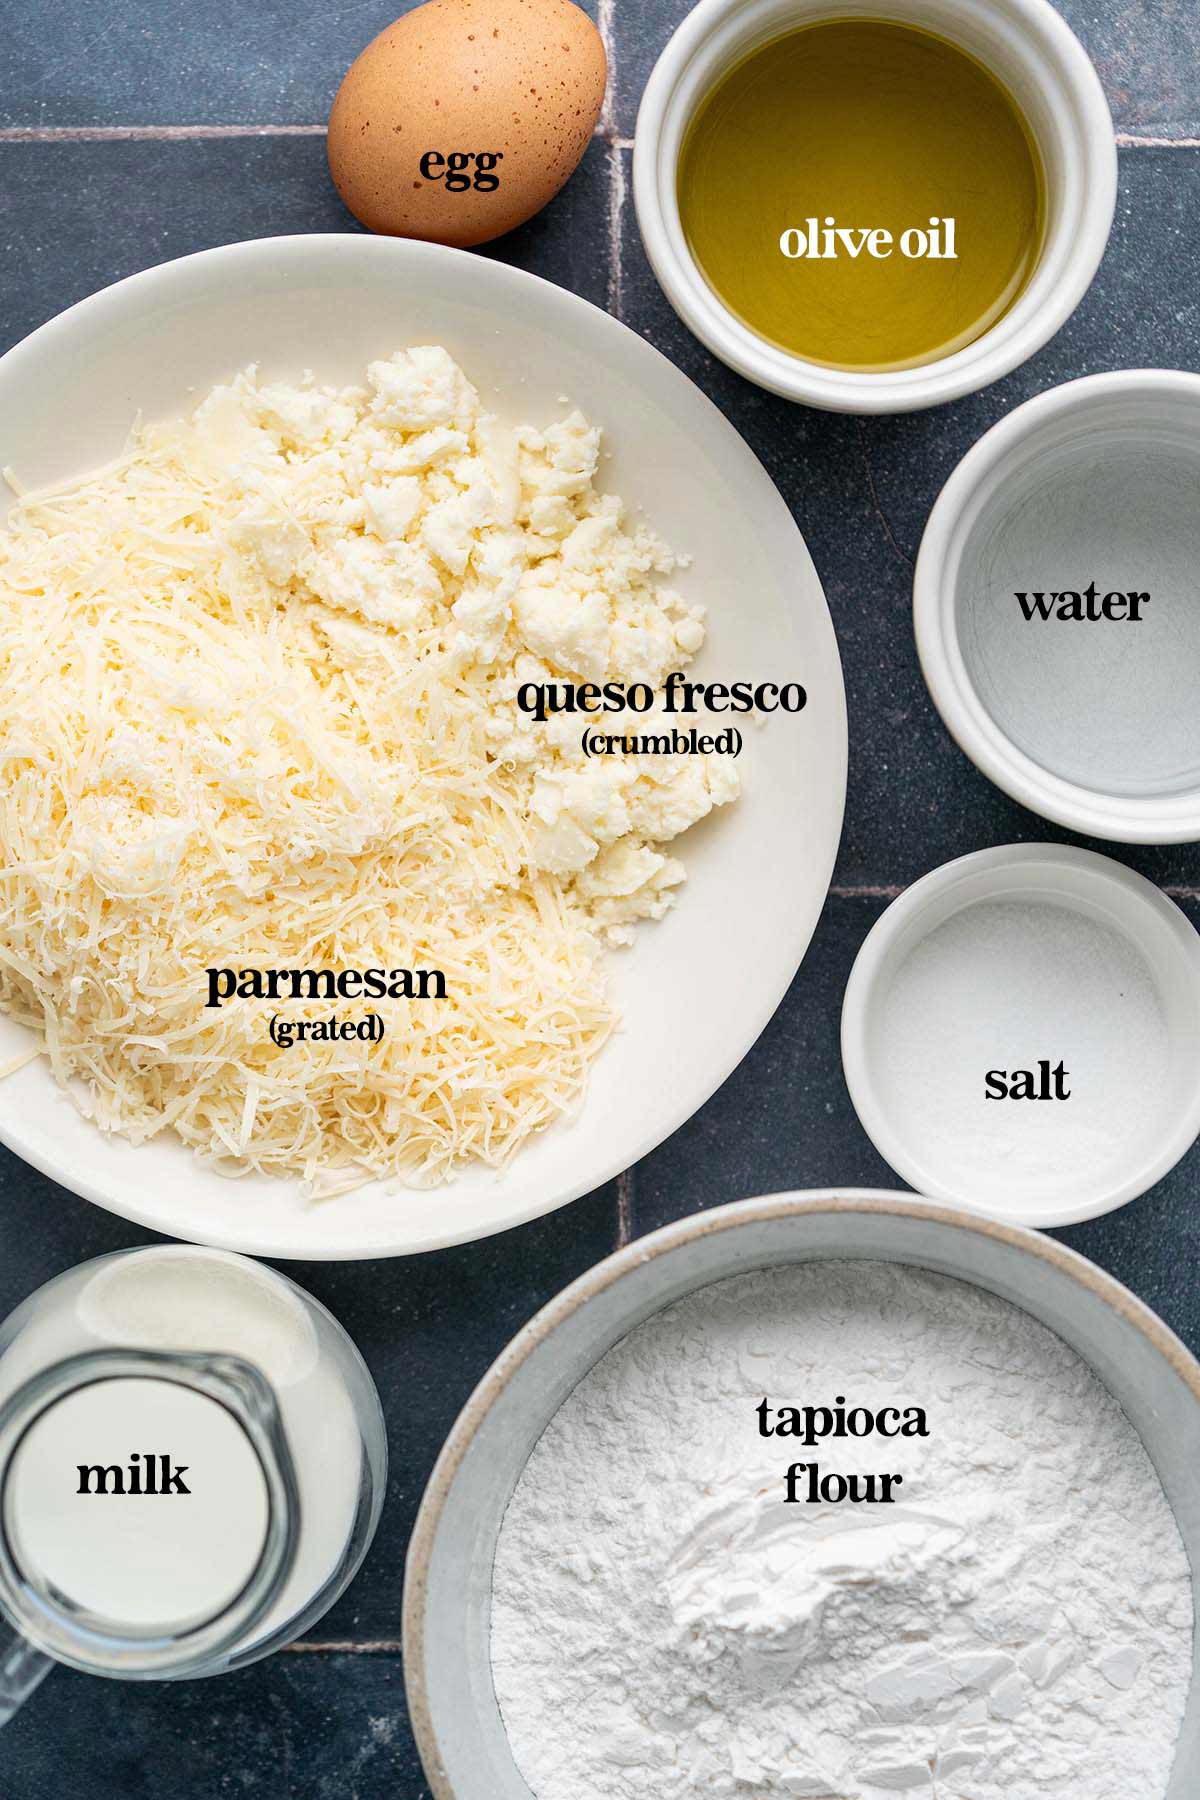
- Tapioca flour – Tapioca flour is a gluten free flour made from cassava root. It’s the key ingredient in this cheesy bread that creates its stretchy chewiness. If you’ve ever had mochi, this bread has a similar texture.
- Salt – To season the bread so it isn’t bland.
- Whole milk – Milk adds rich flavor and helps make this bread soft and tender. Using all milk and no water can result in a less crispy exterior, so we use both.
- Water – Using a combination of milk and water (and not just one or the other) results in just the right texture and flavor. Water helps hydrate and gelatinize the tapioca starch, and mitigates the tenderizing effect of milk so we end up with bread that’s perfectly crisp outside and tender inside.
- Extra-virgin olive oil – A neutral flavored oil (such as vegetable oil or canola oil) is more traditional than olive oil, but I like to use olive oil for its rich flavor and health benefits. You can use what you have on hand.
- Egg – Egg is an important ingredient in Brazilian cheese bread. It acts as a binder, enhances the color and flavor, and helps create the right texture.
- Freshly-grated Parmesan cheese – In Brazil they use Canastra, a semi-hard, semi-cured cheese from Minas Gerais, located in the Brazilian Highlands. In this recipe we use a blend of Parmesan and queso fresco, which are more accessible here in the U.S.
- Queso fresco – Queso fresco is a soft, crumbly cheese with a milky, slightly salty, and subtly tangy flavor. In a pinch, you can use mozzarella or Monterey Jack. The texture will be slightly different though; when queso fresco melts, it softens but doesn’t get stretchy, stringy, or cheese pull like mozzarella.
Step-by-Step Instructions
To prep, preheat the oven to 400F. Line a large baking tray with parchment paper.
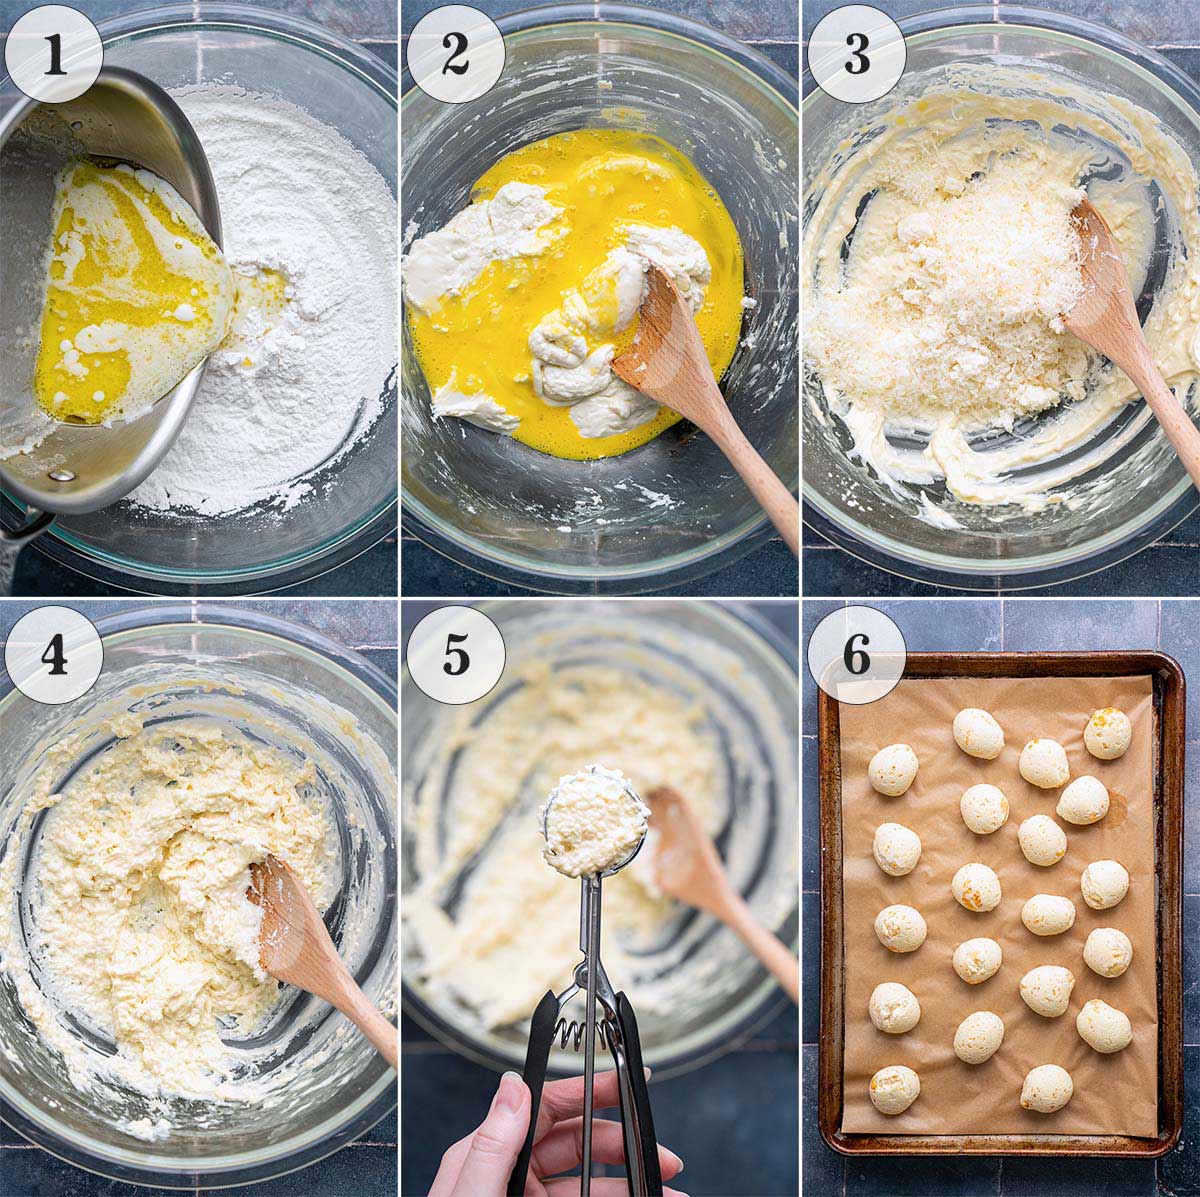
- Whisk together the flour and salt in a large bowl. Add the milk, water, and oil to a small saucepan over medium heat; bring to a boil, and then immediately stir the milk mixture into the flour. (TIP: Don’t let the milk mixture cool; once it boils, immediately stir it into the tapioca.)
- Let the dough cool for 5 to 10 minutes. After that, mix in the egg until well-combined (this will take some elbow grease or you can use an electric mixer).
- Then stir in the cheese.
- Note that it’s normal for the dough to be gummy and sticky.
- Use a 1-tablespoon scoop to measure out the dough, dropping the balls on the prepared baking tray and leaving about 1 to 1 1/2 inches between them. If you want them smoother, you can wet your finger and press down any bumps once they’re on the tray. (For more uniform bread, wet your hands and roll each 1-tablespoon dough portion into a ball, otherwise just scoop them onto the tray.)
- Bake until the bread is puffed and golden, about 18 to 22 minutes.
Make Ahead Friendly
Freeze unbaked dough balls on a tray, then store in a zip-top bag. Bake straight from frozen, just add a few extra minutes to the baking time.
Storage & Reheating
These are best eaten when they’re still warm out of the oven, but you can store leftovers in an airtight container at room temperature for up to 2 days (or in the fridge for up to 5 days). I recommend reheating leftovers to re-crisp the outside; you can do this in a 375F oven for 5 to 7 minutes or in a 325F air fryer for 3 to 5 minutes.
Tips for the Best Pão de Queijo
- Use freshly grated cheese. Pre-shredded cheese often contains anti-caking agents that can affect the texture. Freshly grated cheese melts better and tastes better too.
- Adjust the cheese to your taste. Want it saltier and sharper? Use more a bit more Parmesan. Prefer it gooey and mild? Swap out the queso fresco for mozzarella or Monterey Jack.
- Don’t over-bake. Keep an eye on the oven; the ideal pão de queijo has a golden crust and a tender, chewy interior.

Frequently Asked Questions
Some recipes use a blender method to make these cheesy puffs, in which all ingredients are blended until smooth and poured into mini muffin tins. This method produces a slightly different texture than the original, but is quick and beginner-friendly.
This recipe is more traditional and doesn’t use a blender.
Not exactly. While both come from the cassava root, tapioca flour is more refined, which gives pão de queijo its signature chewiness. On the other hand, cassava flour is coarser and includes more of the whole root; it won’t yield the same result in this recipe.
More Recipes To Help Use Up Your Bag of Tapioca Flour
- Paleo Sandwich Bread
- Soft and Chewy Gluten Free Chocolate Chip Cookies
- Gluten Free Basbousa (Middle Eastern Coconut Almond Flour Cake)

Let’s Connect

Did you make this recipe? Please rate it and leave a comment below. You can also tag @anediblemosaic on social media.
To stay up-to-date, follow me on Facebook, Instagram, Pinterest, and Twitter!

Brazilian Cheese Bread Recipe (Pão de Queijo)
Email This Recipe
Get this recipe link emailed straight to your inbox!
Ingredients
- 2 cups tapioca flour
- 1 1/4 teaspoons salt
- 1/3 cup whole milk
- 1/3 cup water
- 1/4 cup extra-virgin olive oil
- 1 large egg
- 2 ounces freshly-grated Parmesan cheese finely grate it on the small side of a box grater (about 1 cup finely grated)
- 2 ounces queso fresco crumbled (about 1/3 cup crumbled; or you can use shredded mozzarella)
Instructions
- Prep. Preheat the oven to 400F. Line a large baking tray with parchment paper.
- Make the dough. Whisk together the flour and salt in a large bowl. Add the milk, water, and oil to a small saucepan over medium heat; bring to a boil, and then immediately stir the milk mixture into the flour. Let the dough cool for 5 to 10 minutes. After that, mix in the egg until well-combined (this will take some elbow grease or you can use an electric mixer), and then stir in the cheeses. (Note that it’s normal for the dough to be gummy and sticky.)
- Scoop out the dough. Use a 1-tablespoon scoop to measure out the dough, dropping the balls on the prepared baking tray and leaving about 1 to 1 1/2 inches between them. If you want them smoother, you can wet your finger and press down any bumps once they’re on the tray. (For more uniform bread, wet your hands and roll each 1-tablespoon dough portion into a ball, otherwise just scoop them onto the tray.)
- Bake. Bake until the bread is puffed and golden, about 18 to 22 minutes.
Notes
- Storage and Reheating: These are best eaten when they’re still warm out of the oven, but you can store leftovers in an airtight container at room temperature for up to 2 days (or in the fridge for up to 5 days). I recommend reheating leftovers to re-crisp the outside; you can do this in a 375F oven for 5 to 7 minutes or in a 325F air fryer for 3 to 5 minutes.
- Recipe Yield: This recipe makes 16 to 20 rolls. If you don’t have a large baking tray, use 2 trays and rotate them once halfway through baking.
Nutrition
Nutritional information is automatically calculated and should be used as an approximate.
Share it with me on Instagram and leave a comment to let me know your thoughts!


I’m the writer, recipe developer, photographer, and food stylist behind this blog. I love finding the human connection through something we all do every day: eat! Food is a common ground that we can all relate to, and our tables tell a story. It’s my goal to inspire you to get in the kitchen, try something new, and find a favorite you didn’t know you had.
Free Bonus