

This post may contain affiliate links, view our disclosure.
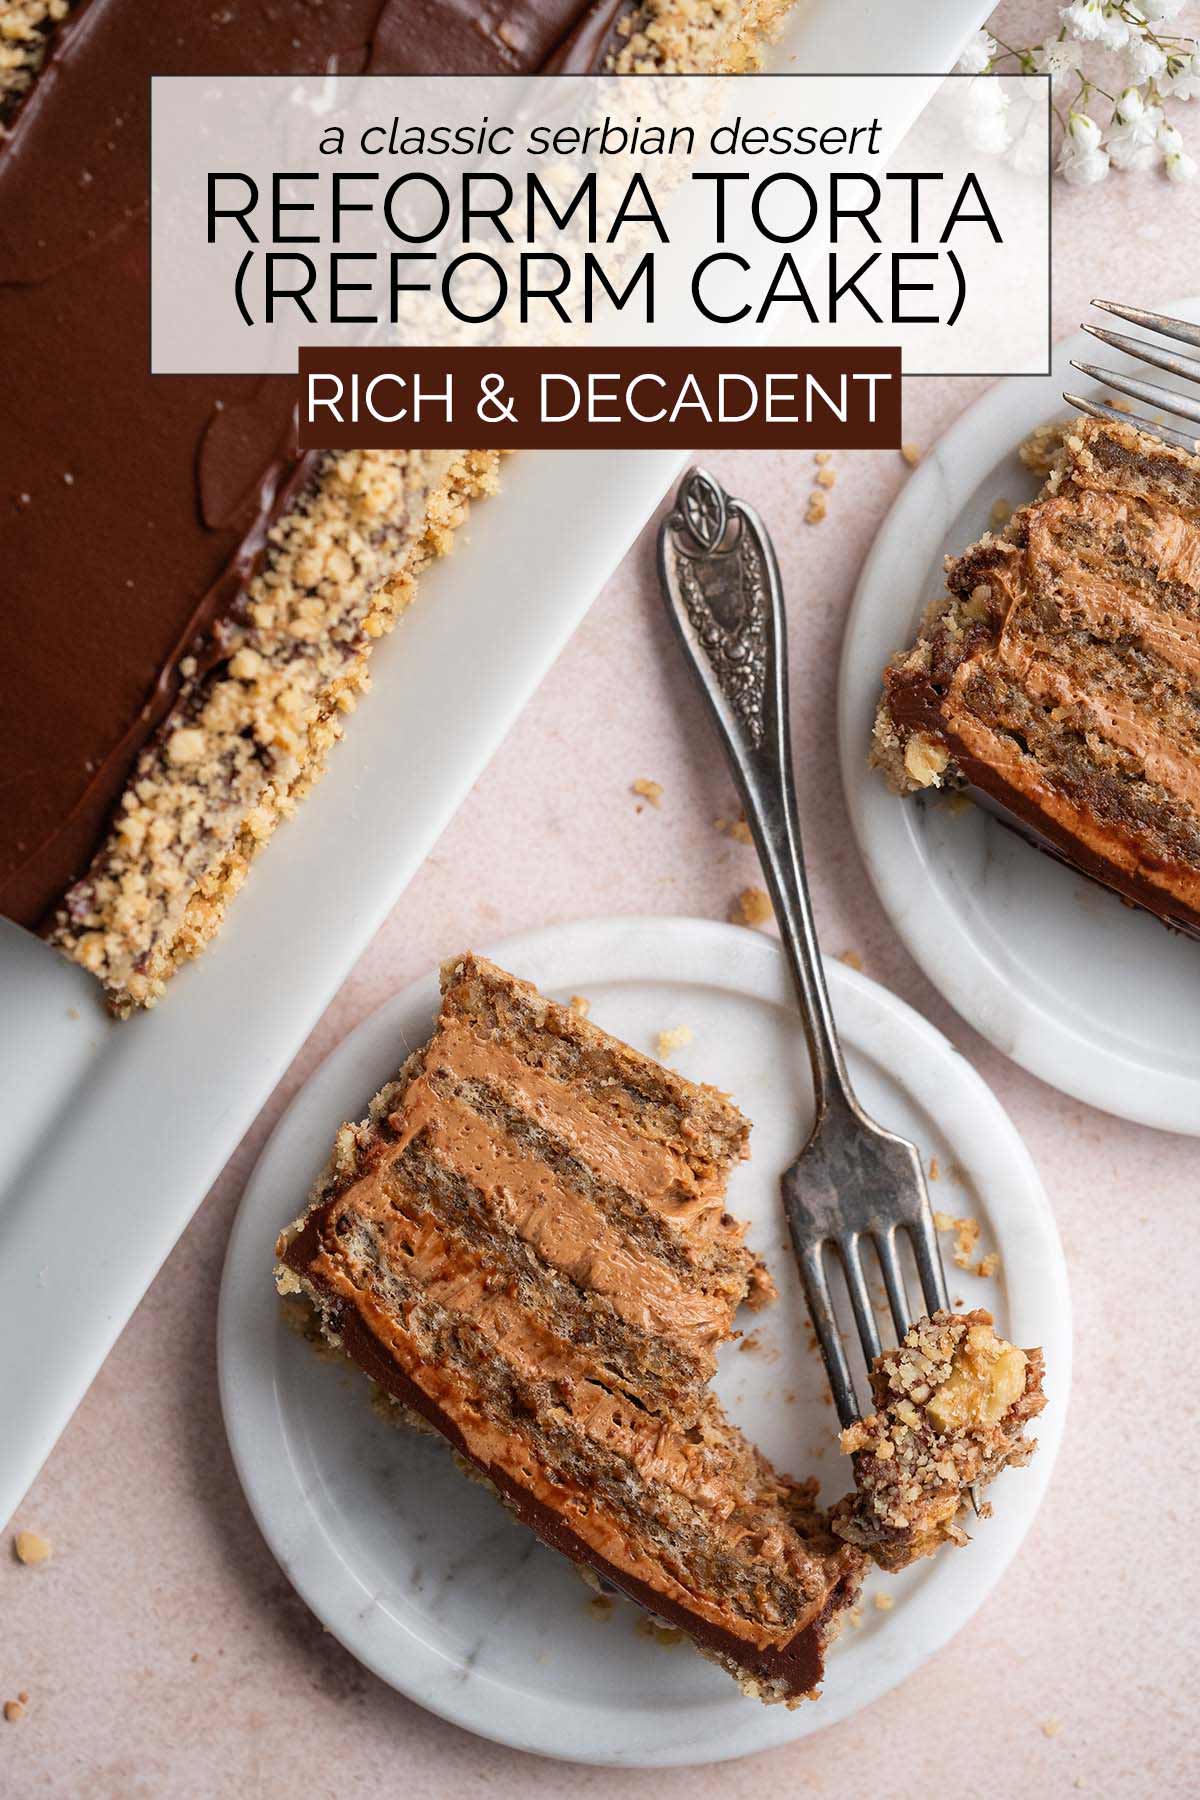
Learn how to make Serbian Reforma Torta, a rich walnut and chocolate layer cake that’s perfect for holidays, birthdays, special occasions, or anytime you need a decadent dessert.
I have a real thing for show-stopping cakes (like the cake that looks like a giant cream puff!). Refined and deliciously decadent, yes, but they’re also gorgeous and fun to photograph! And for me, a cake with a backstory is even better.
Take Serbian Reforma Torta (aka Reform Cake).
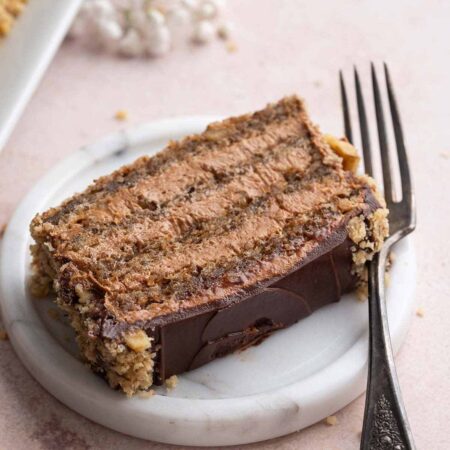
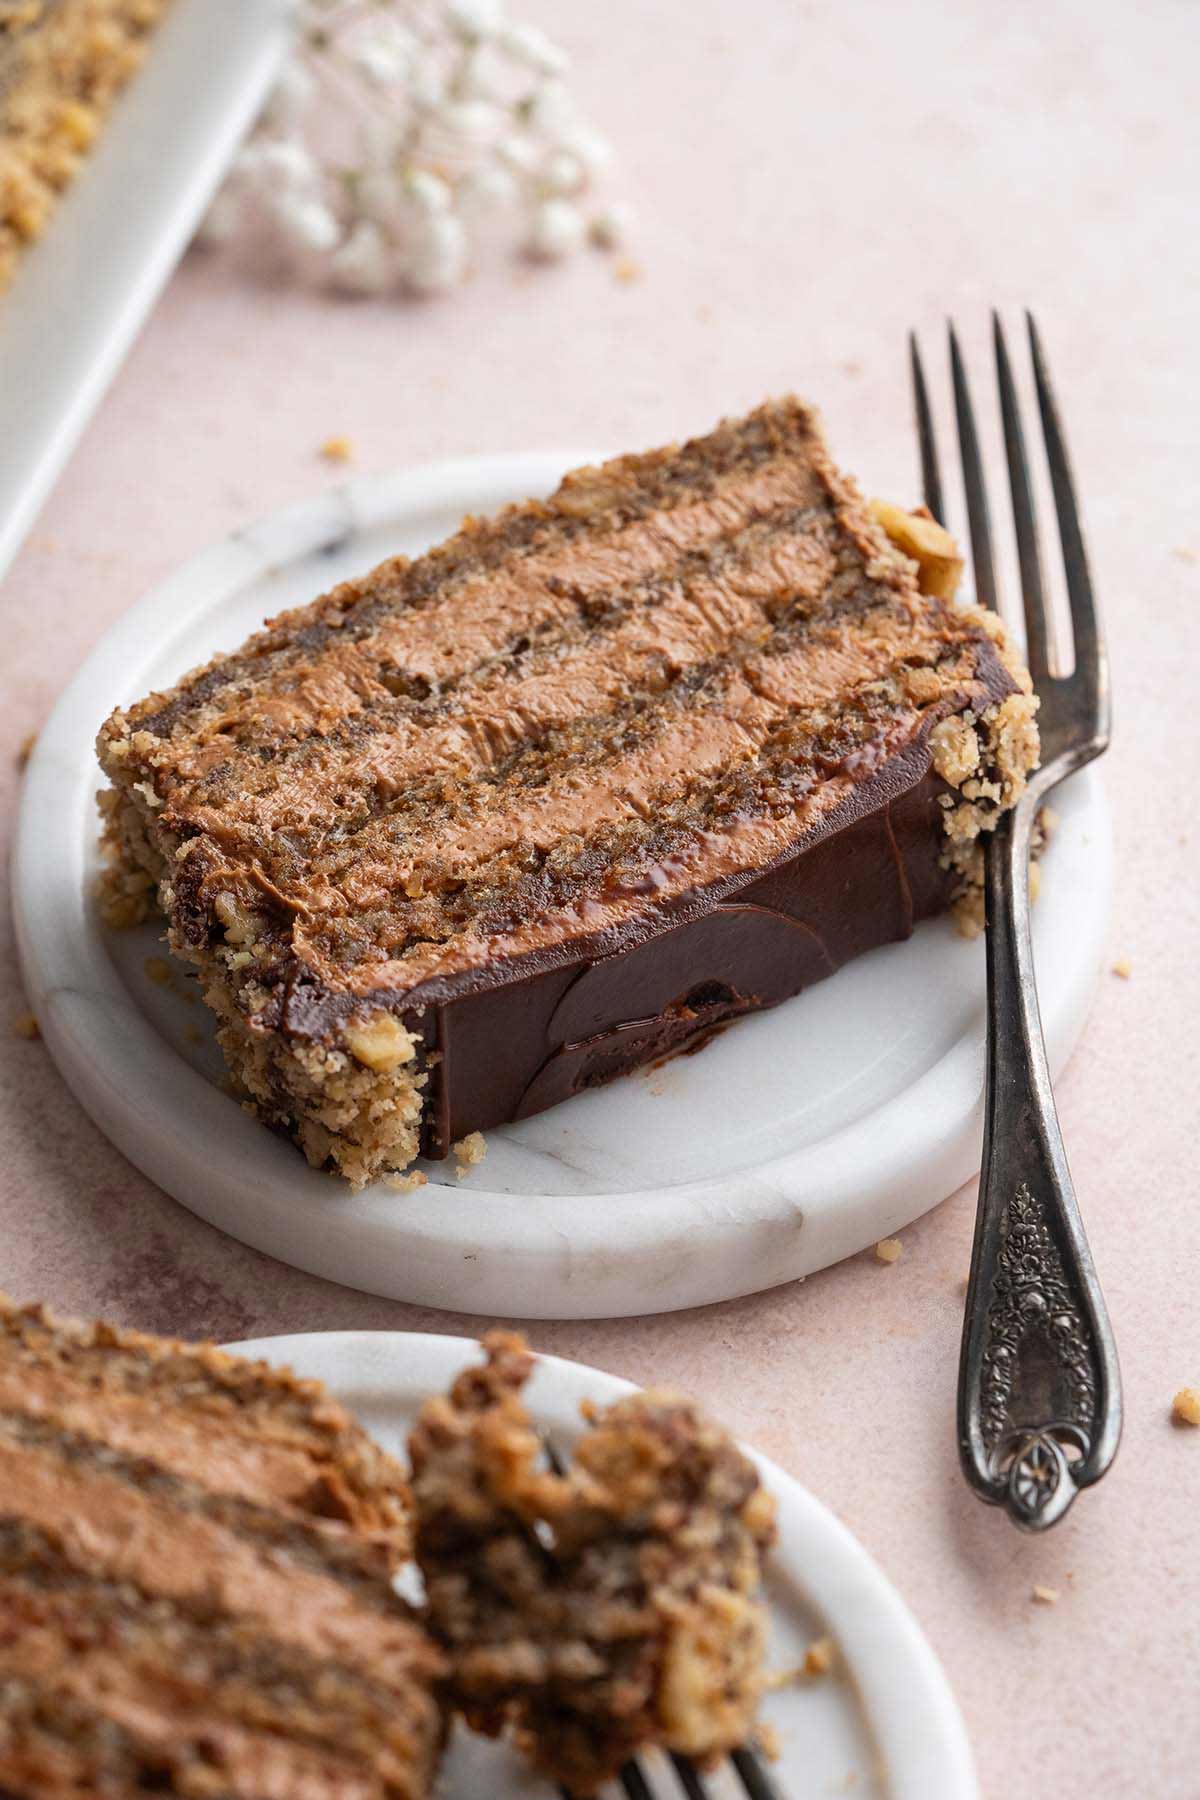
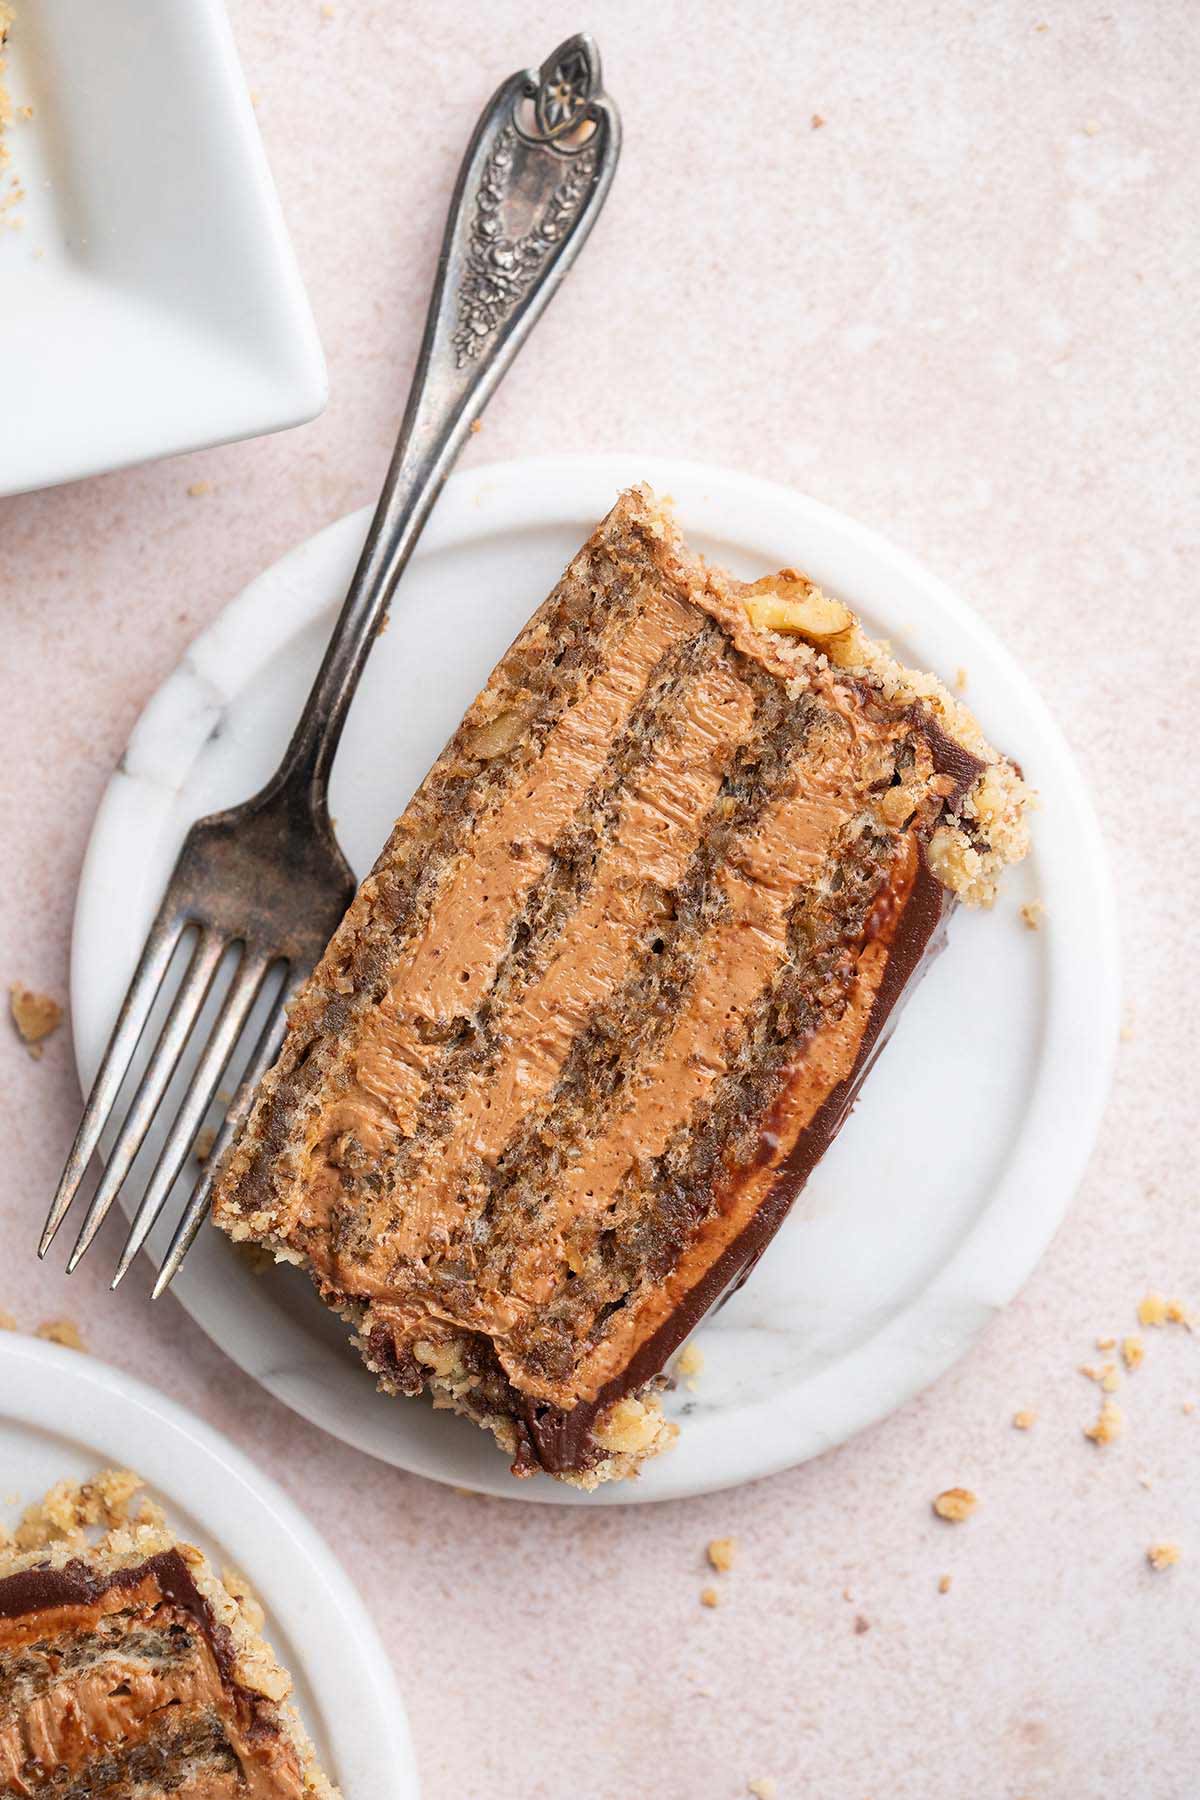
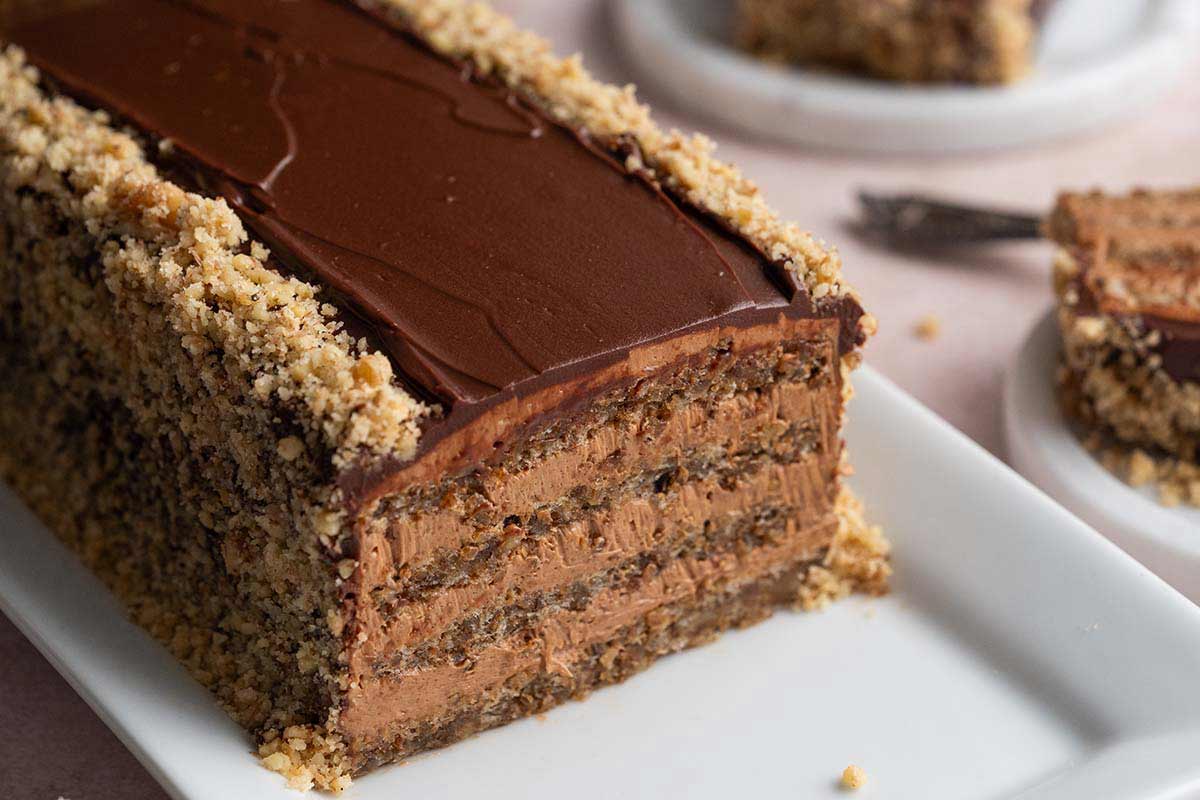
It’s a traditional Serbian layered cake made with soft, airy walnut sponge and velvety-smooth chocolate buttercream frosting (typically enriched with egg yolks) that’s covered in rich chocolate ganache, and frequently decorated with more walnuts. It’s a legacy dessert in the Balkans, especially popular in Serbia, and is often part of festive tables and formal occasions.
There’s some debate as to its origin, but it’s believed that this elegant cake was first created during the Communist reforms after WWII. At that time, luxury ingredients like eggs, butter, sugar, chocolate, and nuts were no longer as scarce. The generous use of such decadent ingredients meant that this cake was a real treat, used to commemorate special occasions and celebrations (i.e., slavas). It remains a popular cake for weddings and holidays, such as Easter and Christmas.
A slice of Reform Cake paired with a cup of coffee will transport you to a Balkan café without having to leave your kitchen. I’m going to walk you through the process of making it with step-by-step photos and lots of tips for success!
What Makes This Cake Truly Special
- Its one of a kind flavor and elegance. If you like the walnut-chocolate flavor combination, get ready for your new favorite cake! Tender, nutty walnut sponge and silky, rich chocolate buttercream make gorgeous layers. Dark chocolate ganache adds decadence and a lovely sheen on the outside, and also prevents this treat from being too sweet. It’s the type of cake that’s an experience, which makes it a great choice for special occasions. The next birthday cake for your favorite person, perhaps?
- Despite being a seriously impressive dessert, it’s surprisingly simple. To start, in this recipe we use common ingredients. And even though there are multiple components (cake, cream, and ganache), none of them are particularly difficult. Take your time and you got this!
- No waste! After making this cake, you won’t be stuck with a bowl full of egg whites or yolks to try to figure out how to utilize. This cake recipe uses a dozen eggs whole eggs between the cake and the frosting; 12 egg whites in the sponge cake, and 12 egg yolks in the chocolate cream filling.
- You can make it gluten free. With one easy swap you can make this cake gluten free! We only use 3 tablespoons of flour in the cake to help stabilize the sponge. You can omit it if you’re comfortable making sponge cakes, or use your favorite 1:1 gluten-free flour for a GF treat.
Ingredients
Breaking It Down
Ingredients Explained
In this section I explain the ingredients and give substitution ideas where applicable. For the full recipe (including the ingredient amounts), see the recipe card below.
Walnut Sponge Cake Ingredients

- Walnuts – You want raw, unsalted walnuts here; they should be very finely chopped. I use my food processor, but be careful you don’t over-process them or you’ll end up with walnut butter! If walnuts aren’t your thing, hazelnuts are another great choice.
- All-purpose flour – Here we add the flour as a failsafe for a little more stability in our sponge cake. If you’re comfortable make sponge cakes, you can omit it. Or if you want to make this cake gluten free, feel free to use a 1:1 gluten free flour substitute.
- Salt – To make sure the cake isn’t bland.
- Egg whites – Egg whites are integral in sponge cake. When you whip egg whites, you incorporate air into them. This transforms egg whites into a foam that gives the sponge its light, airy texture. The whipped whites trap tiny bubbles of air that expand in the oven, giving the cake volume and height, acting as a natural leavening agent (without the use of baking powder or baking soda!).
- Caster sugar – Also called superfine sugar, ultrafine sugar, or baker’s sugar, this is granulated white sugar that’s more finely ground so it dissolves faster than regular granulated sugar.
Chocolate Buttercream Frosting Ingredients (For the Filling)
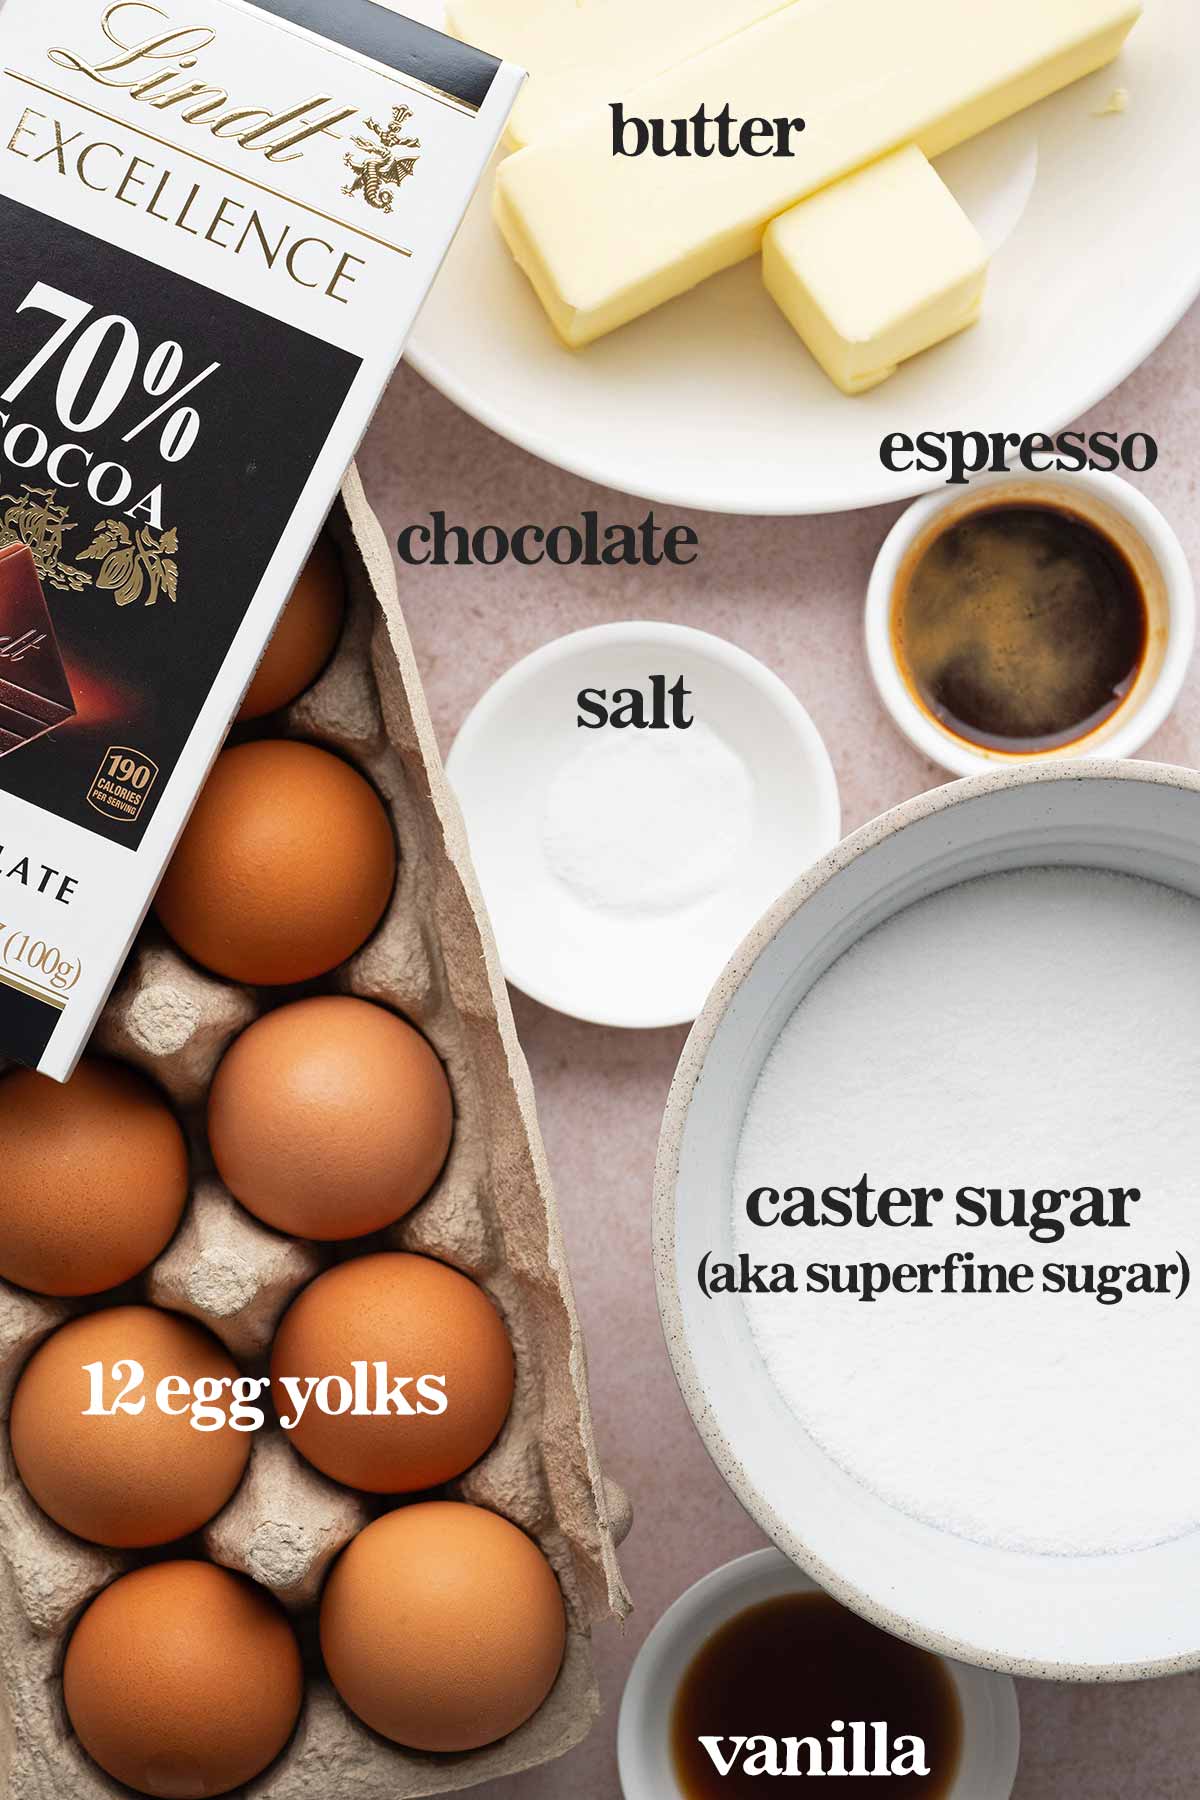
- Egg yolks – I love that in this recipe we use the egg whites in the cake and the egg yolks in the chocolate custard buttercream filling! The yolks add richness and creaminess and help make the filling completely luxurious.
- Caster sugar – The same sweetener that we use in the sponge cake.
- Vanilla – For depth of flavor and aroma.
- Salt – To help create a balanced flavor profile.
- Instant espresso powder – You won’t be able to taste coffee here; instead, it pulls out the flavor nuances in the chocolate. We dissolve it in a little hot water so it disperses evenly.
- Dark chocolate – 70% dark is perfect. Make sure it’s finely chopped so it melts fast.
- Unsalted butter – Slightly softened (but not melted).
Chocolate Ganache Ingredients (For the Coating)
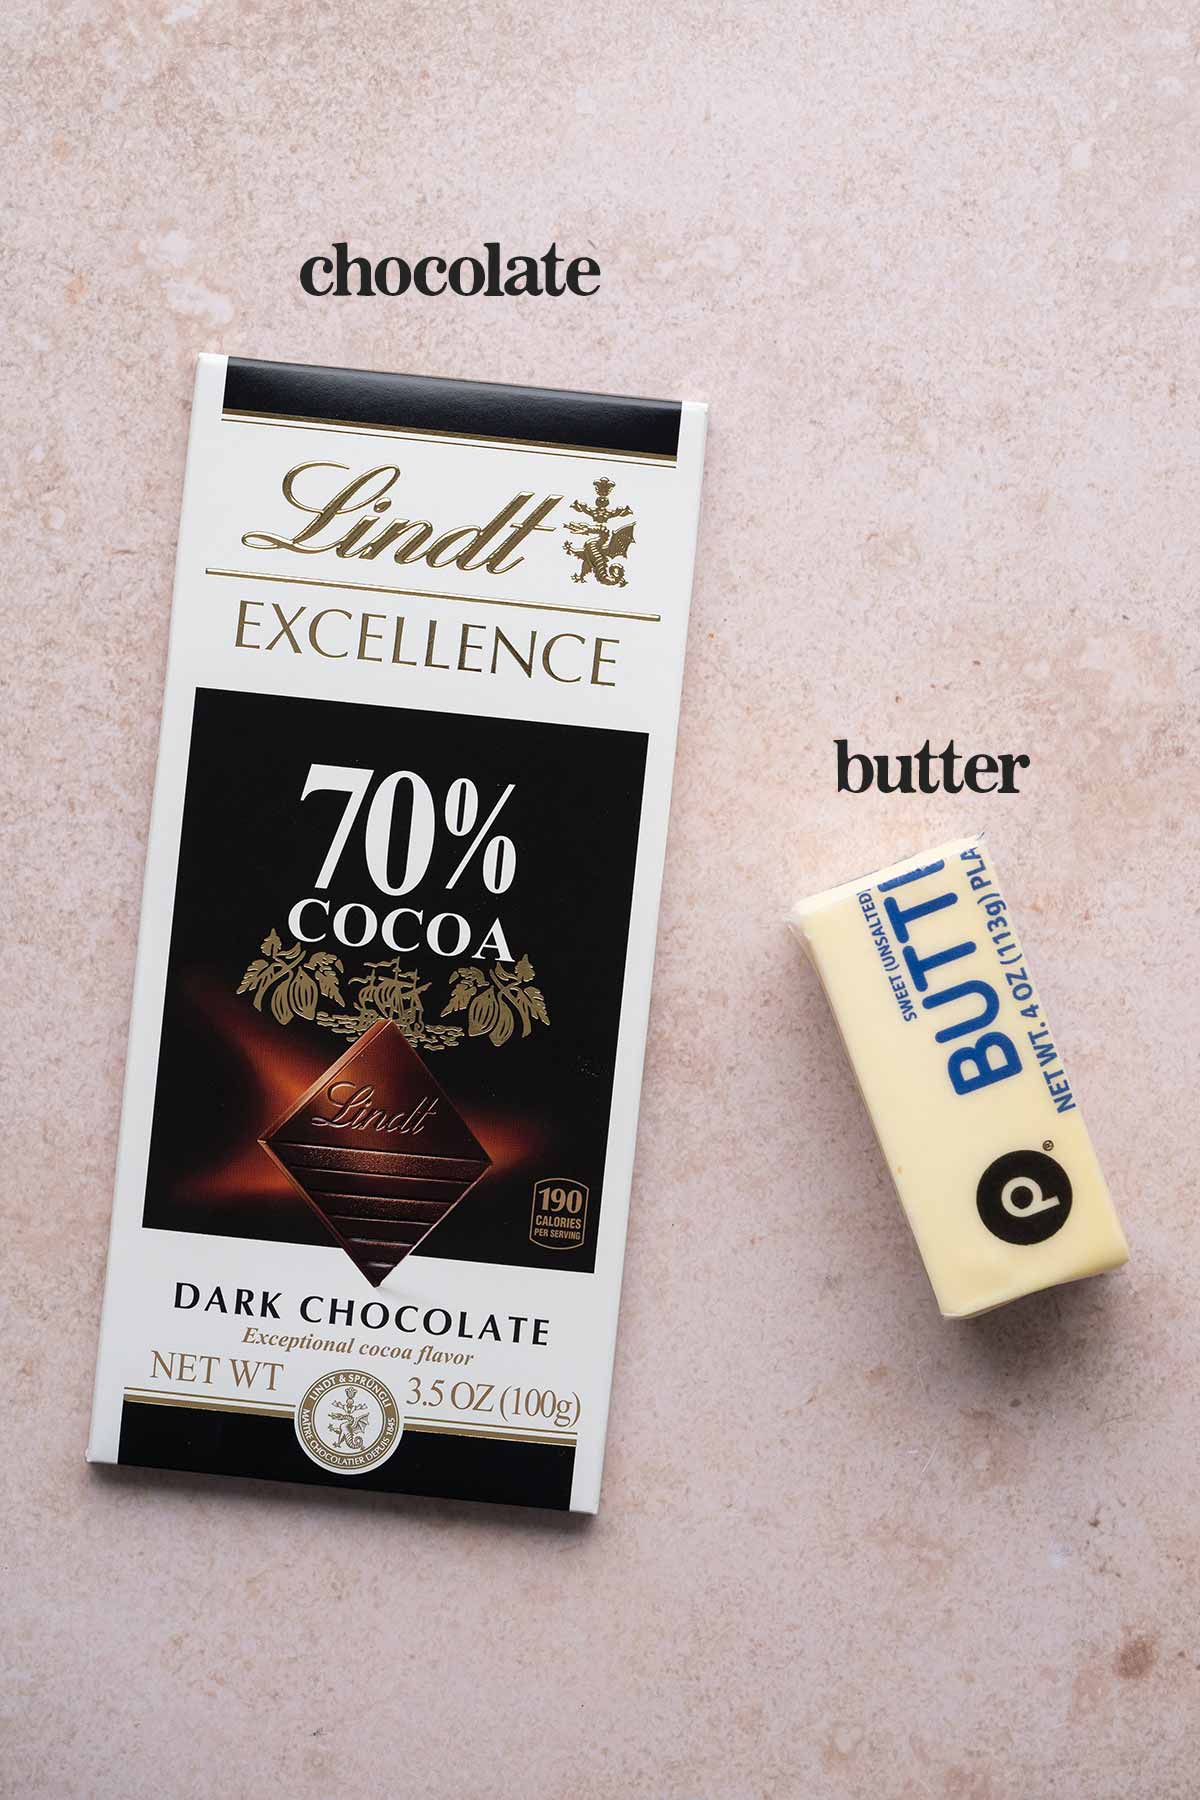
- Dark chocolate – I like to use 70% dark chocolate here as well. It adds deep flavor and helps balance out the sweetness of the cake and cream filling.
- Butter – Adds rich smoothness, and helps make the chocolate set a bit softer.
Other Ingredients
- Walnuts – I like to decorate the cake with more finely chopped walnuts, but this is optional.
Step-by-Step Instructions
There are multiple steps to this cake, but don’t be intimidated. Read the entire recipe through before starting, follow the step-by-step photo instructions, and you’ll be fine!
Also, note that if you want to make this over multiple days instead of tackling it in one day, you can make the sponge cake a day ahead.
Make the Walnut Sponge Cake
To prep, preheat the oven to 350F. Line a half sheet pan with parchment paper. IMPORTANT: Don’t grease the parchment paper.
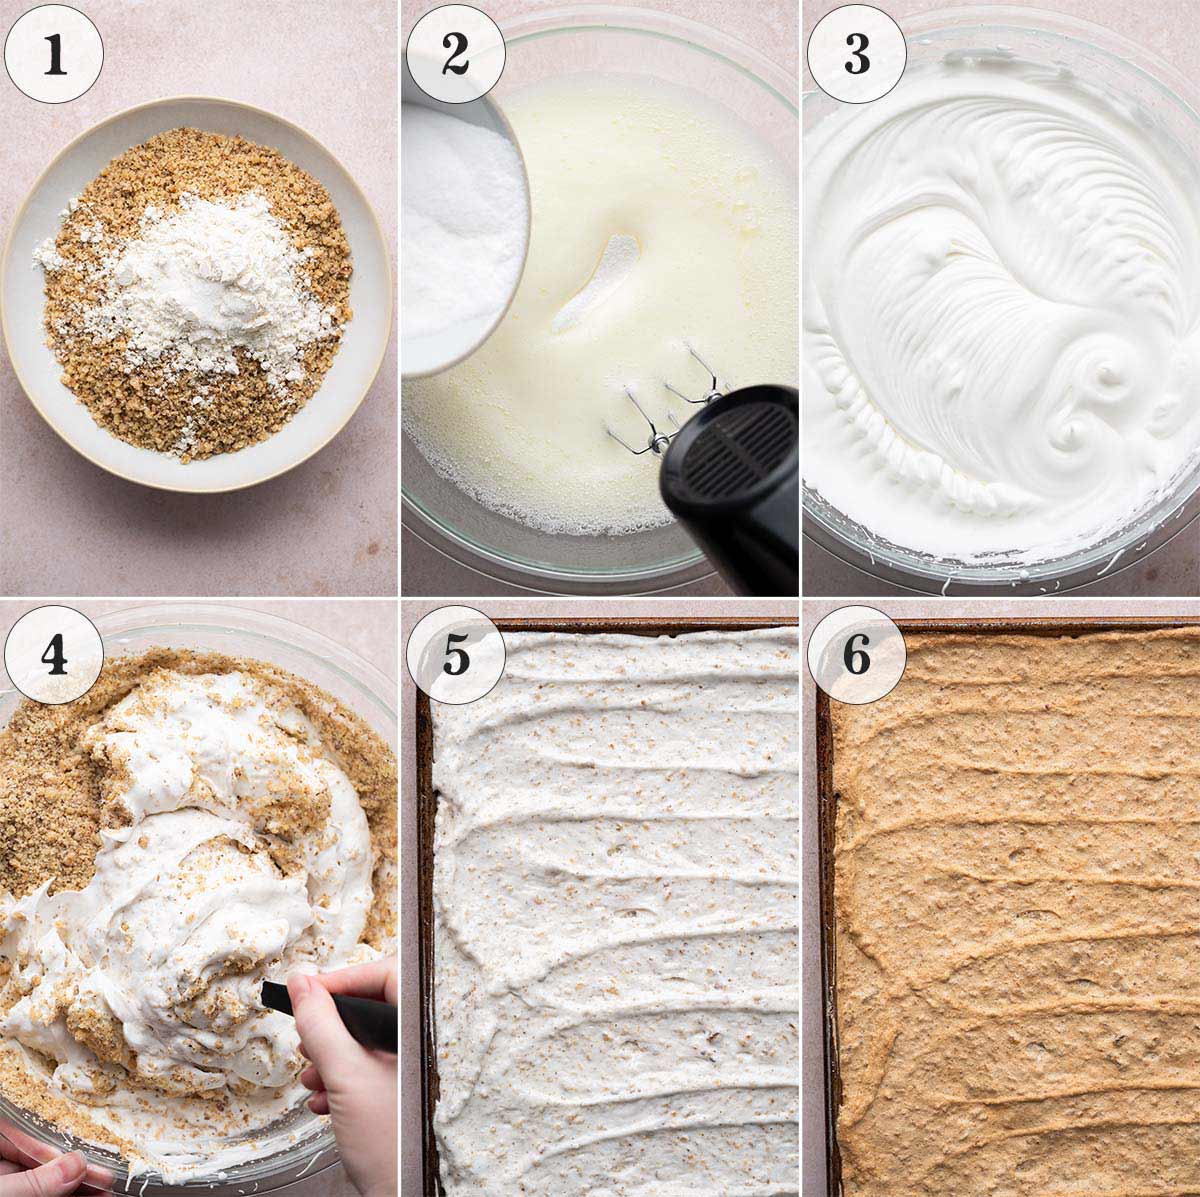
- Mix together the very finely chopped walnuts, flour, and salt in a bowl.
- Add the egg whites to a large bowl, and use a handheld electric mixer to beat until it starts to form soft peaks. While beating, add the sugar a little at a time until it forms stiff peaks.
- You want the egg whites to look like this. Be careful not to over or under-whip them.
- Gently fold the walnut mixture into the egg whites, being careful not to over-mix. IMPORTANT: You want to deflate the egg whites as little as possible.
- Spread the cake batter out onto he prepared baking tray.
- Bake until the cake springs back when pressed and the outside is starting to turn golden, about 25 to 35 minutes.
Cool the Cake, Then Trim It
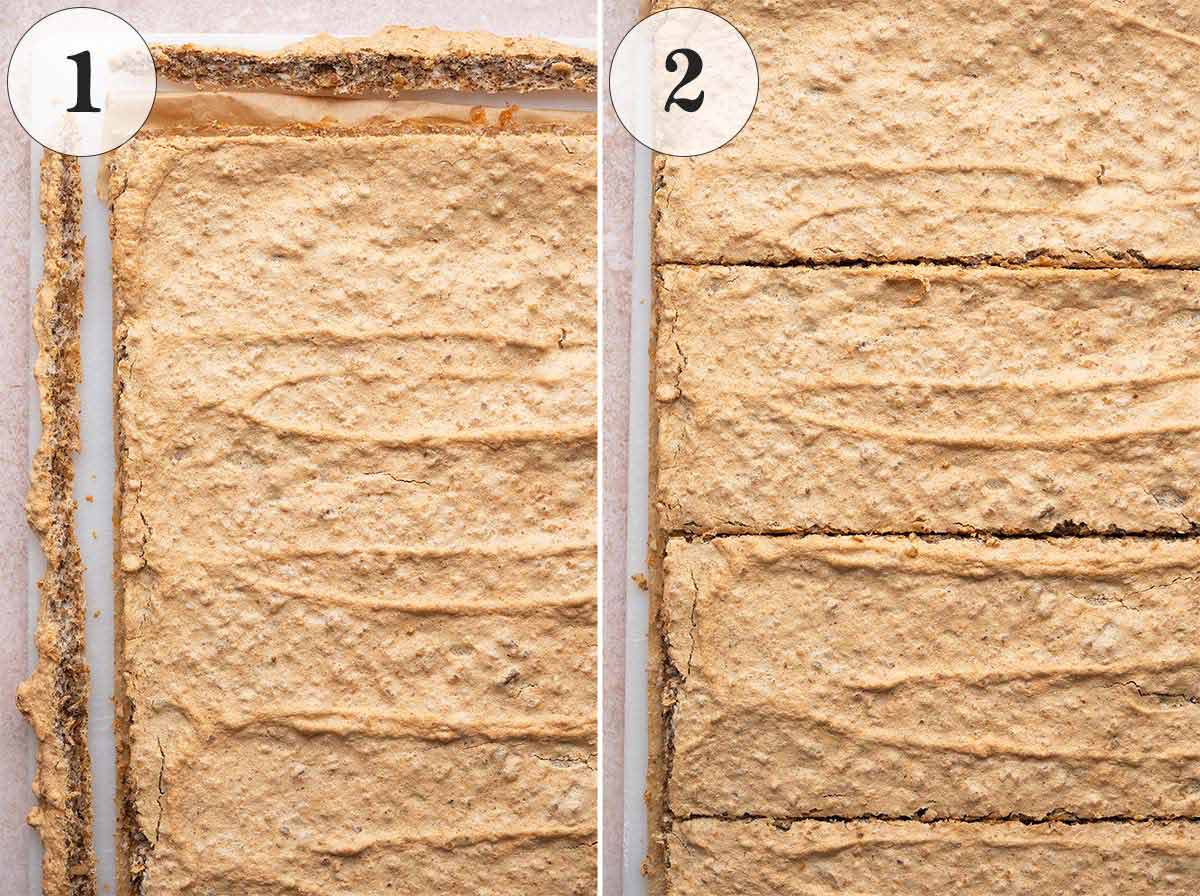
- Let the cake cool for 15 minutes, then run a paring knife around the outside of the cake, invert it onto a cooling rack, and slowly and carefully peel off the parchment paper. Cool completely (about 45 minutes more), then trim off the outside (so you have perfect edges).
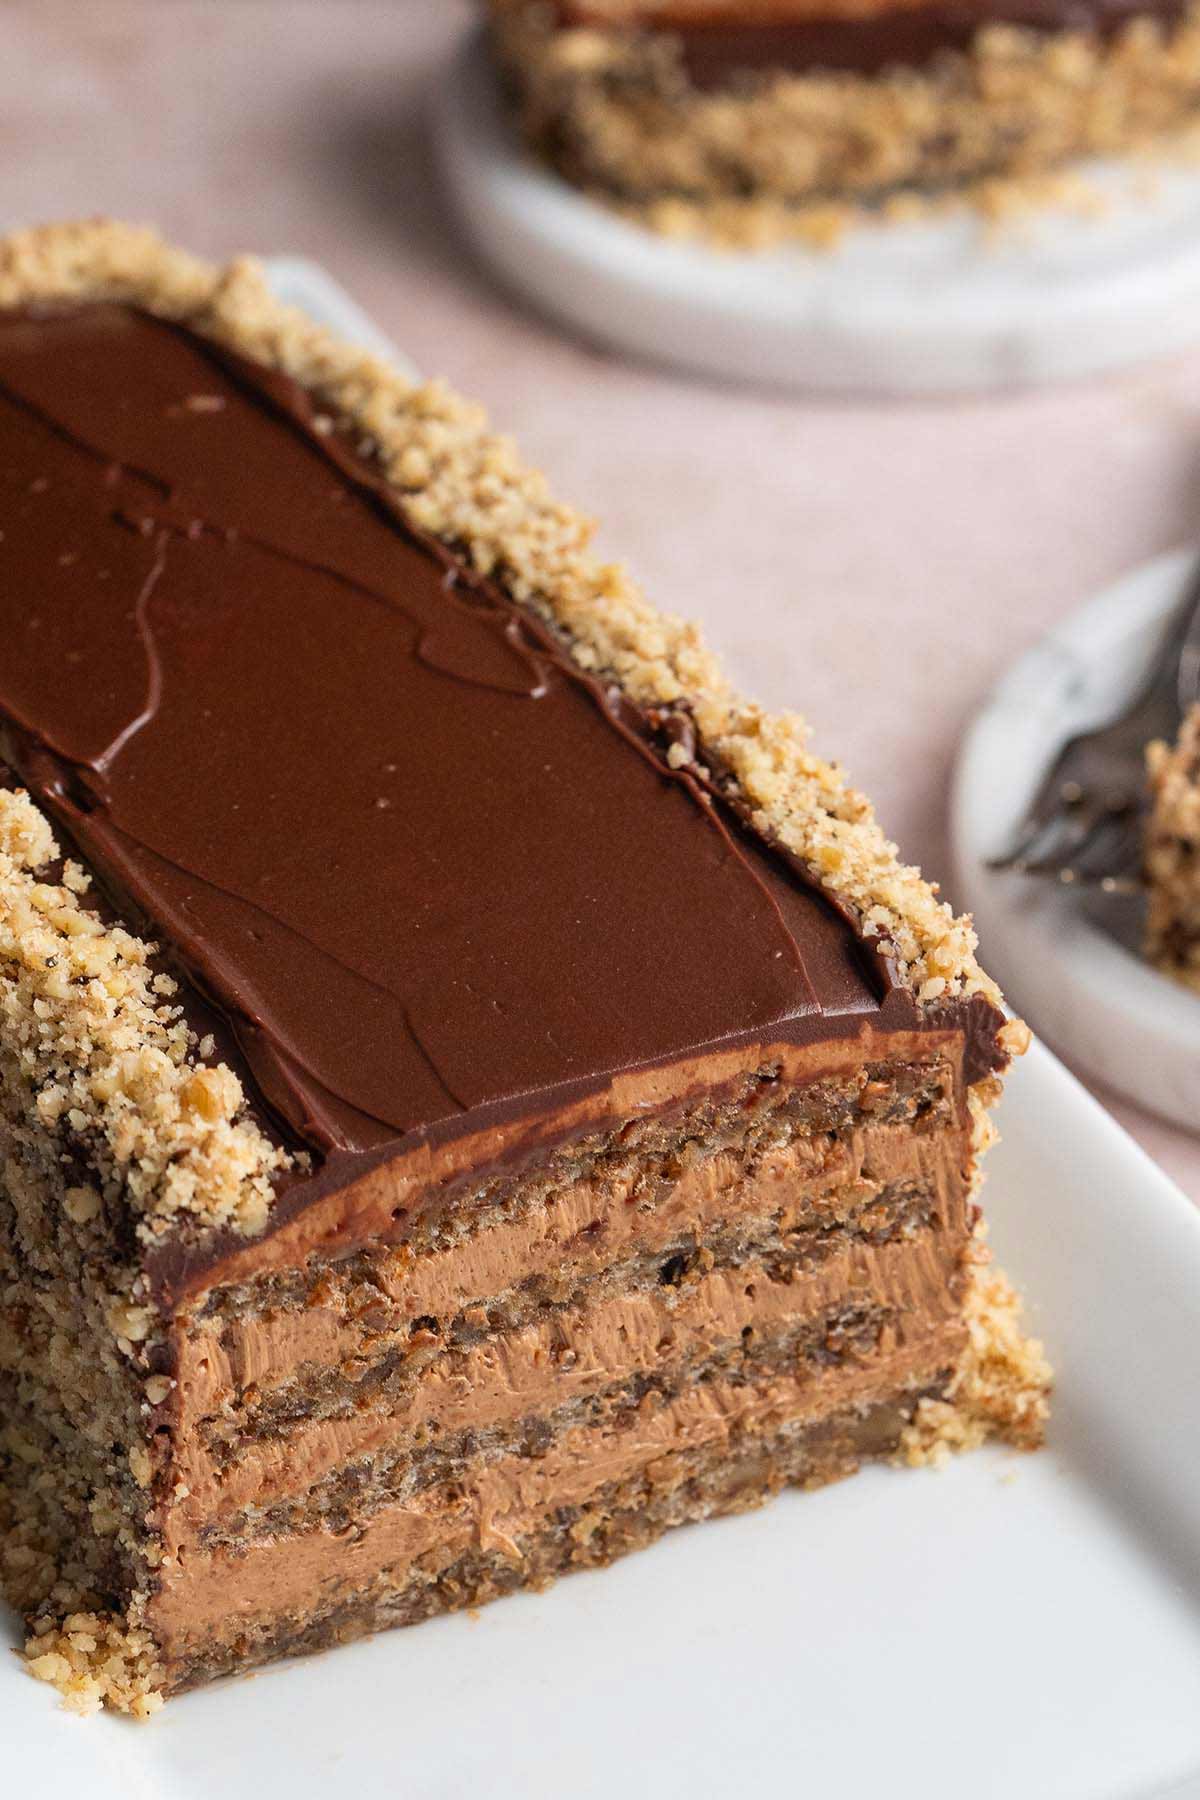
- Cut the cake into 4 equal pieces (I make 3 horizontal cuts to end up with 4 rectangles of cake).
Make the Chocolate Buttercream Frosting
While the cake is baking, start making the filling.

- Add the egg yolks to the boil of a double boiler that’s not yet placed on its water bath, and while beating with a handheld electric mixer, add the sugar 1/4 cup at a time, beating until thickened, about 3 minutes.
- Transfer the bowl to a double boiler and cook until the mixture thickens and runs off the whisk in fluffy ribbons, about 20 minutes, whisking very frequently. Adjust the heat to try to keep the water in the double boiler at a gentle boil.
- Whisk in the vanilla, salt, and instant espresso powder. Add the chopped chocolate, whisking until melted.
- Once the chocolate is melted, remove from the heat and cool to room temperature. IMPORTANT: After removing from the heat, place a piece of plastic wrap directly on top of the chocolate mixture to prevent a skin from forming. (Once it’s cooled, it’ll look like a gloopy pudding.)
- Add the butter to a large bowl, and use a handheld electric mixer to beat well. Beat in 1/4 of the room temperature chocolate mixture into the butter at a time.
- Thoroughly beating between each addition of butter until the cream is light and fluffy.
Assemble the Cake
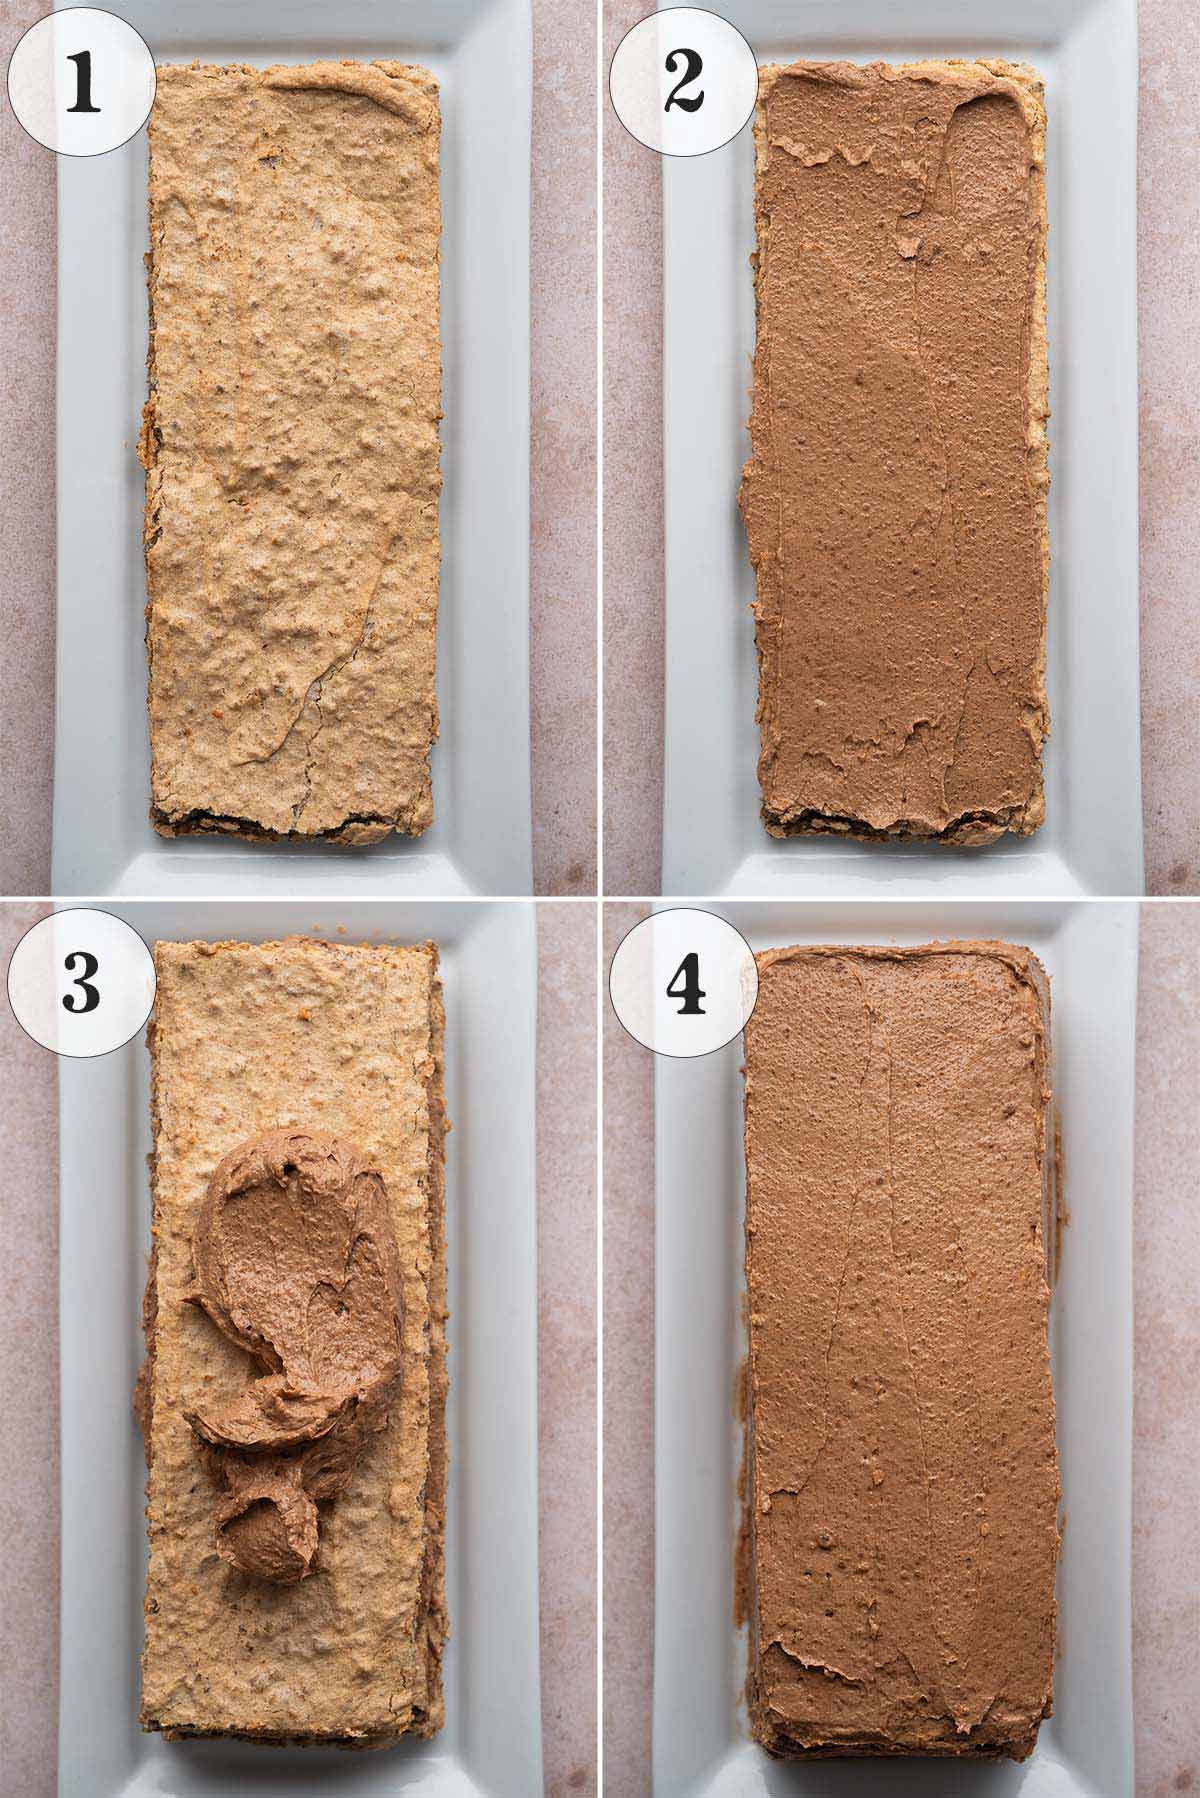
- Put 1 piece of cake onto a rectangular cake platter.
- Spread 1/5 (about 2/3 cup) of the chocolate cream evenly across it.
- Place the 2nd piece of cake on top. Spread 1/5 of the chocolate cream evenly across it, top with the 3rd piece of cake, spread on 1/5 of the chocolate cream, and place the 4th piece of cake on top.
- Spread the remaining chocolate cream evenly on the top and sides of the cake. Place the cake in the fridge to set while you make the chocolate coating.
Make the Chocolate Ganache
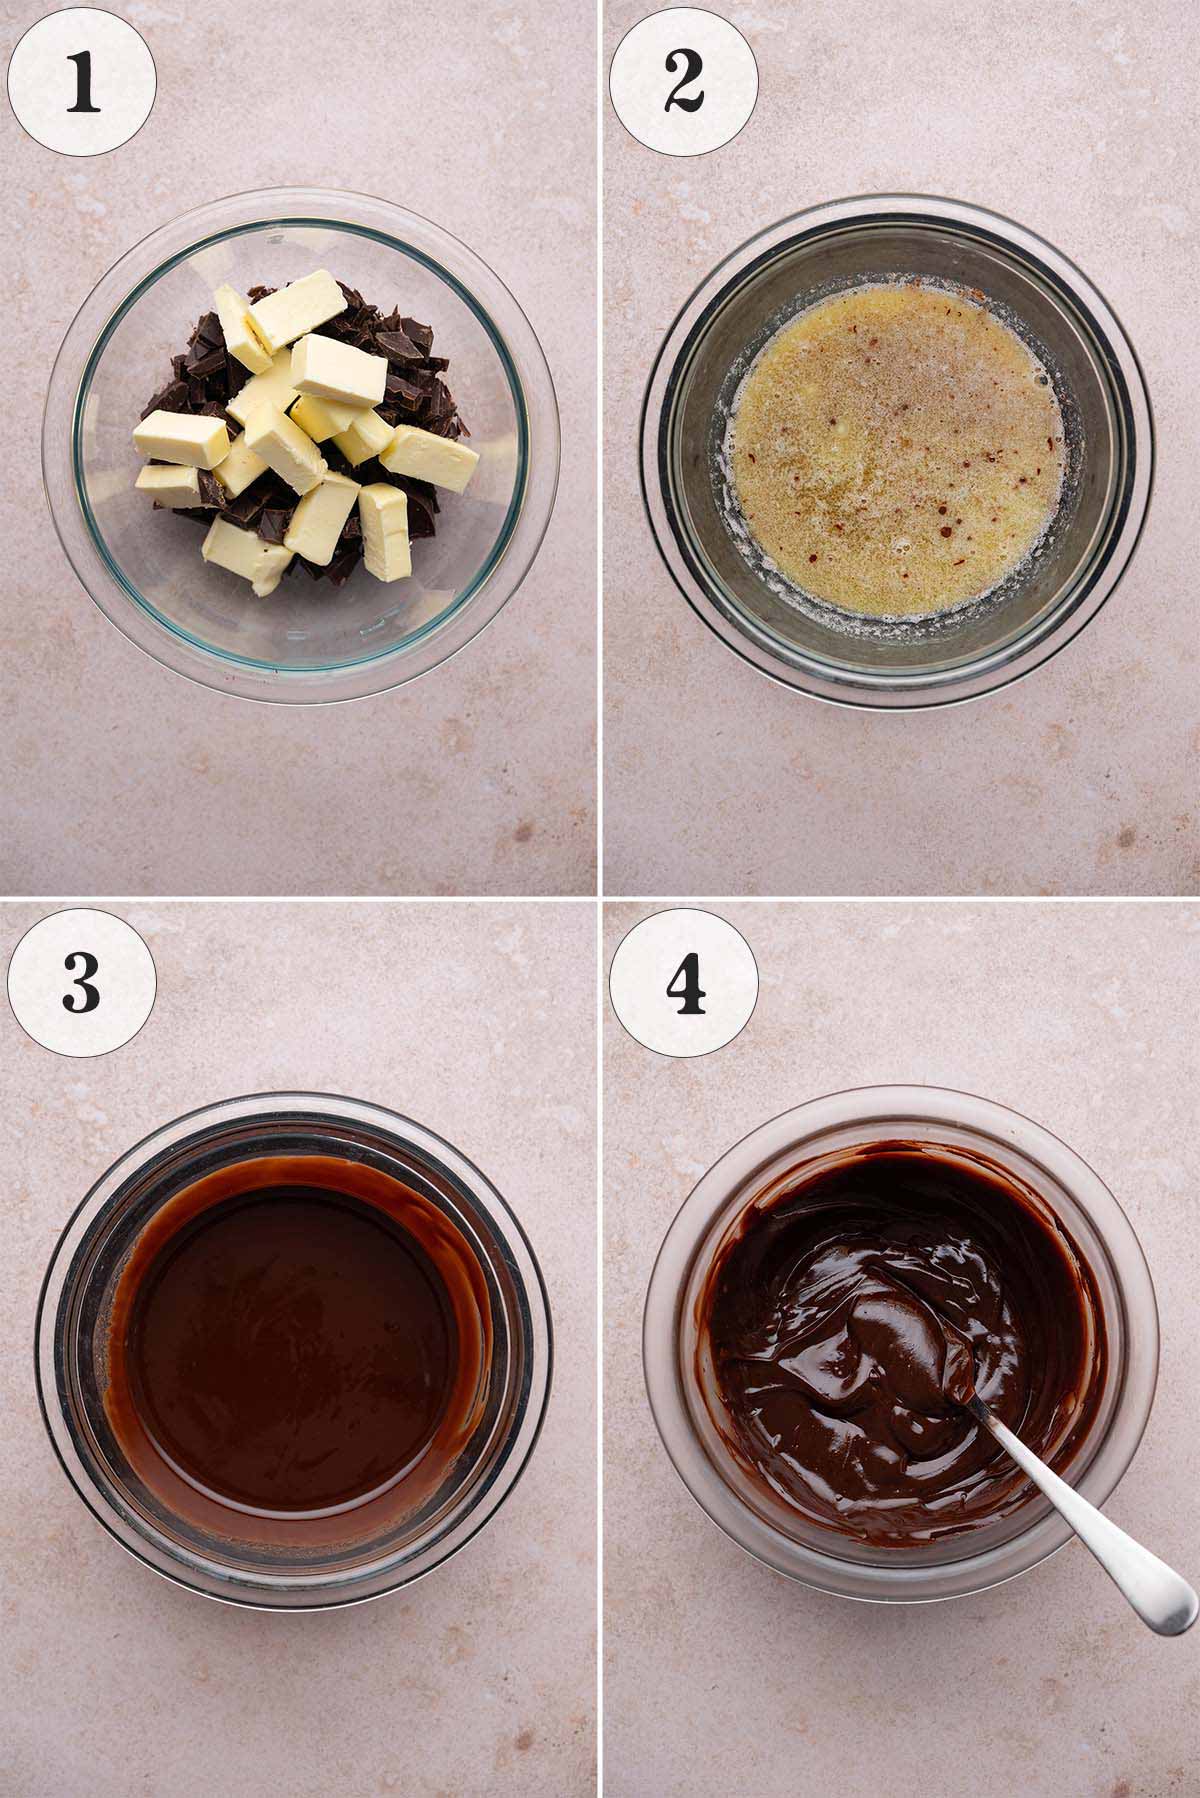
- Add the chocolate and butter to a microwave-safe bowl or the bowl of a double boiler.
- Melt them together in a microwave or double boiler (don’t overheat or it’ll take a long time to cool).
- Stir gently to combine.
- Cool to room temperature, making sure not to cool too much (we need it pourable, but slightly thickened).
Decorate the Cake

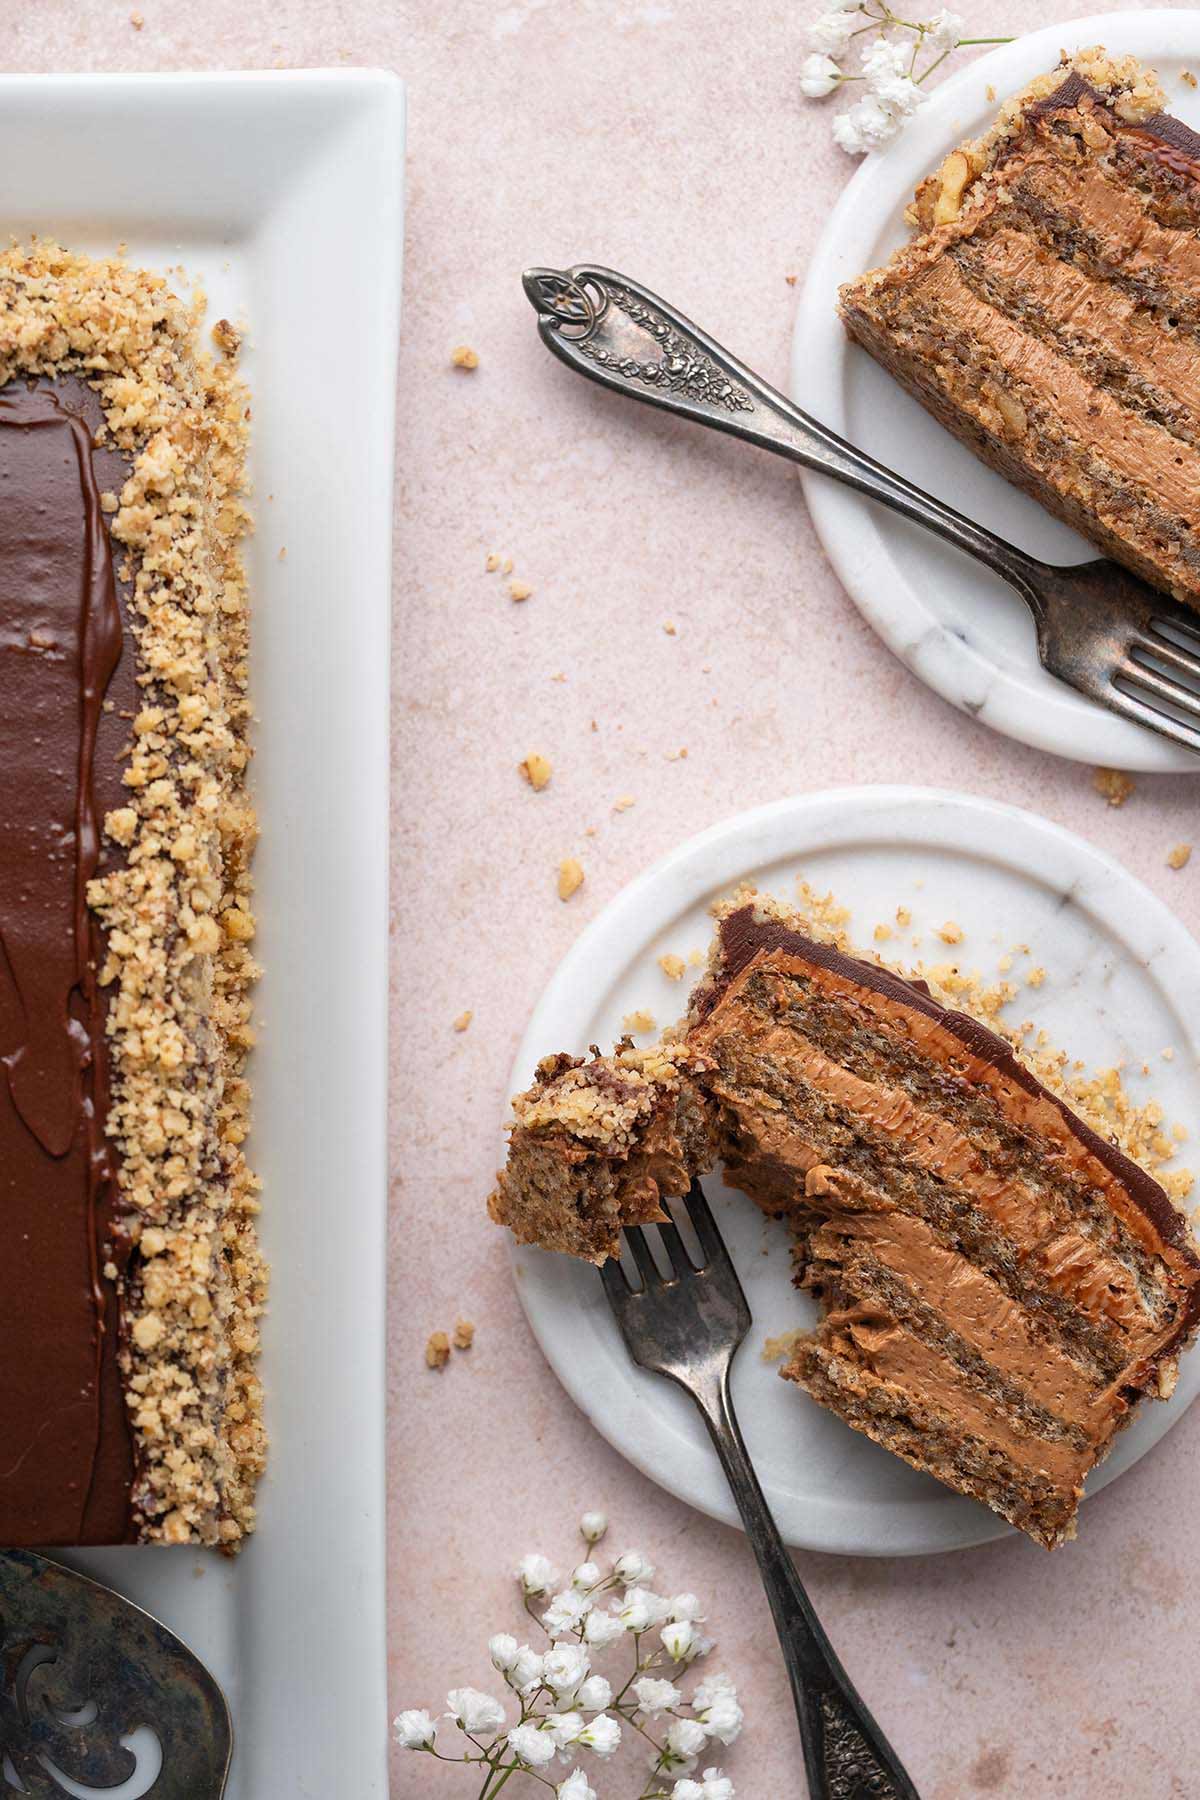
- Pour the chocolate coating on top of the cake. Use an offset spatula to spread it out evenly across the top, let it drip down the sides, and then use the spatula to spread it out evenly on the sides.
- Once the chocolate is partially set but still soft enough to press nuts into, if desired, decorate the top and/or sides by pressing finely chopped walnuts.
Storage
Store this cake well-wrapped in the fridge for up to 5 days or in the freezer for up to 2 months.
Pro Tips for the Best Reforma Torta
- Make it ahead. This cake tastes even better the next day!
- Use room temperature eggs. This helps with volume and stability when whipping.
- Let the chocolate custard cool completely. You don’t want it to melt the butter! And also, the butter should be slightly softened (but not fully melted) so it’s easy to whip.
- Chill before slicing. This cake slices beautifully when fully set.
Frequently Asked Questions
Reforma Torta stands out for its combination of rich, nutty sponge layers and a luxurious chocolate buttercream. Unlike traditional sponge cakes that often rely on flour for structure, this cake’s base is made primarily with ground walnuts and whipped egg whites, giving it a moist yet delicate crumb. The nutty flavor is intensified because we use very little flour. Combined with a velvety chocolate buttercream that’s made with egg yolks and real butter, this cake is a truly decadent experience.
Yes; in fact, it’s even better if you do. This cake improves as it rests, allowing the layers to meld and the flavors to deepen. You can make it one to two days in advance and store it in the fridge. Just be sure to cover it well to prevent it from drying out or absorbing other fridge odors. For the best texture, let it sit at room temperature for about 30 minutes before serving.
Dark chocolate (around 70%) is the most commonly used and authentic choice, and it’s my personal favorite as well. It brings a deep, bittersweet richness that balances perfectly with the sweet walnut layers. Milk chocolate can make the cake overly sweet and a bit cloying, so it’s usually avoided. For the buttercream, quality really matters, so opt for a chocolate bar over chocolate chips, which may contain stabilizers.
Yes, you can freeze Reforma Torta, but it’s best done in slices for easier thawing and serving. Wrap each slice tightly in plastic wrap, then place them in an airtight container or freezer bag. They’ll keep well for up to two months.
To serve, thaw overnight in the fridge, then bring to room temperature before enjoying. Keep in mind that while the flavor will hold up, the texture of the buttercream may soften slightly after freezing.
Traditional Reforma Torta uses walnuts, but this cake is also delicious with pecans, hazelnuts, or almonds.
More Decadent Cake Recipes to Try
Let’s Connect

Did you make this recipe? Please rate it and leave a comment below. You can also tag @anediblemosaic on social media.
To stay up-to-date, follow me on Facebook, Instagram, Pinterest, and Twitter!

Reforma Torta (Serbian Reform Cake Recipe)
Email This Recipe
Get this recipe link emailed straight to your inbox!
Equipment
Ingredients
Walnut Sponge Cake:
- 300 grams walnuts very finely chopped
- 3 tablespoons all-purpose flour
- 1/4 teaspoon salt
- 12 large egg whites
- 250 grams caster sugar also called superfine sugar (about 1 1/4 cups)
Chocolate Buttercream Frosting (For the Filling):
- 12 large egg yolks
- 250 grams caster sugar also called superfine sugar (about 1 1/4 cups)
- 2 teaspoons pure vanilla extract
- 1/4 teaspoon salt
- 1/4 teaspoon instant espresso powder dissolved in 1/2 teaspoon hot water (optional)
- 100 grams 70% dark chocolate finely chopped
- 250 grams unsalted butter slightly softened but not melted (about 1 cup + 1 tablespoon + 2 teaspoons)
Chocolate Ganache (For the Coating):
- 100 grams 70% dark chocolate chopped
- 5 tablespoons unsalted butter cut into pieces
Other:
- 1 cup walnuts finely chopped (optional; for decoration)
Instructions
Make the Walnut Sponge Cake:
- Preheat the oven to 350F. Line a half sheet pan with parchment paper. IMPORTANT: Don’t grease the parchment paper.
- Mix together the very finely chopped walnuts, flour, and salt in a bowl.
- Add the egg whites to a large bowl, and use a handheld electric mixer to beat until it starts to form soft peaks. While beating, add the sugar a little at a time until it forms stiff peaks.
- Gently fold the walnut mixture into the egg whites, being careful not to over-mix. IMPORTANT: You want to deflate the egg whites as little as possible.
- Spread the cake batter out onto he prepared baking tray. Bake until the cake springs back when pressed and the outside is starting to turn golden, about 25 to 35 minutes.
- Let the cake cool for 15 minutes, then run a paring knife around the outside of the cake, invert it onto a cooling rack, and slowly and carefully peel off the parchment paper. Cool completely (about 45 minutes more), then trim off the outside (so you have perfect edges) and cut the cake into 4 equal pieces (I make 3 horizontal cuts to end up with 4 rectangles of cake).
Make the Chocolate Buttercream Frosting:
- While the cake is baking, start making the filling.
- Add the egg yolks to the boil of a double boiler that’s not yet placed on its water bath, and while beating with a handheld electric mixer, add the sugar 1/4 cup at a time, beating until thickened, about 3 minutes. Transfer the bowl to a double boiler and cook until the mixture thickens and runs off the whisk in fluffy ribbons, about 20 minutes, whisking very frequently. Adjust the heat to try to keep the water in the double boiler at a gentle boil.
- Whisk in the vanilla, salt, and instant espresso powder. Add the chopped chocolate, whisking until melted. Once the chocolate is melted, remove from the heat and cool to room temperature. IMPORTANT: After removing from the heat, place a piece of plastic wrap directly on top of the chocolate mixture to prevent a skin from forming. (Once it’s cooled, it’ll look like a gloopy pudding.)
- Add the butter to a large bowl, and use a handheld electric mixer to beat well. Beat in 1/4 of the room temperature chocolate mixture into the butter at a time, thoroughly beating between each addition until it’s light and fluffy.
Assemble the Cake:
- Put 1 piece of cake onto a rectangular cake platter. Spread 1/5 (about 2/3 cup) of the chocolate cream evenly across it, and place the 2nd piece of cake on top. Spread 1/5 of the chocolate cream evenly across it, top with the 3rd piece of cake, spread on 1/5 of the chocolate cream, and place the 4th piece of cake on top. Spread the remaining chocolate cream evenly on the top and sides of the cake. Place the cake in the fridge to set while you make the chocolate coating.
Make the Chocolate Ganache:
- Melt the chocolate and butter together in a microwave or double boiler (don’t overheat it, or it’ll take a long time to cool). Cool to room temperature, making sure not to cool too much (we need it pourable, but slightly thickened).
Decorate the Cake:
- Pour the chocolate coating on top of the cake. Use an offset spatula to spread it out evenly across the top, let it drip down the sides, and then use the spatula to spread it out evenly on the sides.
- Once the chocolate is partially set but still soft enough to press nuts into, if desired, decorate the top and/or sides by pressing finely chopped walnuts.
Notes
- Storage: Store this cake well-wrapped in the fridge for up to 5 days or in the freezer for up to 2 months.
- To Freeze: Cut into slices, wrap each slice tightly in plastic wrap, then place them in an airtight container or freezer bag. They’ll keep well for up to two months. To serve, thaw overnight in the fridge, then bring to room temperature before enjoying. Keep in mind that while the flavor will hold up, the texture of the buttercream may soften slightly after freezing.
Nutrition
Nutritional information is automatically calculated and should be used as an approximate.
Share it with me on Instagram and leave a comment to let me know your thoughts!


I’m the writer, recipe developer, photographer, and food stylist behind this blog. I love finding the human connection through something we all do every day: eat! Food is a common ground that we can all relate to, and our tables tell a story. It’s my goal to inspire you to get in the kitchen, try something new, and find a favorite you didn’t know you had.
Free Bonus


This recipe is a version of the Reform Cake. Few extra ingredients are listed here which are not part of original recipes. But most importantly. We (Serbians, Hungarians) absolutely do not put salt into this recepie ever. That for sure changes the taste palette and turns it into an American version of. The steps are perfect.
Nelli, Thank you for your comment, I’m happy you approve! Yes, the little bit of salt here helps create a balanced flavor profile that isn’t so cloyingly sweet.
Thanks so much for this post. My grandmother gave me her recipe for this cake but I never had the steps! I can’t wait to try! This cake brings back so many memories of sitting in my grandmas kitchen in Serbia.
This cake is exquisite — every bite is a delight. It brings back memories from my childhood in Eastern Europe. Thank you so much, Faith.
Magda
Magda, Thank you so much for your lovely comment, it made my day. I’m so happy you enjoyed this!
I want to try this cake and would like to know the size of the baking pan.
Thank you
Magda, A half sheet pan is 18 inches long by 13 inches wide by 1 inch deep. I hope you enjoy the cake! :)
Thank you very much. Will try it this weekend.
Magda
Now that’s a real show-stopper! The layers are stunning and the flavors are unbeatable.