

This post may contain affiliate links, view our disclosure.
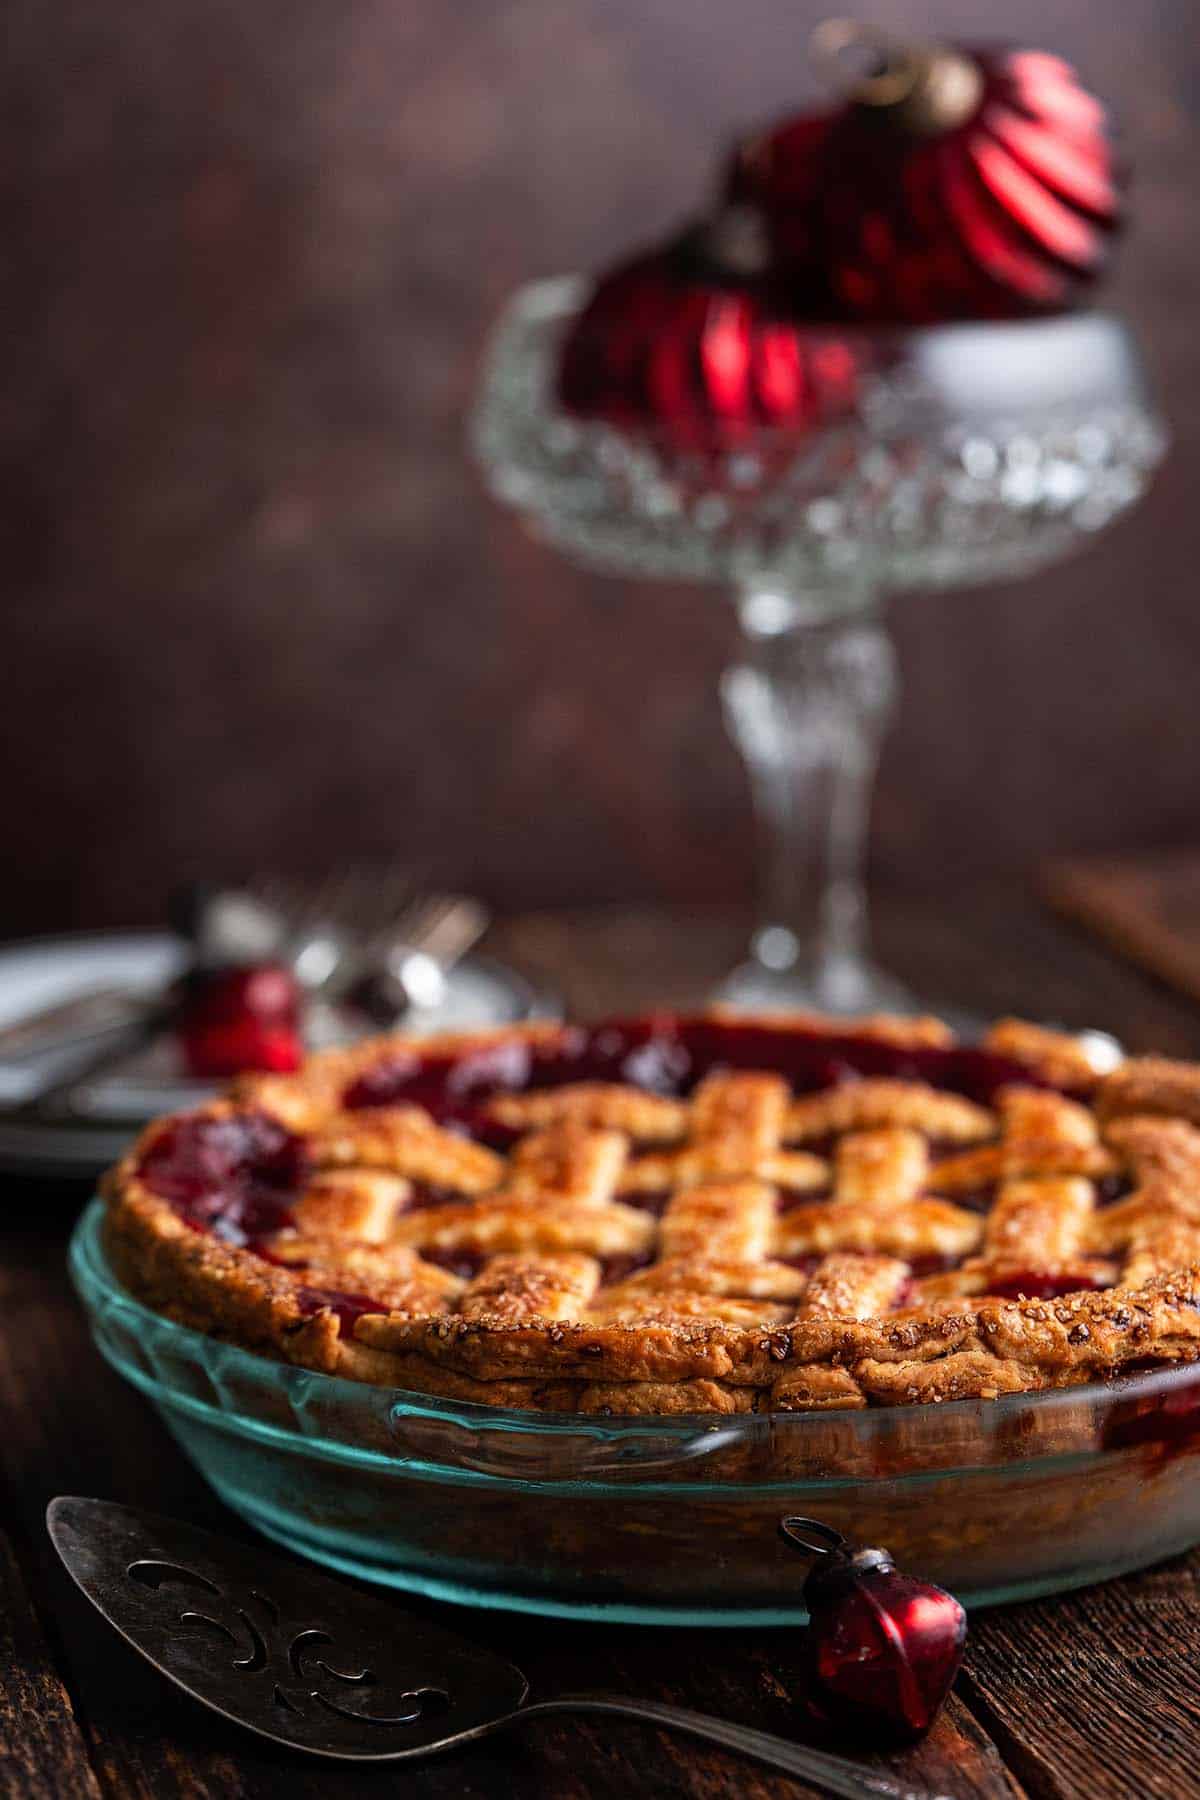
This lattice-topped cranberry pie is laced with warm Christmas spices and has a sweet, slightly tart flavor and a rich, flaky butter crust. It’s festive for the holiday season and a lovely dessert for Thanksgiving, Christmas, or New Years!

Recently I had the idea to make a cranberry pie. And once it was there, I just couldn’t shake the thought, lol! Not apple pie with cranberries, Nantucket pie (which is really just cake with cranberries that’s cooked in a pie plate!), cranberry cream pie, or even cranberry cheesecake.
Just a good old-fashioned pie with cranberries! Picture a classic apple or cherry pie, but with cranberries as the star of the show. Complete with a flaky butter crust and sweet spiced fruit filling.

I was torn between a few different ideas for the pie topping. I first considered a crumbly streusel topping (something similar to French apple pie or Dutch apple pie), mostly because cranberries are tart and the added sweetness would help with that.
But then the idea of a lattice topped pie won out. I knew the color of the filling would be a deep, rich shade of red and I wanted to showcase that, not cover it up with a bunch of crumbs, lol. So, with the idea of a lattice cranberry pie in mind, I set about testing the recipe.

I always use the same all-butter crust recipe (it’s the one that I used for my blueberry pie), so I was all set there. But then there was the filling. Now, there are two main things to keep in mind with pie filling: 1) it needs the perfect sweetness level, and 2) it shouldn’t be too runny or too gluey.
That sounds easy as pie, right? The only issue is that cranberries are a little tricky to work with. They are very tart (borderline bitter), and so I knew the pie would need more sugar than normal. Additionally, cranberries have a lot of liquid, so I anticipated the pie filling might need some finesse to not be runny.
My first try was abysmal: tart enough to make you pucker and more soup than pie. However, a couple tries later, this beauty ensued.
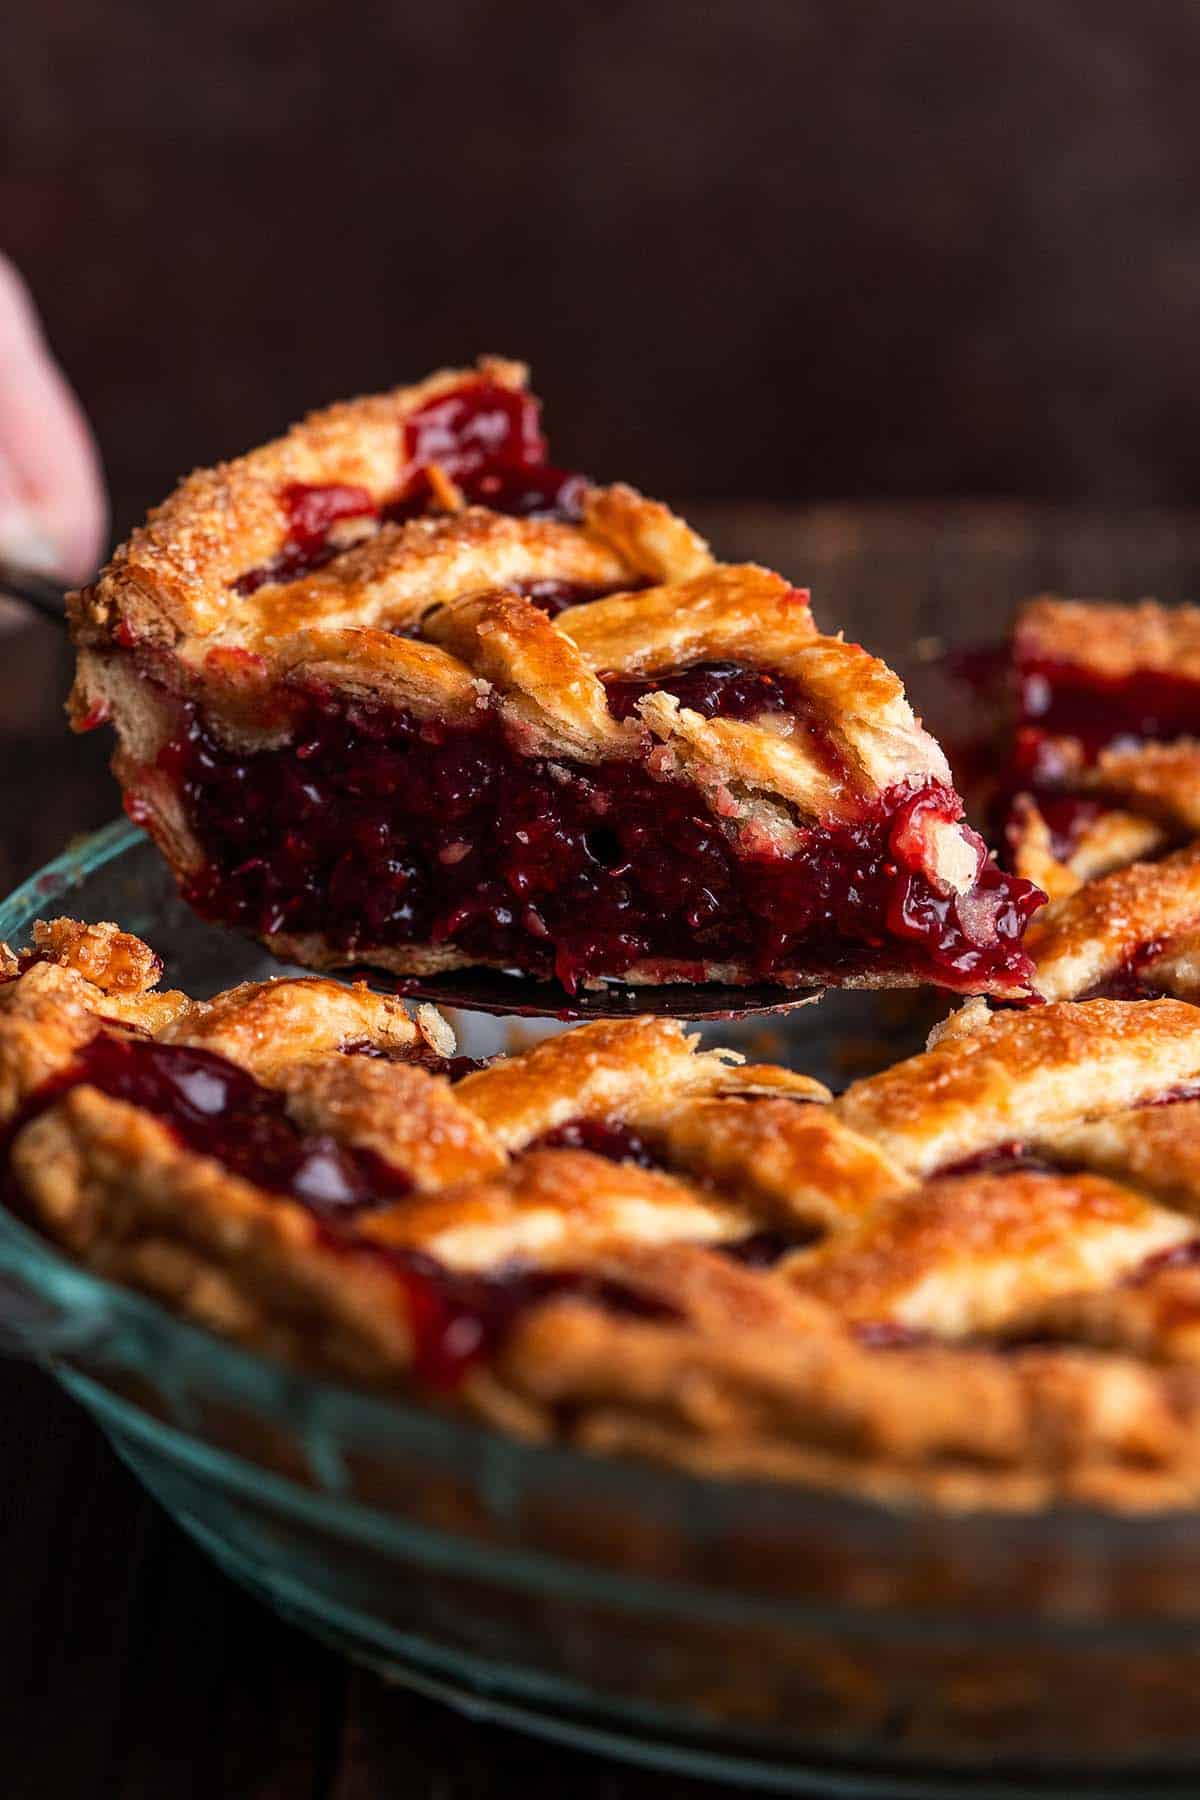
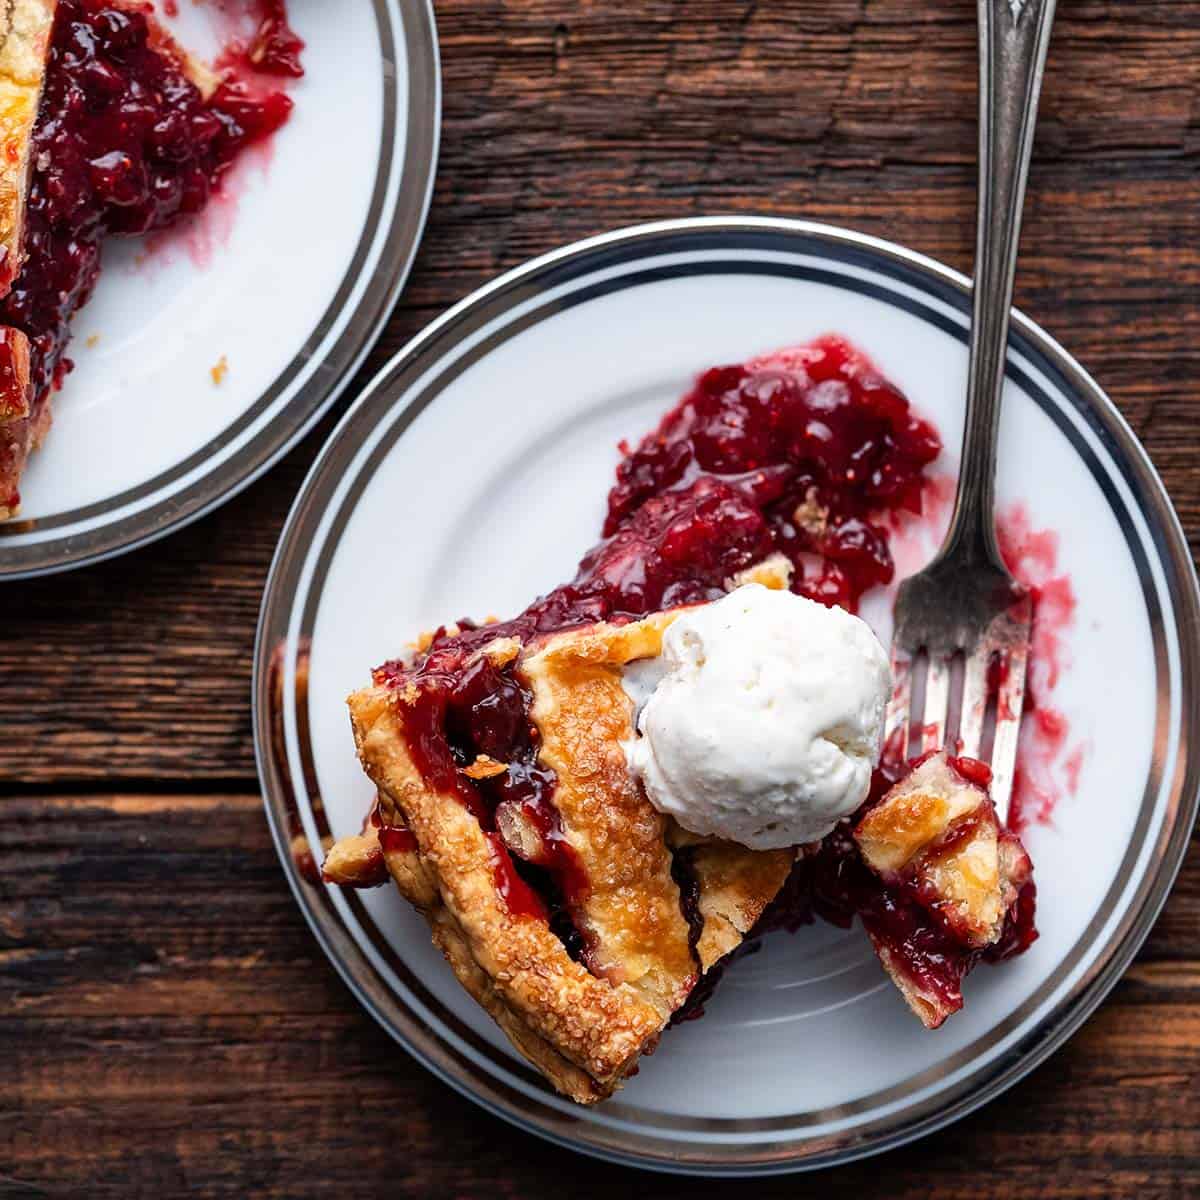
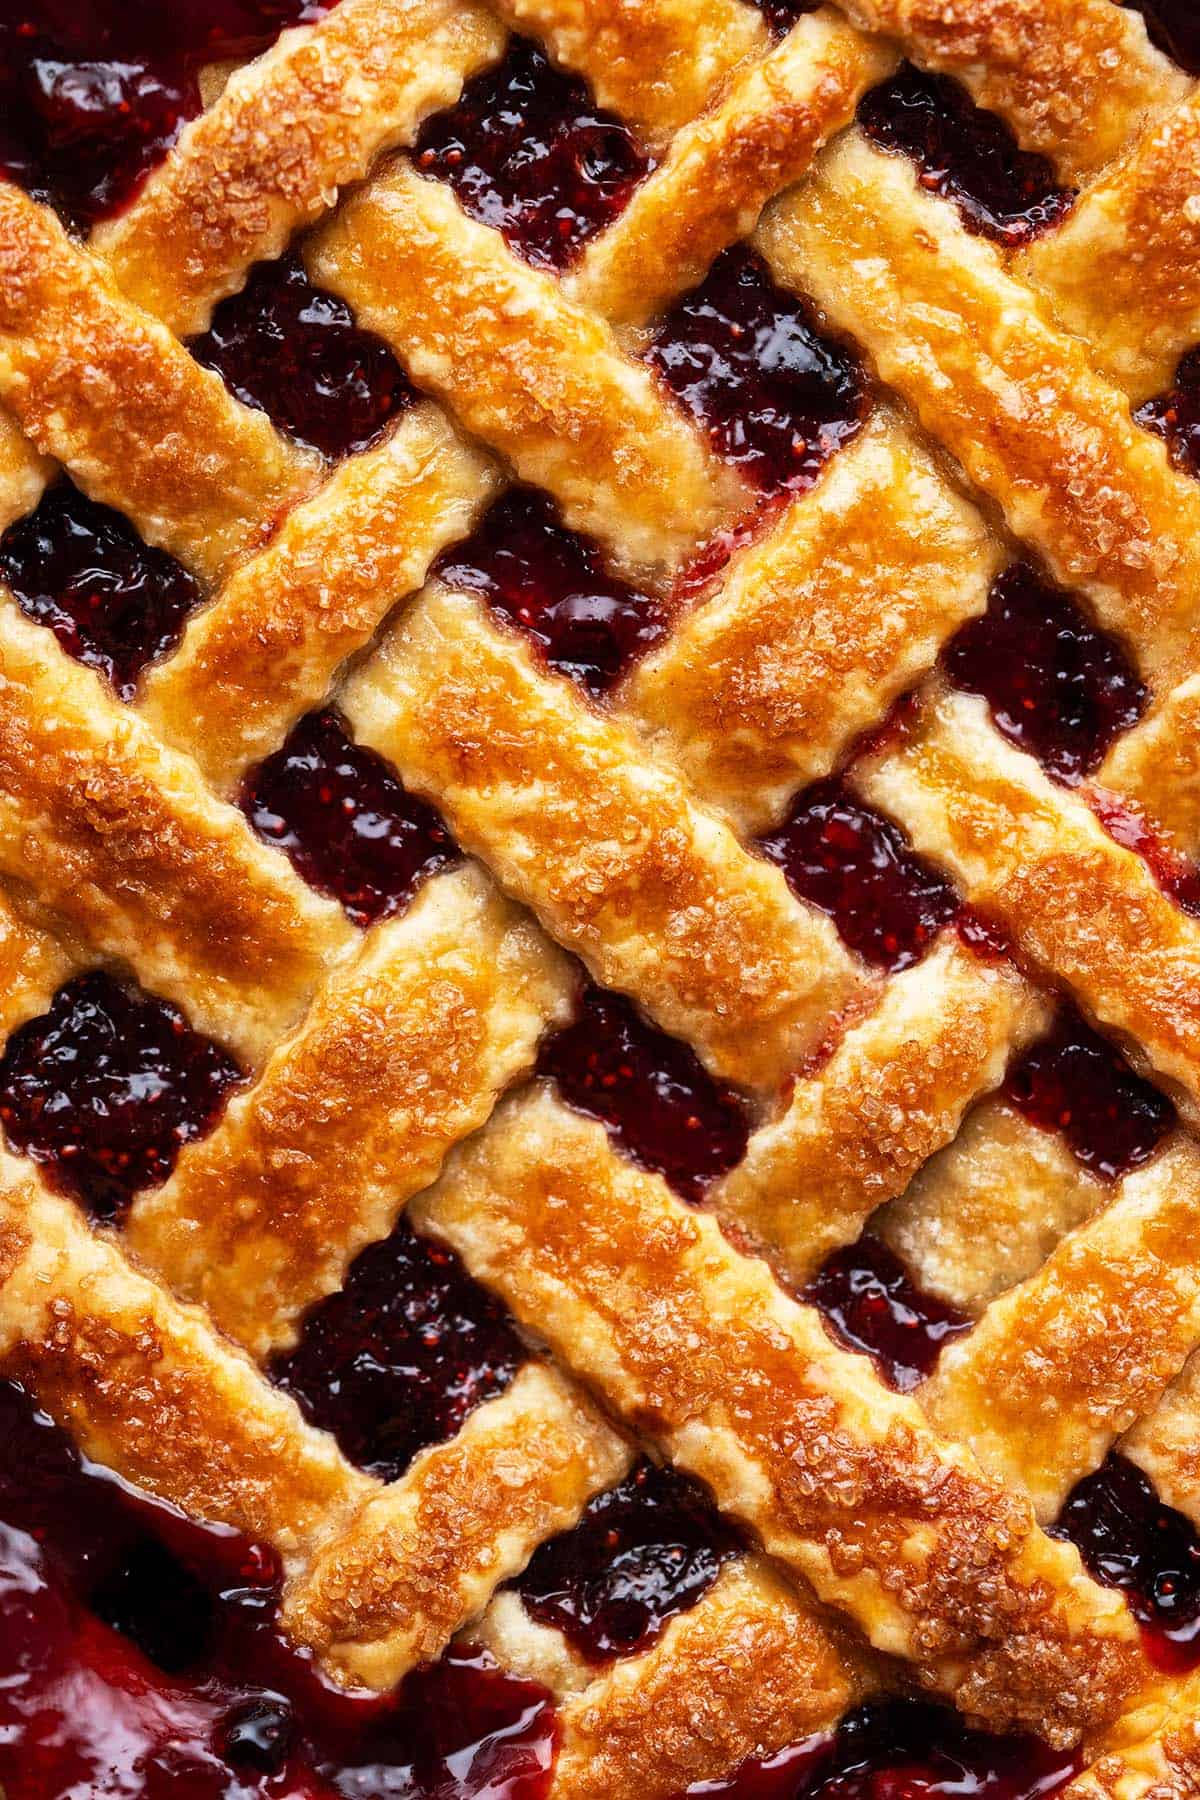
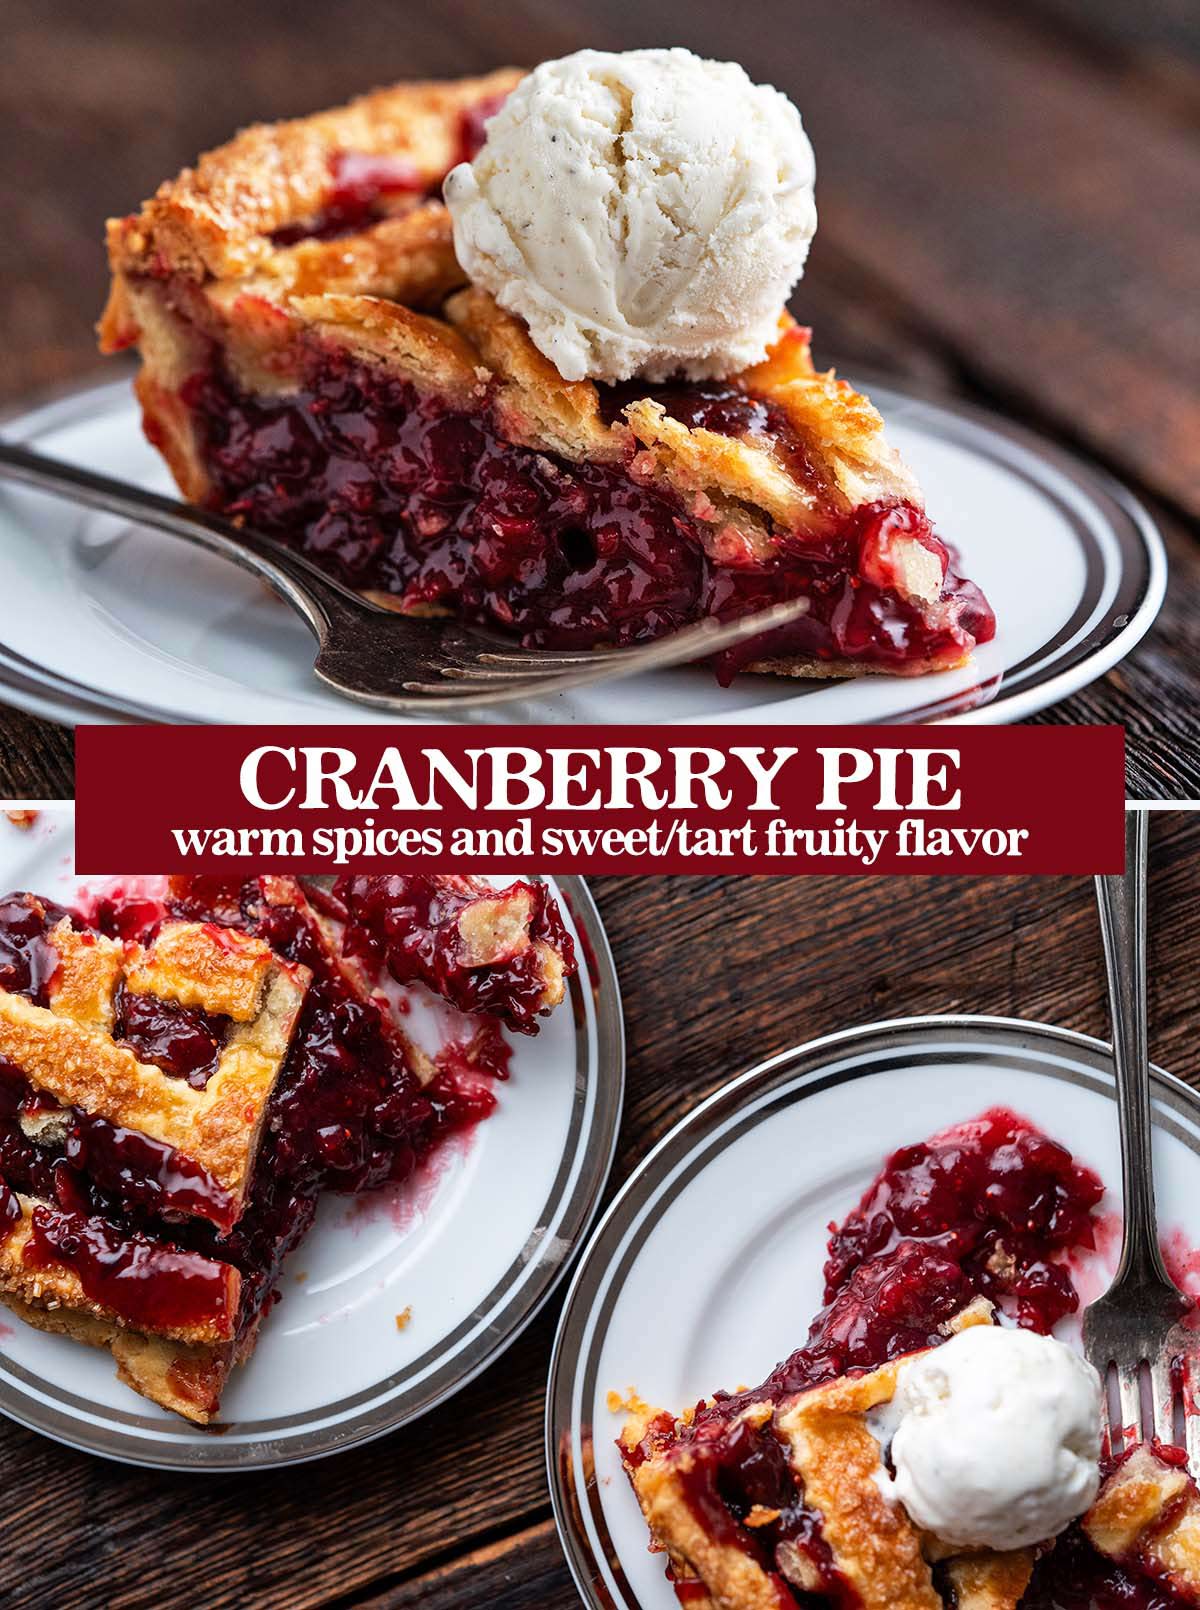
This cranberry pie recipe is the perfect balance of sweet and slightly tart flavor. (I didn’t want to add too much sugar and lose the natural integrity of cranberry’s sweet/tartness.) It’s subtly spiced with warm Christmas spices, and the top sparkles, thanks to egg wash and a sprinkling of turbinado sugar. Talk about holiday bling!
The filling is perfectly set: it’s not runny, but it’s not too stiff. The fruity filling oozes in just the right way. And because of the pretty lattice top, you can see the gorgeous red filling.
If you enjoy a holiday baking project and want to try something a little different, I highly recommend this. It works well as a Thanksgiving pie, and it’s also a lovely Christmas dessert. Or make it to ring in the New Year!
If you like your sweets on the extra sweet side and you’re worried about this pie being too tart, serve it topped with a scoop of vanilla ice cream or a generous dollop of sweetened whipped cream. Easy as pie.

Ingredients in Cranberry Pie with Fresh Cranberries and Homemade Pie Crust
Breaking It Down
Ingredients Explained
In this section I explain the ingredients and give substitution ideas where applicable. For the full recipe (including the ingredient amounts), see the recipe card below.
Cranberry Pie Filling Ingredients
- Fresh cranberries – You’ll need two 12-ounce bags of cranberries, which is about 6 cups of cranberries; frozen cranberries will also work here.
- Sugar – Use regular granulated white sugar in this recipe; if you want your pie on the sweeter side, you can increase the sugar to 4 cups.
- All-purpose flour – We use a blend of flour and cornstarch to help thicken our fruity cranberry pie filling. I did a lot of experimenting with this recipe and using a 2:1 mix of flour:cornstarch worked like a charm.
- Cornstarch – Cranberries naturally contain a lot of liquid, so we use both flour and cornstarch to make sure our pie isn’t soupy.
- Salt – A natural flavor enhancer, a little bit of salt helps bring out the flavors of everything else.
- Cinnamon, ginger, allspice, and cloves – This festive blend of warm spices makes sure this cranberry pie is perfect for the holidays. It will make your whole house smell like Christmas as it bakes!
All-Butter Pie Crust Ingredients
- All-purpose flour – This is the base of our pie crust.
- Salt – Salt ensures that our delicious short crust isn’t bland, and takes pastry crust from mediocre to “wow”. Don’t skip the salt, and don’t skimp on the salt, friends.
- Unsalted butter – For the best flavor, use grass-fed butter if you can, but don’t worry if you can’t. Also, if you only have salted butter, you can use it and omit the added salt.
- Ice water – Make sure your water is icy cold so it keeps the butter chilled for the flakiest crust.
Other Ingredients
- Egg – We lightly beat the egg with 1 tablespoon water and brush it on the top crust to give the crust a deep golden color and shine.
- Turbinado sugar – For the top; this adds a little extra sweetness and pretty sparkle.

How to Make Cranberry Pie
This recipe isn’t difficult, but there are multiple steps because we’re making both the filling and the dough from scratch, and both of them need to be chilled. To help you plan, please be sure to read through the entire recipe before starting.
Step 1: Make the Cranberry Filling
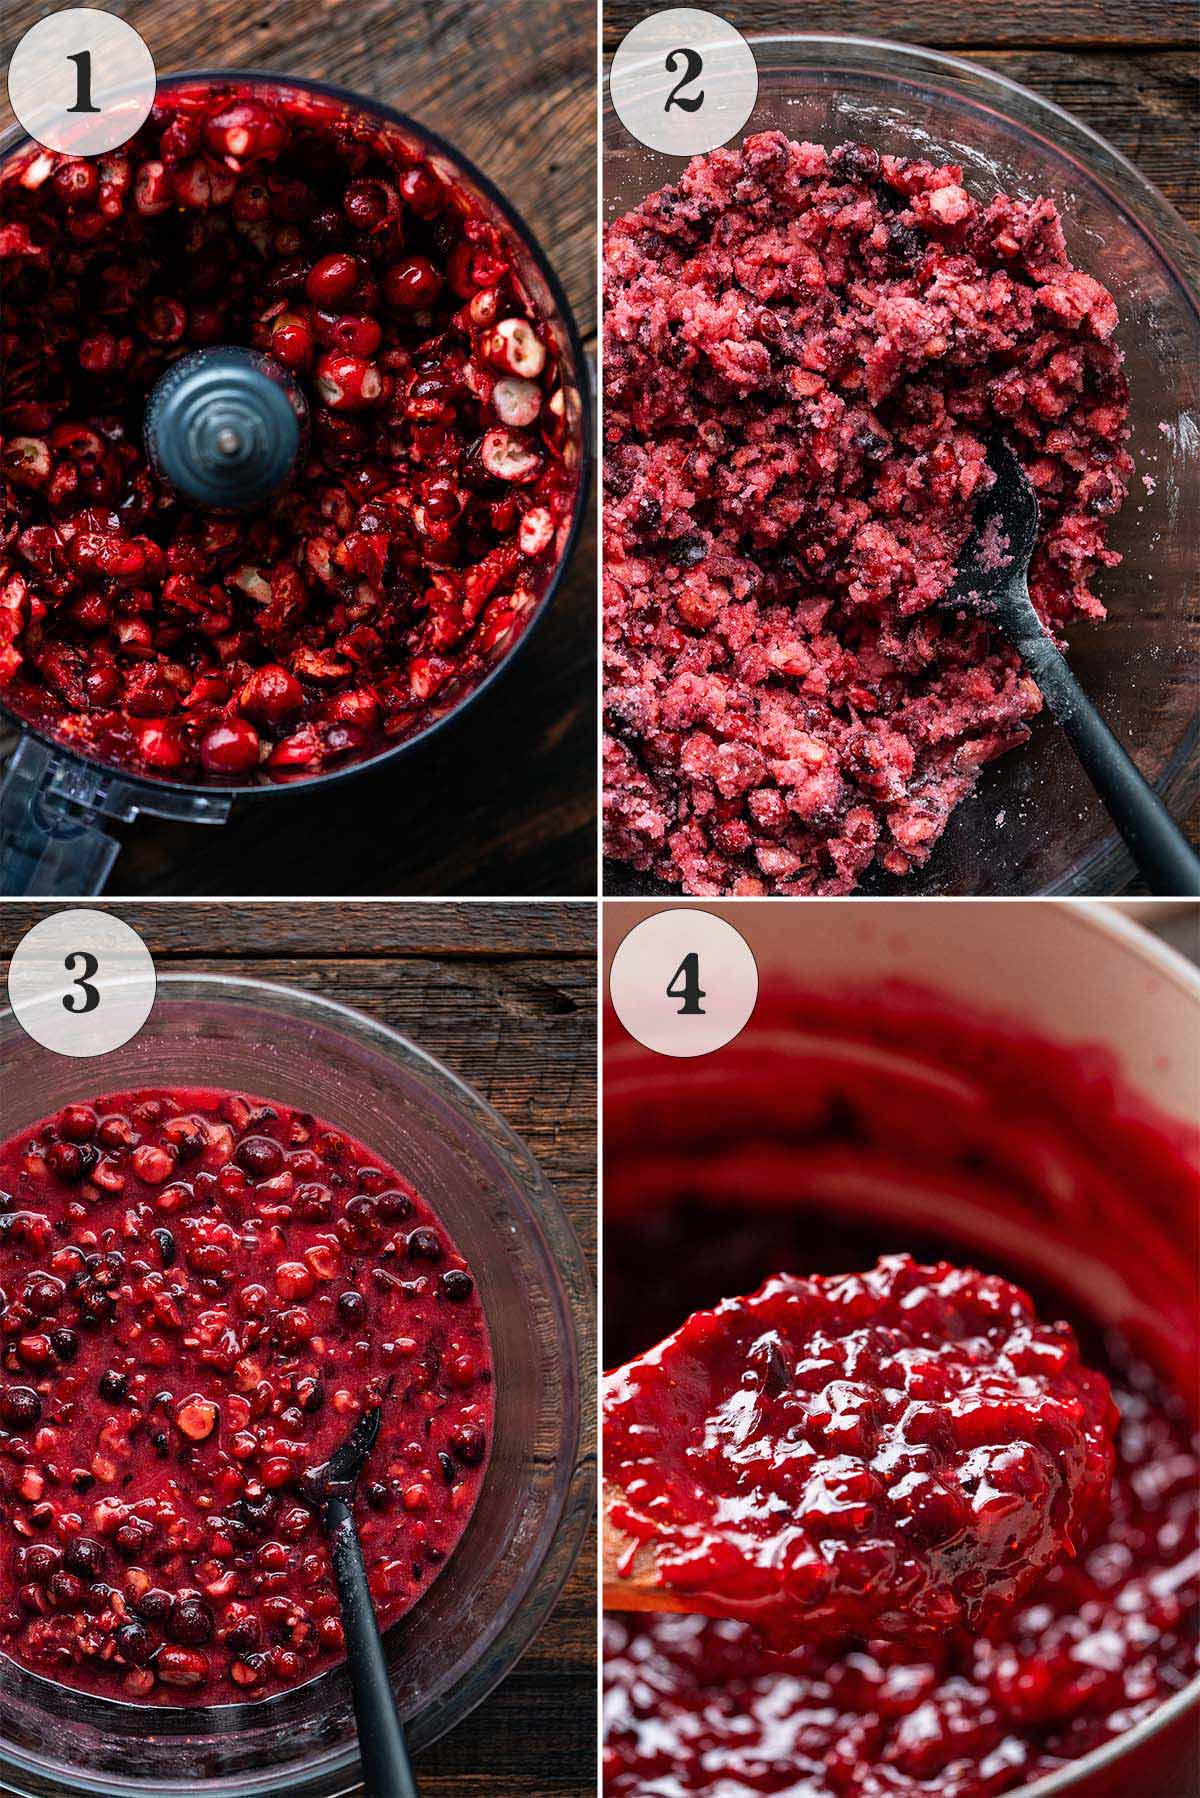
- Chop. Add the cranberries to a food processor and pulse until coarsely chopped (or chop them by hand).
- Combine. Add the chopped cranberries, sugar, flour, cornstarch, and salt to a large bowl and toss well to coat.
- Macerate. Let the cranberries sit like this until they’re liquidy (they will release a lot of juice!), about 45 minutes to 1 hour.
- Cook and cool. Add the cranberry mixture to a large pot over medium heat. Cook until the mixture is thickened and jammy (it should have a consistency similar to cherry pie filling), about 5 to 8 minutes. Don’t overcook it at this stage because it’ll thicken more as it cools and as it bakes. Let the filling cool to room temperature, about 2 hours (better yet, let it cool to room temperature and then chill it in the fridge overnight).
Step 2: Make the Pie Dough
While the filling cools, make the dough for the crust.
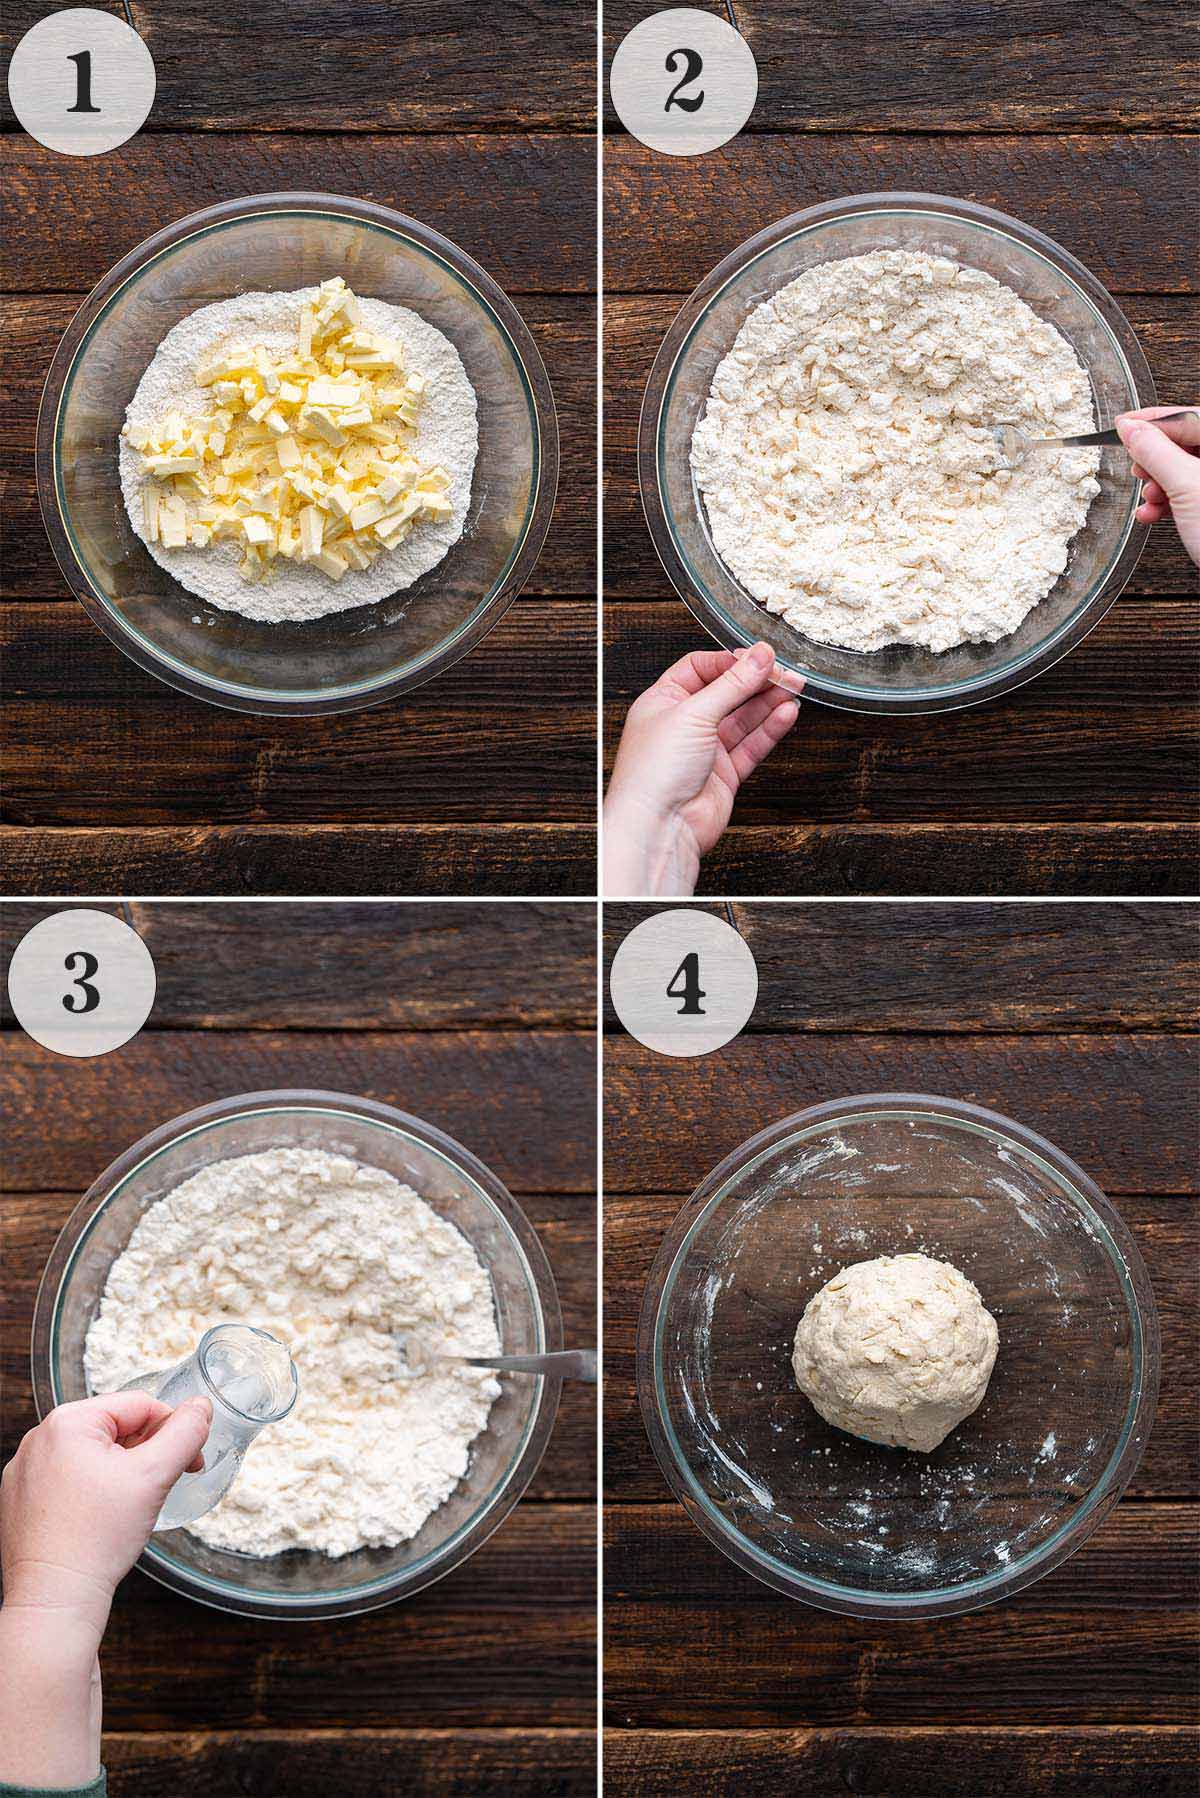
- Whisk together the flour and salt in a large bowl. Cut in the butter with a fork, a pastry cutter, 2 butter knives, or your fingertips.
- It should look crumbly, with some pieces of butter the size of small peas.
- Drizzle the water in a little at a time, mixing as you go (you can use a fork to mix, but it works best mixing with your fingertips).
- Add just enough water so it comes together to form a ball of dough (you may need more or less water). Divide the dough into 2 equal parts. Roll each into a ball, flatten each ball slightly into a disk, wrap them in plastic wrap, and refrigerate until chilled, at least 30 minutes (or up to 3 days).
Step 3: Assemble the Pie

- Roll out the first disk of dough for the bottom crust. Place 1 disk of dough onto a floured work surface. Working from the center out, roll the dough out to a circle about 11 to 12 inches in diameter.
- Put the bottom crust in the pie pan. Fold the dough over onto itself, pick it up, and transfer it to a pie plate. Unfold the dough and push it into the bottom and up the sides of the pie plate. Use a fork to poke several holes in the bottom of the pie crust.
- Add the filling. Evenly spread the cooled cranberry filling on the dough in the pie pan. Pop this into the fridge while you roll out the second disk of dough.
- Preheat the oven. It needs to be at 450F for the first part of baking. Also, if you don’t have a pie drip catcher, I recommend putting 1 rack in the center of the oven and putting 1 rack right below it. On the bottom rack, place a foil-lined baking tray (or just a large piece of aluminum foil) to catch any drippings so they don’t burn on the bottom of your oven.
- Roll out the second disk of dough for the lattice top. It needs to be a circle about 12 inches in diameter, the same way you rolled out the first disk of dough. Cut the dough into about 3/4-inch strips (I used a fluted pastry wheel).
- Weave the lattice top. For the lattice top, place 5 to 7 dough strips parallel across the pie, leaving about 1/2 to 3/4-inch between each strip. Fold half of the strips up. To get the woven lattice effect, lay a strip of dough perpendicular to the parallel dough strips, and unfold the folded strips over the perpendicular strip. Continue this way for a woven look. (And remember, it doesn’t have to be perfect; your pie will be absolutely delicious either way. You’re making a homemade pie, be proud of that! You’re basically a rock star.) Trim the dough strips, and tuck the outside of the dough under. Use your fingers to flute the edges, or crimp them with a fork.
- Egg wash. Lightly brush the top lattice with egg wash, and sprinkle on the turbinado sugar.
Step 4: Bake and Cool the Pie
- Bake. Bake the pie (uncovered) in a preheated 450F oven for 10 minutes. Remove the pie from the oven and immediately turn the oven down to 350F. Cover the top of the pie with foil (basically just drape it over the top and lightly fold it over the sides), and bake at 350F until the pie is golden on the top and bottom and bubbling in the center (this takes about 1 hour 30 minutes to 1 hour 45 minutes). Check your pie at the 1 hour mark and every 10 to 15 minutes after. If by the 1 hour 10 minute mark the top still isn’t turning golden, remove the foil and bake it uncovered.
- Cool. So it can fully set, let the pie cool to room temperature (or at least until it’s lukewarm) before slicing and serving, about 3 hours.

Storage Tips
Once your pie cools to room temperature, wrap it well and store it on the counter for up to 2 days or in the fridge for up to 4 days.
Pro Tips For the Best Cranberry Pie
- You can bake the pie once the cranberry filling is cool. However, for best results (in terms of flavor and texture), I recommend letting the filling cool to room temperature and then chilling it in the fridge overnight before baking the pie. This allows the flavors to blend beautifully, and helps it thicken perfectly.
- Take your time with the lattice top. It looks complicated, but I promise it’s not! And if you prefer, feel free to make a regular double-crust pie instead of lattice crust.
- After the first day, I like to reheat pie before serving. To reheat a slice of pie, put it on a baking tray in a preheated 350F oven until warm, about 10 to 15 minutes (depending on whether it was chilled or not). Check it around the 10 minute mark and cover it loosely with foil if the top is starting to brown too much but the filling isn’t warm yet.
Cranberry Pie Recipe FAQs
Yes! Like many types of fruit, fresh cranberries should be rinsed before baking. I find the easiest way to do this is to put them into a colander and rinse them under cool running water. You should also remove and discard any bruised or shriveled cranberries.
That depends on the particular recipe you’re making; it should say if you need to chop the cranberries or not.
For this pie recipe, we chop the cranberries (in a food processor, but you can also do it by hand) for the cranberry filling. This is because we need them to release their liquid so we can cook it down and our pie filling won’t be too runny. Otherwise, we run the risk of pie soup!
Again, that will depend on the recipe. Each recipe should say if you need to cook the cranberries before baking.
Here, we cook the cranberry filling first. This helps make sure our cranberries cook down into the perfect pie filling. We’re aiming for balance: a filling that’s gelled enough to set properly, but still oozes juicy fruit.
If you chop the cranberries and toss them with sugar, flour, cornstarch, and salt, they will release their liquid beautifully. However, if you bake it like that, your pie will be soupy. (And if you get rid of the juices, your pie will be too tart!) This is why we allow the cranberries to release their juices, and then cook it down into a beautiful garnet-colored pie filling.
More Cranberry Desserts to Try

Let’s Connect

Did you make this recipe? Please rate it and leave a comment below. You can also tag @anediblemosaic on social media.
To stay up-to-date, follow me on Facebook, Instagram, Pinterest, and Twitter!

Cranberry Pie Recipe
Email This Recipe
Get this recipe link emailed straight to your inbox!
Equipment
- Standard 9-inch pie pan preferably glass so you can check the bottom crust
Ingredients
Cranberry Filling:
- 24 ounces fresh cranberries (about 6 cups cranberries or 2 12-ounce bags of cranberries; frozen cranberries will also work)
- 3 1/2 cups granulated white sugar
- 1/2 cup all-purpose flour
- 1/4 cup cornstarch
- 1/2 teaspoon salt
- 1 teaspoon ground cinnamon
- 3/4 teaspoon ground ginger
- 1/4 teaspoon ground allspice
- 1/8 teaspoon ground cloves
Crust:
- 2 1/2 cups all-purpose flour
- 3/4 teaspoon salt
- 1 cup unsalted butter chilled and diced
- 3/4 cup water
Other:
- 1 egg lightly beaten with 1 tablespoon water (for egg wash)
- 2 tablespoons turbinado sugar for the top
Instructions
To Make the Cranberry Filling:
- Chop. Add the cranberries to a food processor and pulse until coarsely chopped (or chop them by hand).
- Macerate. Add the chopped cranberries, sugar, flour, cornstarch, and salt to a large bowl and toss well to coat. Let the cranberries sit like this until they’re liquidy (they will release a lot of juice!), about 45 minutes to 1 hour.
- Cook. Add the cranberry mixture to a large pot over medium heat. Cook until the mixture is thickened and jammy (it should have a consistency similar to cherry pie filling), about 5 to 8 minutes. Don’t overcook it at this stage because it’ll thicken more as it cools and as it bakes.
- Cool. Let the filling cool to room temperature, 2 hours (better yet, let it cool to room temperature and then chill it in the fridge overnight).
To Make the Dough For the Pie Crust:
- Make the dough while the filling cools. Whisk together the flour and salt in a large bowl. Cut in the butter with a fork, a pastry cutter, 2 butter knives, or your fingertips. It should look crumbly, with some pieces of butter the size of small peas. Drizzle the water in a little at a time, mixing as you go (you can use a fork to mix, but it works best mixing with your fingertips). Add just enough water so it comes together to form a ball of dough (you may need more or less water).
- Chill the dough. Divide the dough into 2 equal parts. Roll each into a ball, flatten each ball slightly into a disk, wrap them in plastic wrap, and refrigerate until chilled, at least 30 minutes (or up to 3 days).
To Assemble the Pie:
- Roll out the first disk of dough for the bottom crust. Place 1 disk of dough onto a floured work surface. Working from the center out, roll the dough out to a circle about 11 to 12 inches in diameter.
- Put the bottom crust in the pie pan. Fold the dough over onto itself, pick it up, and transfer it to a pie plate. Unfold the dough and push it into the bottom and up the sides of the pie plate. Use a fork to poke several holes in the bottom of the pie crust.
- Add the filling. Evenly spread the cooled cranberry filling on the dough in the pie pan. Pop this into the fridge while you roll out the second disk of dough.
- Preheat the oven. It needs to be at 450F for the first part of baking. Also, if you don't have a pie drip catcher, I recommend putting 1 rack in the center of the oven and putting 1 rack right below it. On the bottom rack, place a foil-lined baking tray (or just a large piece of aluminum foil) to catch any drippings so they don’t burn on the bottom of your oven.
- Roll out the second disk of dough for the lattice top. Roll out the second disk of dough to a circle about 12 inches in diameter the same way you rolled out the first disk of dough. Cut the dough into about 3/4-inch strips (I used a fluted pastry wheel).
- Weave the lattice top. For the lattice top, place 5 to 7 dough strips parallel across the pie, leaving about 1/2 to 3/4-inch between each strip. Fold half of the strips up. To get the woven lattice effect, lay a strip of dough perpendicular to the parallel dough strips, and unfold the folded strips over the perpendicular strip. Continue this way for a woven look. (And remember, it doesn’t have to be perfect; your pie will be absolutely delicious either way. You’re making a homemade pie, be proud of that! You’re basically a rock star.) Trim the dough strips, and tuck the outside of the dough under. Use your fingers to flute the edges, or crimp them with a fork.
- Egg wash. Lightly brush the top lattice with eggwash, and sprinkle on the turbinado sugar.
To Bake and Serve:
- Bake. Bake the pie (uncovered) in a preheated 450F oven for 10 minutes. Remove the pie from the oven and immediately turn the oven down to 350F. Cover the top of the pie with foil (basically just drape it over the top and lightly fold it over the sides), and bake at 350F until the pie is golden on the top and bottom and bubbling in the center (this takes about 1 hour 30 minutes to 1 hour 45 minutes). Check your pie at the 1 hour mark and every 10 to 15 minutes after. If by the 1 hour 10 minute mark the top still isn’t turning golden, remove the foil and bake it uncovered.
- Cool. So it can fully set, let the pie cool to room temperature (or at least until it's lukewarm) before slicing and serving, about 3 hours.
Notes
- Storage: Once your pie is cooled to room temperature, wrap it well and store it on the counter for up to 2 days or in the fridge for up to 4 days.
- Reheating: After the first day, I like to reheat pie before serving. To reheat a slice of pie, put it on a baking tray in a preheated 350F oven until warm, about 10 to 15 minutes (depending on whether it was chilled or not). Check it around the 10 minute mark and cover it loosely with foil if the top is starting to brown too much but the filling isn’t warm yet.
- Pie Pan: I like to use a glass pie plate because I can check on the bottom crust as well as the top crust. No soggy bottoms here!
- Recipe Yield and Serving Size: This pie makes 1 standard 9-inch pie, or 12 servings. The dough recipe is enough for a double crust, or a crust on the bottom with a lattice on top (or a regular top crust instead of a lattice if you prefer).
- Sweetness Level: As you might expect because this is a cranberry pie, this isn’t overly sweet. This pie has a more balanced sweet/tart flavor that still lets the cranberries shine. If you want your pie on the sweeter side, you can increase the sugar to 4 cups.
Nutrition
Nutritional information is automatically calculated and should be used as an approximate.
Share it with me on Instagram and leave a comment to let me know your thoughts!


I’m the writer, recipe developer, photographer, and food stylist behind this blog. I love finding the human connection through something we all do every day: eat! Food is a common ground that we can all relate to, and our tables tell a story. It’s my goal to inspire you to get in the kitchen, try something new, and find a favorite you didn’t know you had.
Free Bonus


Great texture, beautiful color and flavor. The pie is just ridiculously sweet. Too sweet for my liking. Would use the same recipe and maybe use half the called for sugar. Amazing otherwise!