This post may contain affiliate links, view our disclosure.
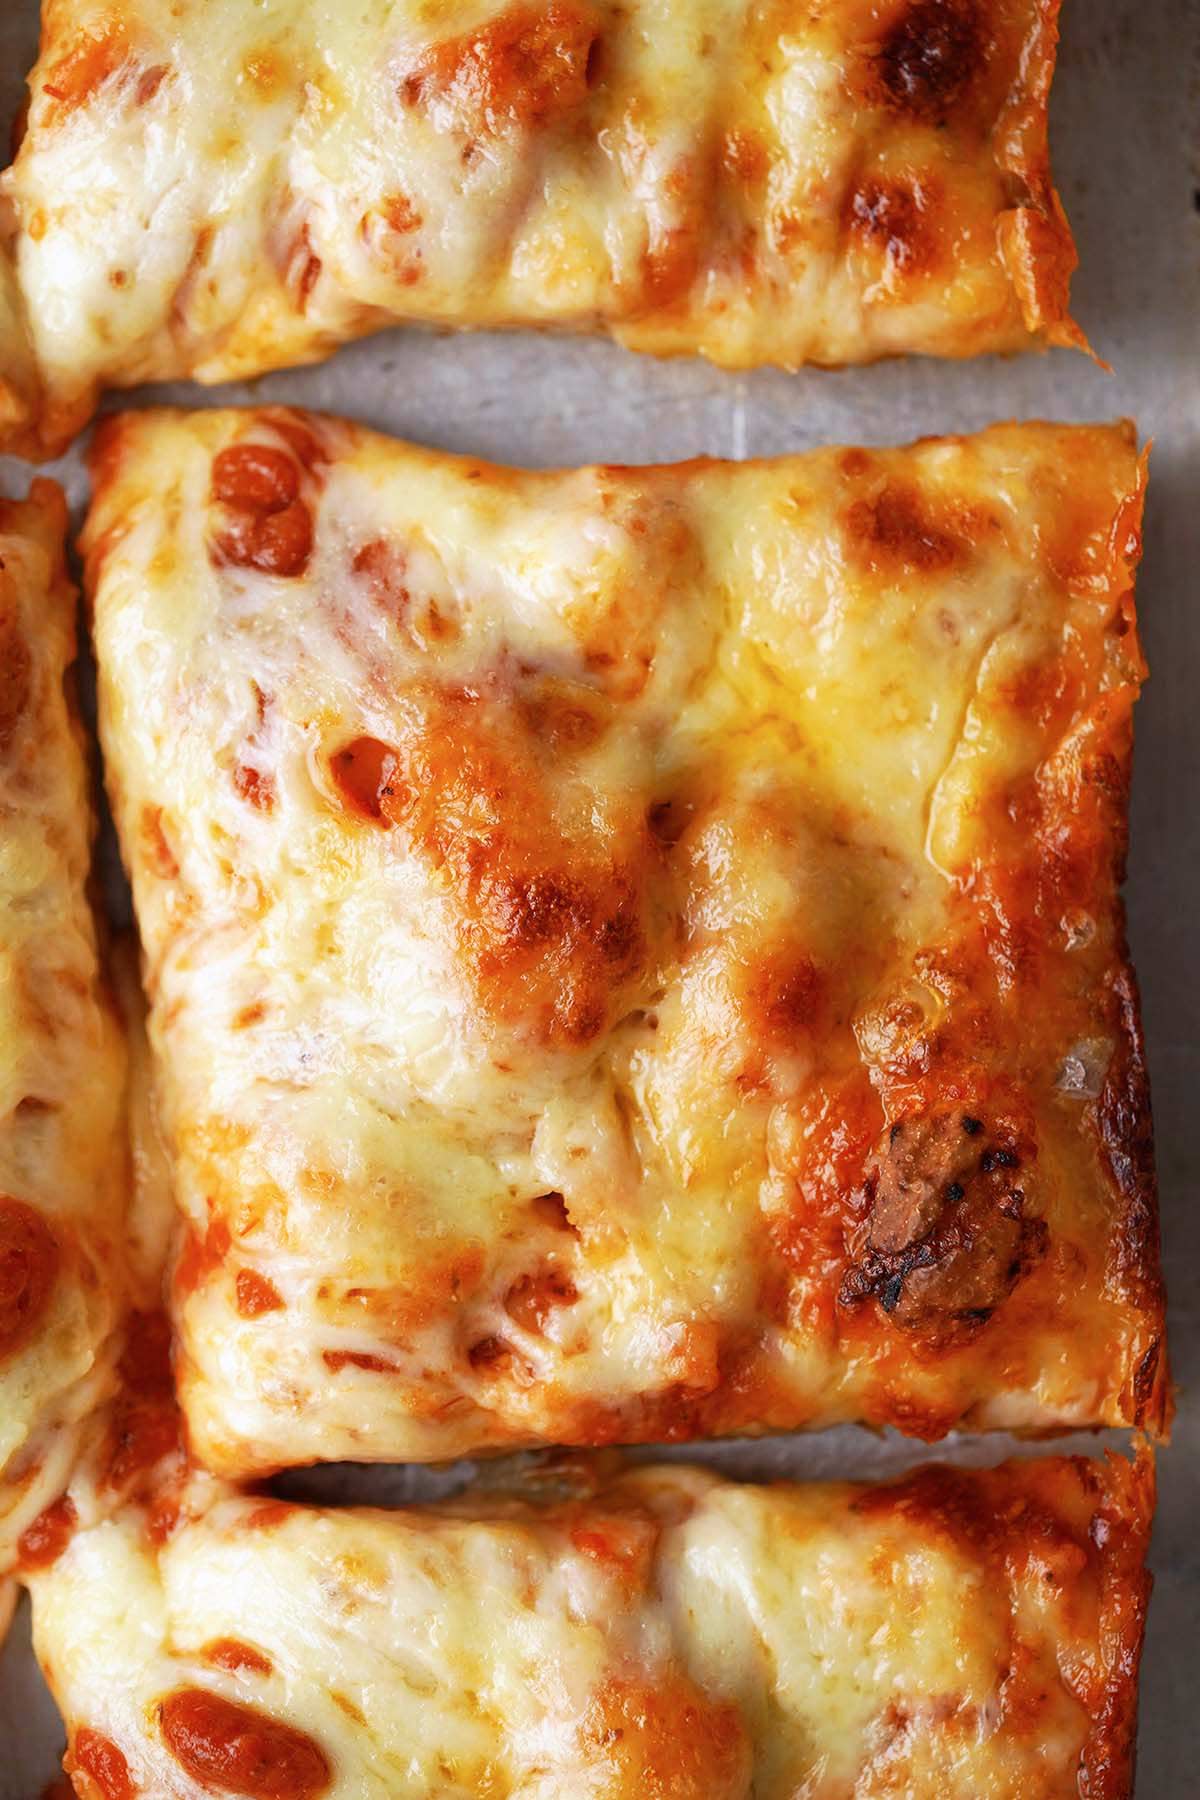
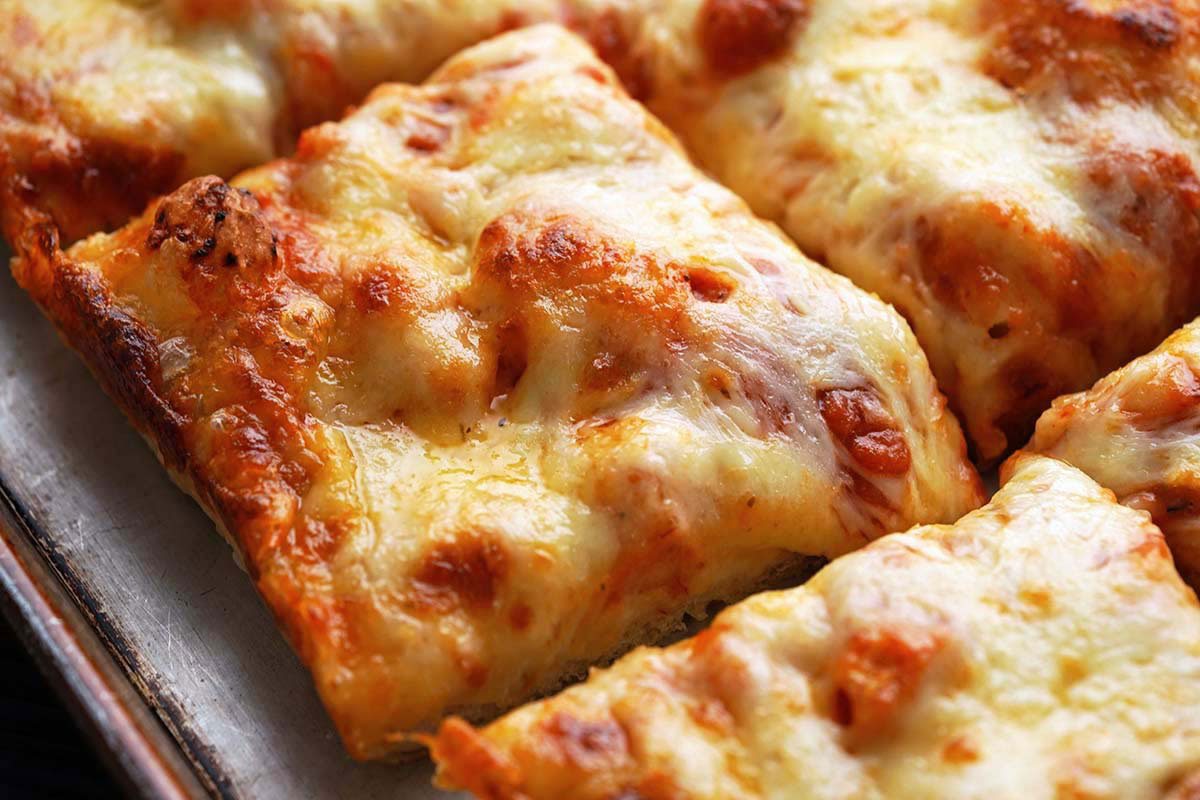
With its thick, chewy, airy crust and oodles of cheese that caramelizes and crisps on the edges, Detroit style pizza made with sourdough will level up pizza night at home!
I absolutely love a good regional dish. Not only are these recipes a source of local pride, but they usually come with an interesting backstory. And like most of us, I’m a sucker for a great story.
As legend has it, Detroit-style pizza dates back to 1946 at Buddy’s Rendezvous Pizzeria on Six Mile and Conant Street in Detroit. Gus Guerra made the first pizza of this kind, but there’s some debate as to whose recipe he used. His Sicilian-inspired pie may have been based on his wife’s Ana’s mother’s recipe, or a recipe from one of their Sicilian employees, a woman named Connie Piccinato. The really interesting part is that Gus used blue steel drip pans borrowed from local automotive plants to make it! (You can read more of the details on Buddy’s Pizza and Wikipedia.)
One Friday night a while ago when the mention of pizza got both of us excited, my fiancé and I ordered from a chain called Jet’s. We’re both from places up north where great pizza is abundant (I’m from Buffalo and he’s from Long Island). Since living in Florida, we’ve been on the hunt for really good pizza. Not pizza that’s “really good for Florida”, but pizza that’s really good in its own right.
Neither of us had ever had Detroit style pizza before, so we figured why not. Because of our past Florida pizza experiences, we were pleasantly surprised at how good it was! (Corner slices, we’re looking at you.) It had a crunchy golden bottom, thick fluffy base, loads of cheese, and a layer of crisp caramelized cheese all the way around. Of course after my sourdough experimentation began, I’ve been on a mission to come up with a homemade sourdough version of it!
It’s taken multiple tries and lots of brainstorming and experimenting, but I present you with my best recipe for sourdough Detroit style pizza. I hope you love it as much as we do.

What is Detroit Style Pizza?
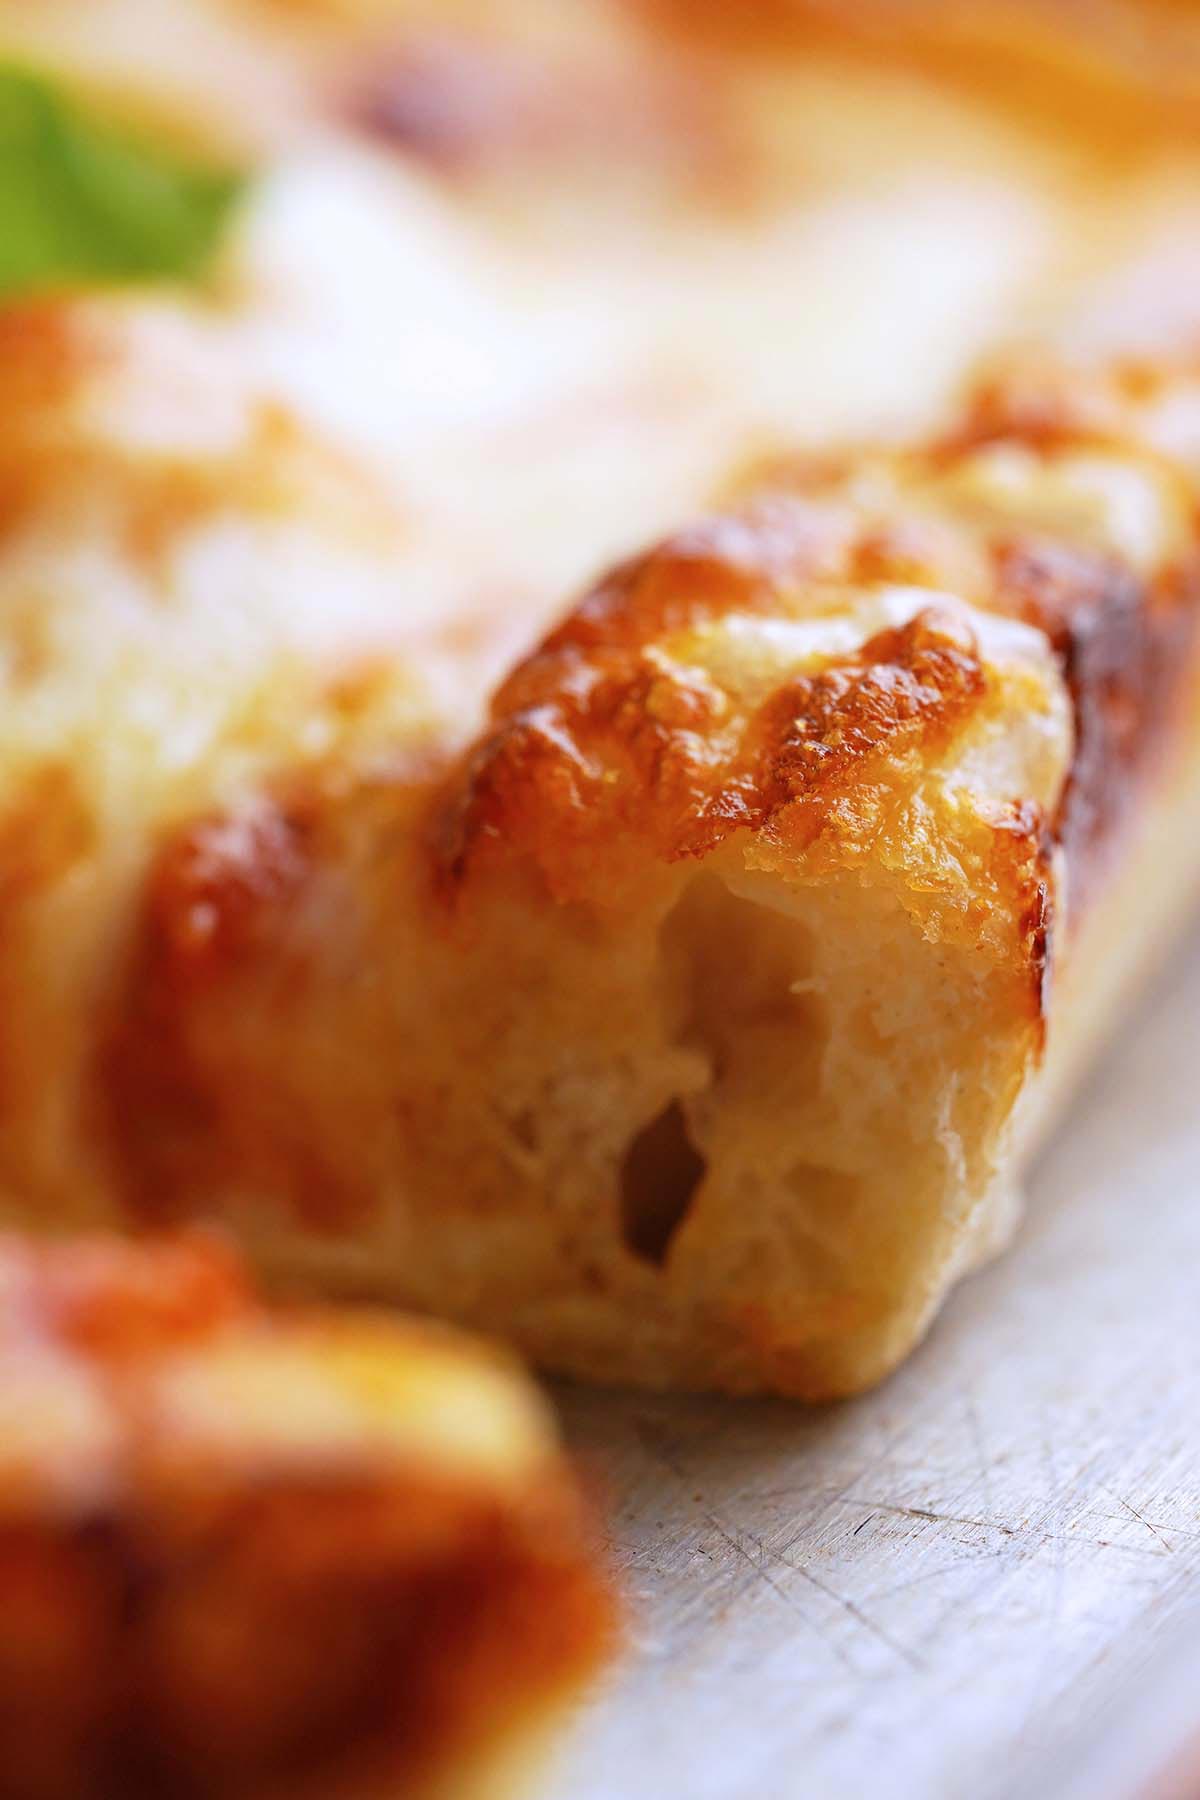
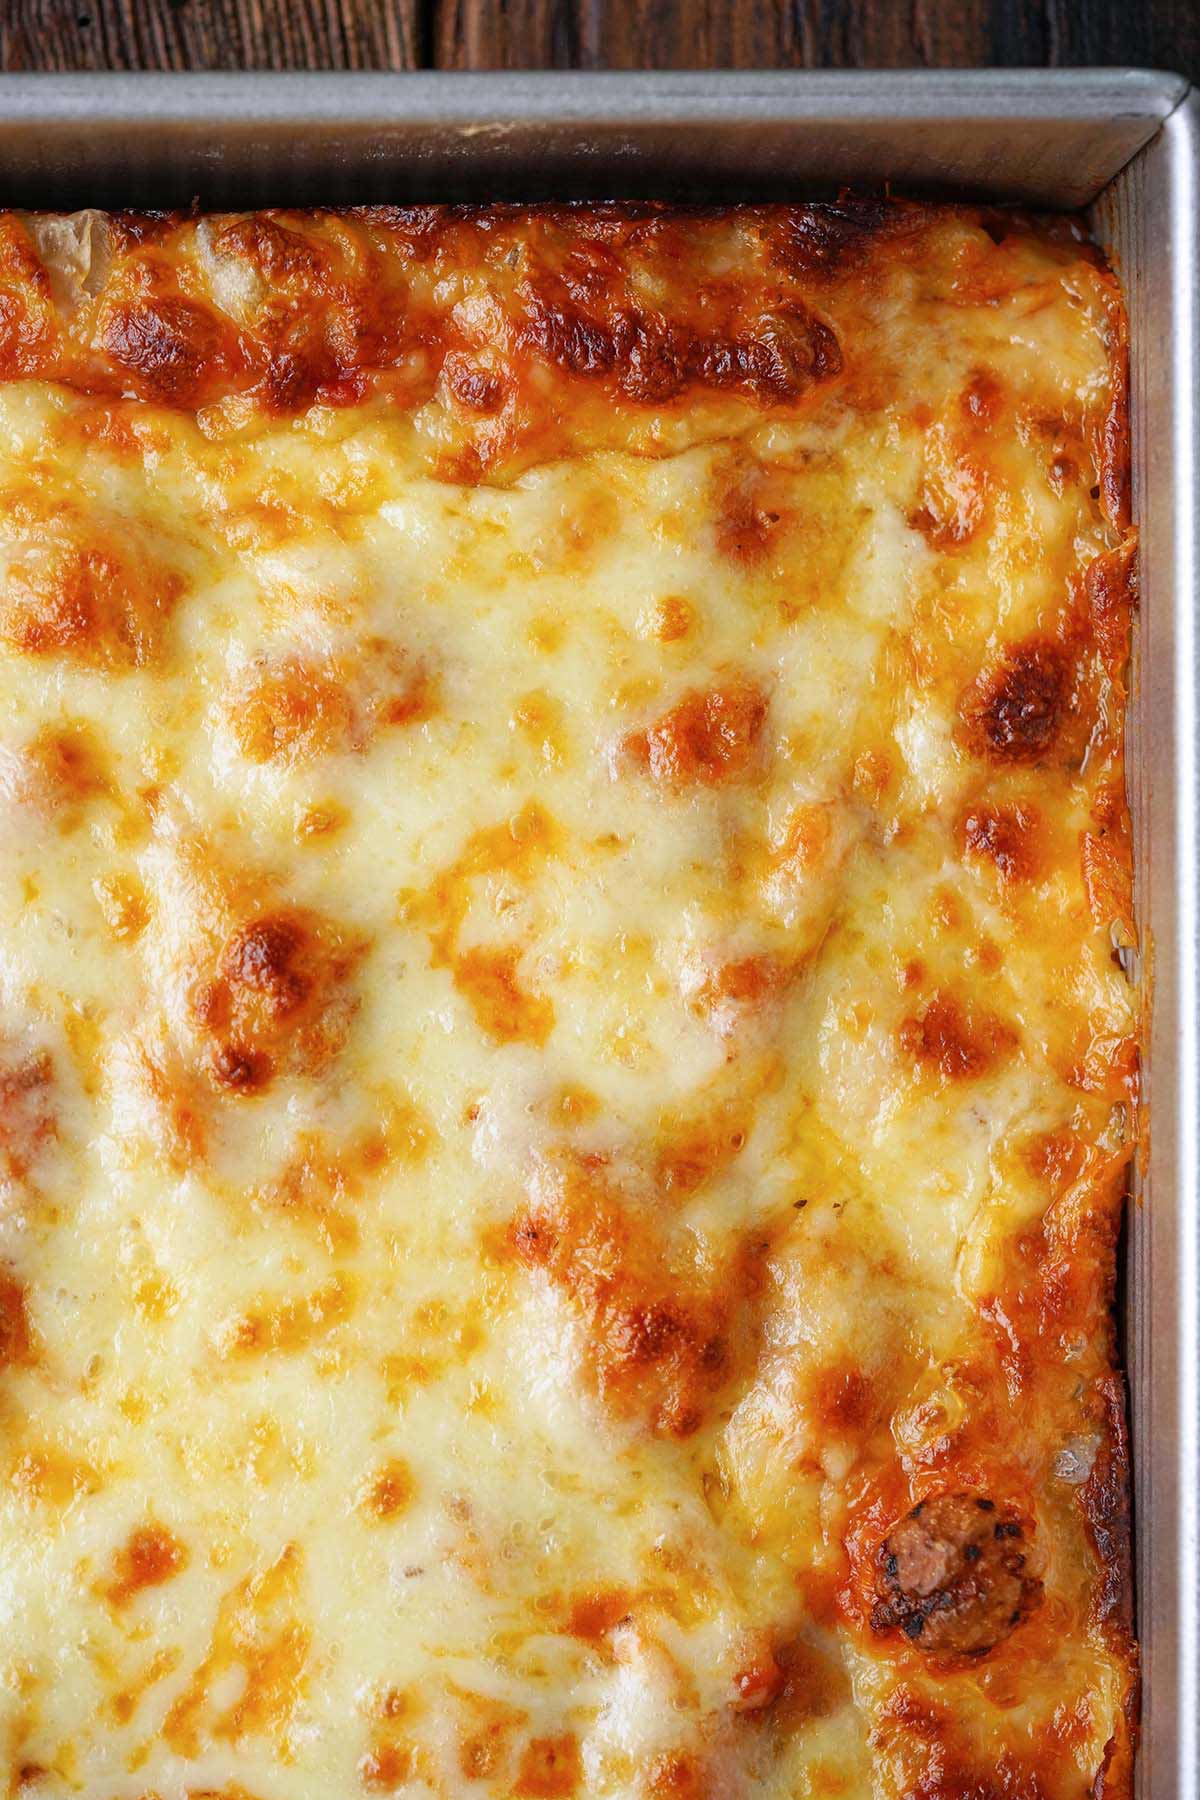
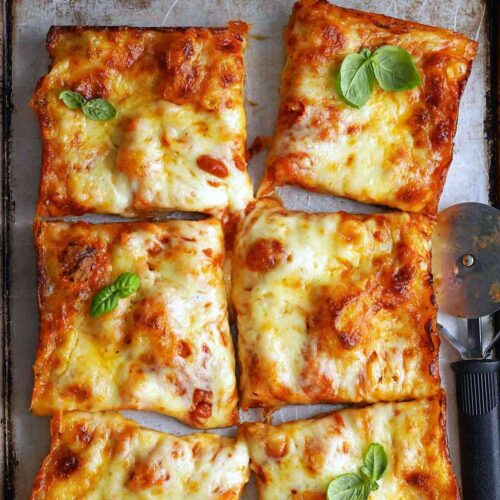
Hailing from the Motor City, Detroit pizza is rectangular or square-shaped pizza. It has a thick and chewy, yet soft and fluffy crust. It’s topped with oodles of cheese (and pepperoni if you like) that’s spread all the way to the edges and finished with “racing stripes” of tomato sauce. The result is a deliciously crispy, golden exterior and thick, airy slices. Unlike round pizzas cut into triangular slices, this pizza is cut into square pieces.
Is Detroit Pizza the Same as Sicilian Pizza?
These two thick-crust pizzas are very similar (they’re both rectangular with a thick base), but definitely not the same thing. Although Detroit style pizza was loosely inspired by Sicilian style pizza, there are a few key differences.
Detroit pizza has an abundance of cheese that goes all the way to the edges, while Sicilian pizza may or may not even have cheese, and if it does, it’s generally nowhere near as much. One of the iconic hallmarks of a classic Detroit pizza is the caramelized cheese outer edge.
While Detroit pizza is soft, airy, and chewy, the Sicilian version is soft, airy, and a bit more bread-y and a little less chewy. Additionally, Detroit pizza’s bottom is crispy to the point of almost being fried thanks to a generous amount of oil and the kind of pan used.
What Makes This Pizza Recipe a Winner
- Crust texture. This unique pizza crust is thick, but strikes just the right balance between being chewy and fluffy.
- Crust flavor. Sourdough adds the perfect amount of tanginess here to offset the cheese’s rich, buttery flavor.
- Crust outer edges. Another factor that makes the crust truly special is the method of adding toppings, specifically, the cheese. Spreading the cheese all the way out to touch the sides of the pan allows it to caramelize, resulting in deliciously crunchy, blistered edges.
- Crust bottom. Lastly about the crust is the fact that the bottom gets gorgeously golden and crispy, almost like it’s fried. It adds a great textural contrast to the soft, fluffy interior.
Ingredients
Breaking It Down
Ingredients Explained
In this section I explain the ingredients and give substitution ideas where applicable. For the full recipe (including the ingredient amounts), see the recipe card below.
Sourdough Pizza Dough Ingredients

- Sourdough starter – Use a 100% hydration starter. Make sure you feed it in advance so it’s active and bubbly when you want to mix the dough.
- Water – Filtered water at room temperature.
- Salt – Fine sea salt adds flavor so the dough isn’t bland. Additionally, it helps control the rate of fermentation.
- Bread flour – Make sure your bread flour is unbleached, and use organic if possible. King Arthur Flour is my personal favorite.
- Duck fat – Here we grease the bottom and sides of the pan with duck fat to help it get the signature Detroit pizza crispy golden bottom. Instead of duck fat, you can also use beef tallow or ghee.
- Extra-virgin olive oil – After greasing the pan with duck fat, we drizzle olive oil in the bottom. This adds flavor and helps contribute to the crispy crust.
Toppings (Use Any Pizza Toppings You Like!)

- Pizza sauce – Use homemade or your favorite store-bought pizza sauce.
- Cheese – You can use all mozzarella, or a blend of mozzarella + mild white cheddar. And if you have it available, use Wisconsin brick cheese for the most authentic tasting Detroit pizza!
Instructions: How to Make Detroit Style Pizza at Home
1: Make the Dough
TIP FOR SUCCESS: Making this sourdough pizza crust is the same process as making sourdough bread. If you want a visual guide, check out my recipe for sourdough bread on Sourdough Diaries for step-by-step process photos. You can also watch my recipe video for sourdough bread on YouTube.
Mix (30 minute wait time). Add the sourdough starter, water, and salt to a large bowl and whisk to combine. Mix in the bread flour (the dough will be shaggy at this point; don’t knead it). Cover the bowl and let the dough rest for 30 minutes.
Stretch and folds (90 minute wait time). Perform a stretch and fold, and then cover the bowl and let the dough rest for 30 minutes. Repeat the stretch and fold process 3 more times every 30 minutes.
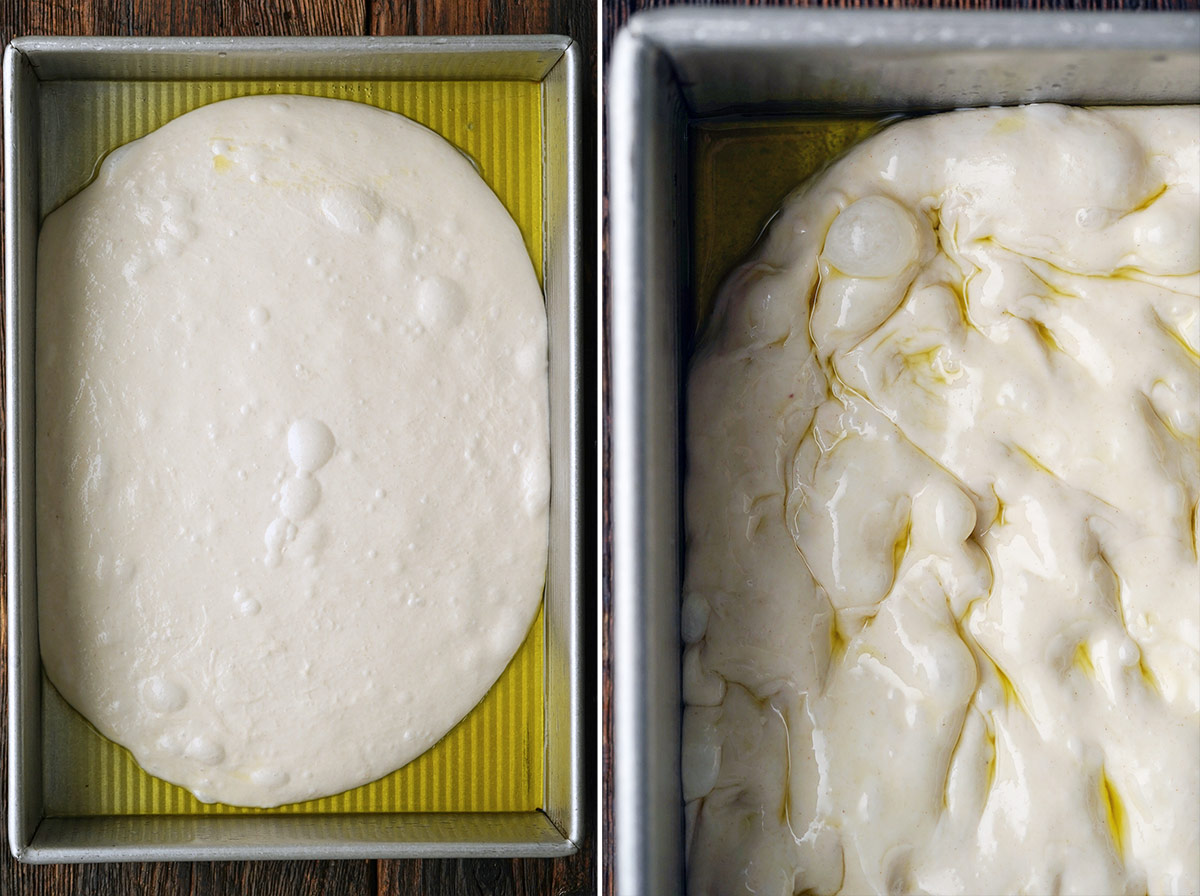
Finish bulk fermentation (4 hour wait time). Grease the bottom and sides of a 9 X 13 X 2.25-inch pan with duck fat. Drizzle 2 tablespoons of oil across the bottom of the greased pan. After the 4th stretch and fold, place the dough in the oiled pan (you don’t have to spread it out, it will naturally spread out as it ferments). Cover the pan with plastic wrap, and let it sit at room temperature until the dough is doubled in size, jiggles when you shake the pan, and is bubbly on top, about 4-ish hours at 74F (adjust the time accordingly if your temperature is different).
Cold proof/second rise (optional; up to 24 hours). At this point, you have the option to do a second fermentation/cold proof if you don’t want to bake the pizza yet. To do so, pop the covered pan of dough into the fridge for up to 24 hours.
2: Assemble the Pizza
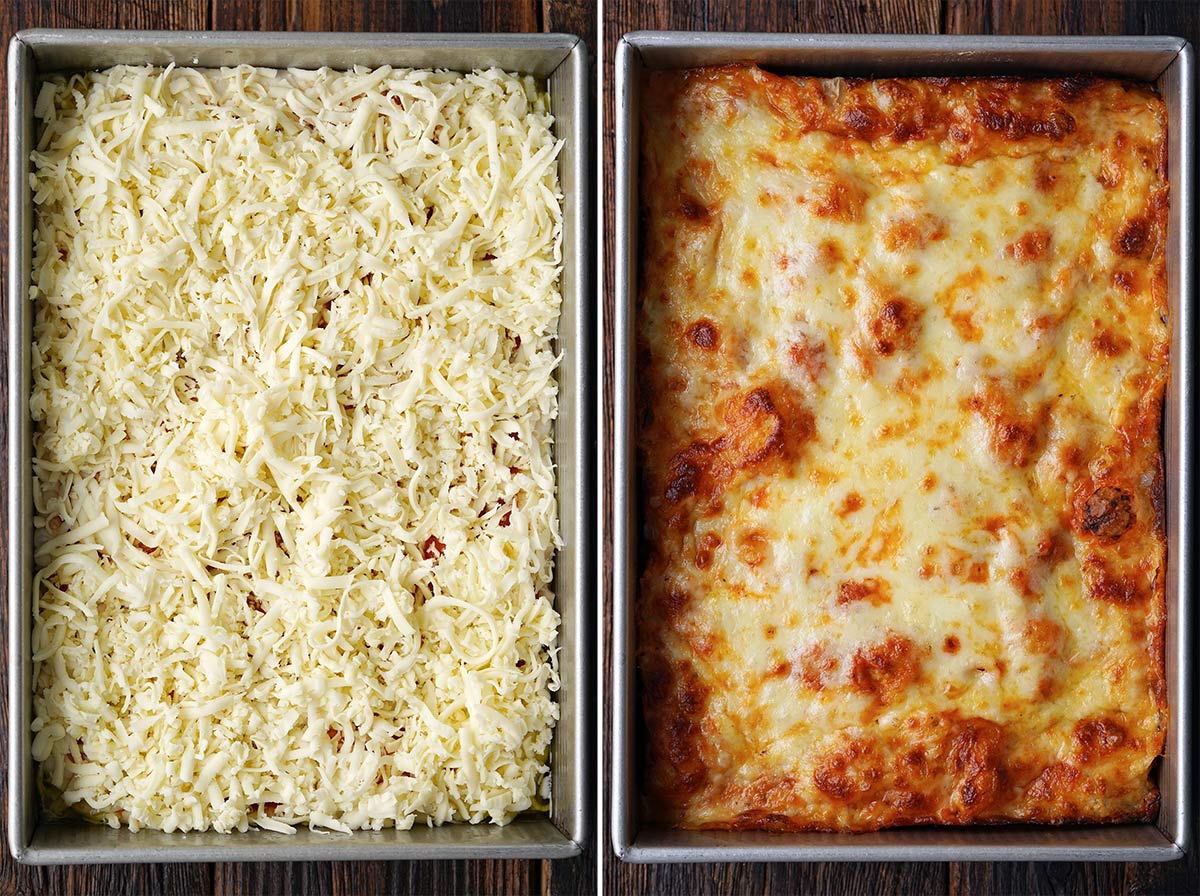
Prep. Position a rack in the bottom 1/3 of the oven and preheat the oven to 450F. Shred the cheese.
Top the pizza. Oil your fingers, and use them to indent the dough and create a dimpled surface, spreading the dough out to the edges of the pan. Spread on the pizza sauce and then the cheese, going all the way to the edges with the toppings. Cover the pan with foil.
3: Bake, Cool Briefly, Slice & Enjoy
Bake (covered) for 15 minutes, then remove the foil cover and bake uncovered until the top is brown in spots, about 13 to 15 minutes more.
Let the pizza cool in the pan for about 10 minutes, then carefully slide it out onto a cutting board and cut it into slices.
Example Bakers Schedule For This Recipe
This is a sample baking schedule that works well for me when I make this pizza. Use it as a guideline and adjust it as needed to fit into your schedule. Note that this pizza recipe is made in one day if you keep an active sourdough starter on hand (and remember to feed it the night before).
- 11pm: Feed your sourdough starter.
- 7am (the next day): Mix your dough and let it sit for 30 minutes.
- 7:30am-9am: Perform 4 sets of stretch and folds every 30 minutes.
- 9am-1pm: Let the dough sit at room temperature to finish bulk fermentation (this takes about 4 hours at 74F in my house; adjust accordingly if your temperature is different).
- 1pm-6pm: Cold proof in the fridge (optional; you can bake it after bulk fermentation if you prefer).
- 6pm-6:15pm: Preheat the oven and assemble the pizza.
- 6:15pm-6:45pm: Bake.
- 7pm: Slice and enjoy!
Detroit Style Pizza Pan
Your pan should be 9 by 13 by 2.25 inches; make sure it’s oven safe up to 450F. This is the pan I use for great results.
Why Sourdough Works Well For Detroit Pizza
- Similar hydration, fermentation, and crumb. Both Detroit pizza and sourdough bread typically have a higher hydration level. They both also usually require a relatively long fermentation period. As a result, the texture for both is soft, chewy, and airy with an open crumb.
- Sourdough’s flavor is the perfect foil for Detroit pizza’s richness. Tangy sourdough cuts through the heavy layer of gooey cheese (and pepperoni if you add it), creating a lovely balance of flavors.
Storage & Reheating
Cool to room temperature and then store in an airtight container in the fridge for up to 4 days. To freeze, individually wrap cooled slices in freezer paper and store them in a zip-top freezer-safe bag for up to 2 months. For best results, thaw in the fridge overnight before reheating.
Of course you can reheat this pizza in the microwave (who hasn’t done that, right?!). But that’s not the best method. The oven method for reheating (350F for about 15 minutes on a baking tray covered with foil) is better than the microwave. However, it isn’t even the best way to reheat this.
If you want the absolute best way (I’m talking so good the-reheated-pizza-might-be-better-than-the-fresh), the stovetop is the way to go. To reheat pizza on the stovetop, you’ll need a large skillet with a lid (or you can cover it with a piece of aluminum foil). Turn the heat on low to medium-low, add however many slices you want, cover the skillet, and let it do its thing for about 10 to 15 minutes. What makes this reheating method the best?, you ask. The bottom gets gloriously crisp and golden, and the cheese melts perfectly.

Tips For the Best Homemade Detroit Style Pizza with Sourdough Crust
- Duck Fat: Duck fat is my personal favorite for greasing the pan here; it lends an underlying savory flavor (nope, it doesn’t make the pizza taste like duck!) and helps it crisp beautifully.
- Olive Oil: It’s going to look like a lot in the pan (the oil will likely pool on the sides as the dough ferments and spreads out). That’s okay; trust the process! The end result is a crisp bottom crust that’s typical of classic Detroit pizza.
- Cheese: You can use all mozzarella (I usually use a block of whole milk mozzarella), or a blend of mozzarella + mild white cheddar to simulate the flavor of brick cheese. And if you have it available, use Wisconsin brick cheese for the most authentic tasting Detroit pizza!
- Optional Proof (Second Rise): After bulk fermentation, you have the option to cold proof the dough for up to 24 hours (which is great because it’s ready when you are, which makes this easy to fit into your schedule!). Although it’s possible to skip the second rise completely, I recommend at least a 3-hour cold proof in the fridge.
- The Pan and the Oven Rack Position: Your pan should be 9 by 13 by 2.25 inches; make sure it’s oven safe up to 450F. We want to position the oven rack in the bottom 1/3 of the oven so it’s a bit closer to the heat source to help the bottom get nice and crispy like traditional Detroit style pizza.
- Topping the Pizza: Instead of spreading the sauce on the dough and then adding the cheese, if you want “racing stripes”, spread the cheese directly on the dough (all the way to the edges), and then ladle on lines of pizza sauce.
- Baking Covered and Uncovered: We bake this sourdough pizza for 15 minutes covered with foil, and then for 13 to 15 minutes uncovered. The reason for baking covered at first is to simulate sourdough baking in a Dutch oven; baking covered traps steam and helps the sourdough crust get the most oven spring, resulting in a light, fluffy texture with an open crumb. After that, we remove the foil for the second half of baking so the crust can set and the top can take on some golden color.
Frequently Asked Questions
The dough for both Detroit pizza and focaccia is at least very similar, if not the same. Both use a high-hydration dough, which means the dough has a relatively high ratio of water-to-flour. As a result, both have a thick base with a chewy, fluffy texture and an airy, open crumb.
Traditionally, this pizza is topped with Wisconsin brick cheese, a rich, buttery, semi-soft cheese that melts and caramelizes well. If this isn’t available, you can use a blend of mozzarella and mild white cheddar for a similar flavor profile.
Typically, Detroit pizza is made in reverse. Instead of dough, tomato sauce, cheese, and then toppings, it’s usually dough, pepperoni or other “toppings” (spread all the way out to the pan edges), cubed or shredded cheese (also spread all the way out), and then “racing stripes” of tomato sauce ladled onto the top in lines lengthwise.
Made this way (with the racing stripes of tomato sauce on top), you can tell how closely related Detroit pizza and focaccia really are! Although it’s not traditional, my favorite way to make this pizza is to spread out the tomato sauce on the dough, and then top with piles and piles of cheese. Feel free to layer it any way you like!
More Recipes For Pizza Night at Home
- Crispy Air Fryer Chicken Wings with Buffalo Sauce
- Copycat Olive Garden Salad Recipe
- Crispy Parmesan Baked Zucchini Fries
- Super Crispy Beer Battered Onion Rings
Let’s Connect

Did you make this recipe? Please rate it and leave a comment below. You can also tag @anediblemosaic on social media.
To stay up-to-date, follow me on Facebook, Instagram, Pinterest, and Twitter!
Sourdough Detroit Style Pizza Recipe
Email This Recipe
Get this recipe link emailed straight to your inbox!
Equipment
Ingredients
Sourdough Crust:
- 112 grams sourdough starter 100% hydration; fed and bubbly
- 297 grams water filtered; room temperature
- 9 grams fine sea salt
- 395 grams unbleached bread flour
- 1 tablespoon duck fat or beef tallow or ghee (to grease the pan; see Notes)
- 2 tablespoons extra-virgin olive oil for the bottom of the pan (plus more to oil your hands; see Notes)
Toppings:
- 3/4 cup pizza sauce
- 1 pound freshly shredded mozzarella cheese see Notes
Instructions
Make the Dough:
- Mix (30 minute wait time). Add the sourdough starter, water, and salt to a large bowl and whisk to combine. Mix in the bread flour (the dough will be shaggy at this point; don’t knead it). Cover the bowl and let the dough rest for 30 minutes.
- Stretch and folds (90 minute wait time). Perform a stretch and fold, and then cover the bowl and let the dough rest for 30 minutes. Repeat the stretch and fold process 3 more times every 30 minutes.
- Finish bulk fermentation (4 hour wait time). Grease the bottom and sides of a 9 X 13 X 2.25-inch pan with duck fat (see Notes). Drizzle 2 tablespoons of oil across the bottom of the greased pan. After the 4th stretch and fold, place the dough in the oiled pan (you don’t have to spread it out, it will naturally spread out as it ferments). Cover the pan with plastic wrap, and let it sit at room temperature until the dough is doubled in size, jiggles when you shake the pan, and is bubbly on top, about 4-ish hours at 74F (adjust the time accordingly if your temperature is different).
- Cold proof/second rise (optional; up to 24 hours). At this point, you have the option to do a second fermentation/cold proof if you don’t want to bake the pizza yet. To do so, pop the covered pan of dough into the fridge for up to 24 hours. (See Notes.)
Assemble the Pizza:
- Prep. Position a rack in the bottom 1/3 of the oven and preheat the oven to 450F (see Notes). Shred the cheese.
- Top the pizza. Oil your fingers, and use them to indent the dough and create a dimpled surface, spreading the dough out to the edges of the pan. Spread on the pizza sauce and then the cheese, going all the way to the edges with the toppings (see Notes). Cover the pan with foil (see Notes).
Bake:
- Bake (covered) for 15 minutes, then remove the foil cover and bake uncovered until the top is brown in spots, about 13 to 15 minutes more.
Cool and Slice:
- Let the pizza cool in the pan for about 10 minutes, then carefully slide it out onto a cutting board and cut it into slices.
Video
Notes
- Duck Fat: Duck fat is my personal favorite for greasing the pan here; it lends an underlying savory flavor (nope, it doesn’t make the pizza taste like duck!) and helps it crisp beautifully.
- Olive Oil: It’s going to look like a lot in the pan (the oil will likely pool on the sides as the dough ferments and spreads out). That’s okay; trust the process! The end result is a crisp bottom crust that’s typical of classic Detroit pizza.
- Cheese: You can use all mozzarella (I usually use a block of whole milk mozzarella), or a blend of mozzarella + mild white cheddar to simulate the flavor of brick cheese. And if you have it available, use Wisconsin brick cheese for the most authentic tasting Detroit pizza!
- Optional Proof (Second Rise): After bulk fermentation, you have the option to cold proof the dough for up to 24 hours (which is great because it’s ready when you are, which makes this easy to fit into your schedule!). Although it’s possible to skip the second rise completely, I recommend at least a 3-hour cold proof in the fridge.
- The Pan and the Oven Rack Position: Your pan should be 9 by 13 by 2.25 inches; make sure it’s oven safe up to 450F. We want to position the oven rack in the bottom 1/3 of the oven so it’s a bit closer to the heat source to help the bottom get nice and crispy like traditional Detroit style pizza.
- Topping the Pizza: Instead of spreading the sauce on the dough and then adding the cheese, if you want “racing stripes”, spread the cheese directly on the dough (all the way to the edges), and then ladle on lines of pizza sauce.
- Baking Covered and Uncovered: We bake this sourdough pizza for 15 minutes covered with foil, and then for 13 to 15 minutes uncovered. The reason for baking covered at first is to simulate sourdough baking in a Dutch oven; baking covered traps steam and helps the sourdough crust get the most oven spring, resulting in a light, fluffy texture with an open crumb. After that, we remove the foil for the second half of baking so the crust can set and the top can take on some golden color.
- Recipe Yield and Serving Size: This makes 1 (9 by 13-inch) pan, which I like to cut into 6 slices for 6 servings. Feel free to cut it smaller if you like. I know 1 slice might not seem like a lot, but this pizza is filling thanks to its sourdough crust and abundance of cheese!
- To See How to Make Sourdough: Sometimes it just helps to see how something is done! Making this sourdough pizza crust is the same process as making sourdough bread. If you want a visual guide, check out my recipe for sourdough bread on Sourdough Diaries for step-by-step process photos. You can also watch my recipe video for sourdough bread on YouTube.
- Storage: Cool to room temperature and then store in an airtight container in the fridge for up to 4 days. To freeze, individually wrap cooled slices in freezer paper and store them in a zip-top freezer-safe bag for up to 2 months. For best results, thaw in the fridge overnight before reheating.
- Reheating: If you want the absolute best way to reheat this pizza (I’m talking so good the-reheated-pizza-might-be-better-than-the-fresh), the stovetop is the way to go. To reheat pizza on the stovetop, you’ll need a large skillet with a lid (or you can cover it with a piece of aluminum foil). Turn the heat on low to medium-low, add however many slices you want, cover the skillet, and let it do its thing for about 10 to 15 minutes. What makes this reheating method the best?, you ask. The bottom gets gloriously crisp and golden, and the cheese melts perfectly.
Nutrition
Nutritional information is automatically calculated and should be used as an approximate.
Share it with me on Instagram and leave a comment to let me know your thoughts!


I’m the writer, recipe developer, photographer, and food stylist behind this blog. I love finding the human connection through something we all do every day: eat! Food is a common ground that we can all relate to, and our tables tell a story. It’s my goal to inspire you to get in the kitchen, try something new, and find a favorite you didn’t know you had.
Free Bonus