


This post may contain affiliate links, view our disclosure.
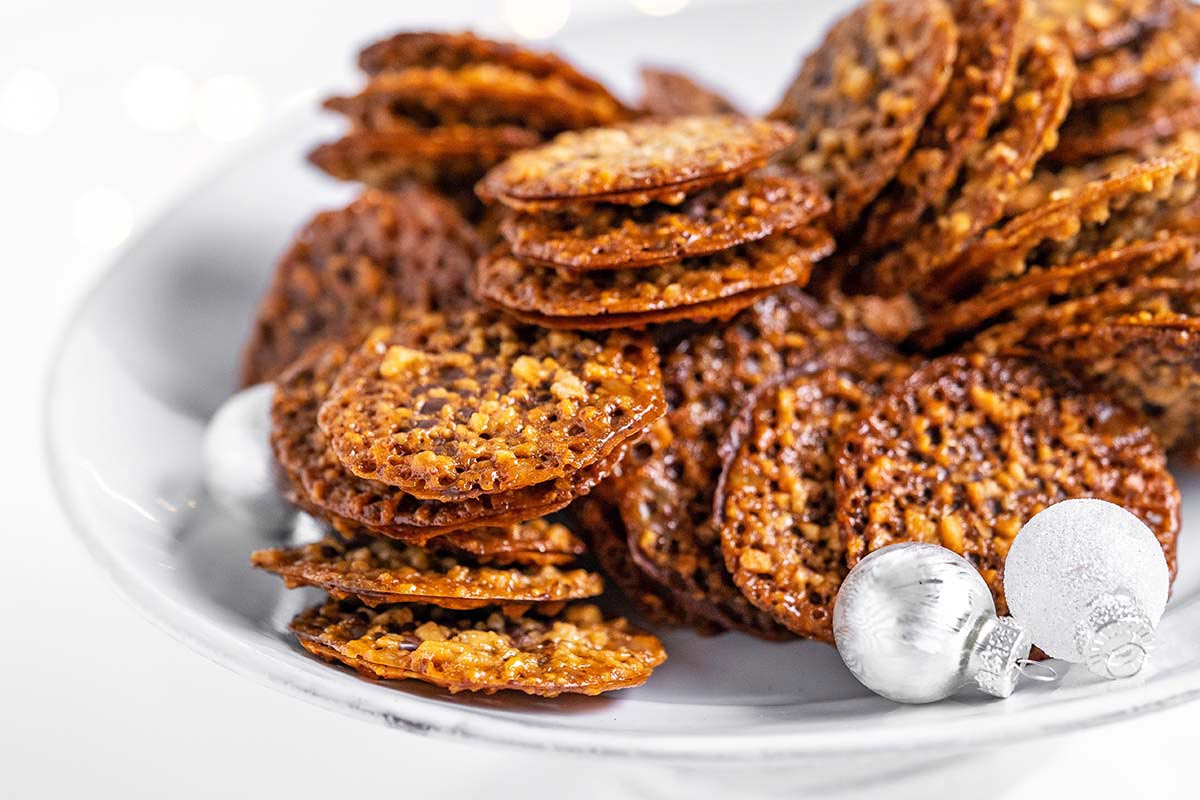
This recipe for Florentines yields delicately lacy, crisp cookies with a nutty caramel/toffee flavor and a hint of vanilla. A little dark chocolate is optional, but the perfect finishing touch. And if you’ve tried to make these cookies and had problems, I share an easy, no-fail method (with a photo guide!) for how to fix them.

The first time I had these cookies was last Christmas when my husband ordered them from an online bakery after one of his friends said we had to try them. They might not look like anything spectacular, but I’m telling you, these cookies are addictive.
They have a nutty, caramel flavor and when you add a drizzle of chocolate (or sandwich two of them together with chocolate), they will have you coming back for more. Of course, this may or may not be a good thing, lol.

Anyway, after having Florentine cookies for the first time, I was on a mission to find the perfect recipe and make them myself!
Compared to many cookie recipes, Florentine biscuits are a bit more time-consuming to make, especially if you want to add chocolate (either drizzled on top or to sandwich them together). But I promise, these cookies are worth the work, especially because they’re so expensive to buy.
And they really are gorgeous and very festive because they feel special. Delicate, thin, lacy, and crispy, with a nutty, caramel/butterscotch/toffee flavor. You can use almonds, pecans, or any kind of nuts you like. And milk or dark chocolate makes the perfect addition!

Florentine Cookies Ingredients
Breaking It Down
Ingredients Explained
In this section I explain the ingredients and give substitution ideas where applicable. For the full recipe (including the ingredient amounts), see the recipe card below.

- Sliced blanched almonds – Almonds are traditional in many Florentine biscuit recipes. They add nutty flavor and perfect crunch.
- Pecans – In addition to almonds, I like to add a little bit of pecans for flavor. You can swap out the pecans for walnuts, hazelnuts, or just use more almonds.
- Flour – Use regular all-purpose flour. We only need a little bit for this recipe!
- Salt – To create a balanced flavor profile.
- Sugar – Use granulated white sugar. The sugar caramelizes as these cookies bake and add rich flavor and color.
- Heavy whipping cream – In addition to providing rich flavor, the cream in this recipe combines with the sugar to form caramel, which is essentially the base of this batter or the glue that holds the nuts together.
- Light corn syrup – A failsafe for the perfect consistency.
- Unsalted butter – For richness, and helps create the signature crisp, lacy, delicate texture these cookies are known and loved for.
- Vanilla extract – For flavor and aroma.
- Water – You may or may not need water to achieve the right consistency for the batter; see the photo instructions below for guidance on how it should look.
- Dark chocolate – Chocolate is optional for sandwiching the cookies together or drizzling decoratively on top.
How to Make Florentines
These cookies aren’t hard to make, but there are a few steps and it’s likely your batter will need “fixing”. To make the process run smoothly, please read the full recipe before starting. Also, refer to my section below “How to Fix Florentines” for the foolproof method to save these cookies if your batter is dry and clumpy!
1: Prep
Position a rack in the center of the oven. Preheat the oven to 350F. Line 2 large baking trays with silicone baking mats or parchment paper. Measure out all ingredients.
2: Chop the Nuts

- Add the almonds and pecans (or whatever nuts you’re using) to a food processor.
- Pulse until finely chopped, but not pasty. (TIP: Don’t over-process the nuts. You want them finely chopped and a little powdery, but don’t go too far or you’ll end up with nut butter!)
3: Make the Batter and Bake the Cookies

- Stir together the finely chopped nuts, flour, and salt in a large bowl. Set aside for now.
- Add the sugar, cream, corn syrup, and butter to a medium saucepan over medium heat. Stir occasionally until the sugar is dissolved. Once it comes to a rolling boil, let it boil for 1 minute. Turn off the heat and stir in the vanilla.
- Pour the liquid sugar mixture into the dry almond mixture and stir just to combine.
- Set aside until the batter is cool enough to handle. (TIP: At this point, you will likely need to add boiling water so the batter takes on a “Cream of Wheat consistency”. The amount of water needed will vary, so you have to use a bit of finesse; see the photos in the section below “How to Fix Florentines” for guidance.)
- Use a 1/2-teaspoon scoop to measure out the batter. Roll each into a ball and flatten it slightly. Arrange the flattened batter balls on the prepared baking sheets. (TIP: 11 cookies on each half sheet pan works well to avoid overcrowding.)
- Bake the cookies 1 tray at a time until they’re thin and golden brown, about 8 to 10 minutes, rotating the tray after 5 minutes. Once the cookies are out of the oven, let them cool completely before using a thin metal spatula to remove them. Continue cooking the batter this way until all the cookies are baked.
4: Chocolate (Optional)

When the cookies are cooled, melt the chocolate. Sandwich 2 cookies together with a thin smear of chocolate in the center. (TIP: Don’t use too much chocolate or it will ooze out of the holes in the cookies.) Alternatively, you can drizzle a little chocolate on the tops. Let the chocolate set completely before serving or storing these cookies.

Tip: How to Fix Florentines Like a Pro (It’s Easy!)
I originally found the recipe I used on the Food Network. And at first the only adaptation I made was to omit the orange zest.
Although the resulting Florentine cookies were melt-in-your-mouth amazing and lovely to look at as well, I had a major mishap while making these!
I made the batter and let it sit to cool as instructed. Then when it was cool enough to handle, I went to scoop it and it was hard and crumbly! I scooped the batter into little crumbly balls and baked the first tray like that, thinking that perhaps it was how the batter was supposed to be.
It turns out I couldn’t have been more wrong. The cookies held their “ball” shape and didn’t flatten out or turn caramel colored.
In an attempt to save the cookies I added water to the batter. I actually ended up adding quite a bit of water, so that in the end the batter had a consistency like Cream of Wheat. I re-scooped the batter and baked the cookies, and (very surprisingly!) they came out perfect.
If this happens to you, this is how to fix the batter for Florentine cookies:

- By the time the Florentine batter is cool enough to handle, you might notice that it is dry and crumbly like this. It’s impossible to scoop, and even if you are able to scoop it, it doesn’t bake properly!
- There’s an easy fix; simply add boiling water. The amount you need will vary, but I find that usually 1/4 to 1/3 cup of boiling water is perfect for 1 batch.
- Stir the boiling water into the batter a little at a time.
- And mix it well. The batter should have the consistency of some type of porridge, similar to Cream of Wheat. Now it’s ready to scoop and bake as directed in the recipe.

Storage Tips
Let the chocolate set completely, and then arrange the cookies in single layers separated with pieces of parchment paper in an airtight container. You can store them at room temperature, in the fridge, or in the freezer.
- Room temperature: Up to 3 days.
- Fridge: About 3 weeks.
- Freezer: Up to 3 months. Let them thaw in the fridge overnight before serving.
Variations
- Chocolate orange combination – Add up to 2 tablespoons of freshly-grated orange zest.
- Nuts – Instead of using all almonds, I like to use a mix of nuts. Almonds + walnuts are good, but almonds + pecans are my favorite combination. I also want to try these cookies with almonds + hazelnuts or almonds + pistachios!
- Chocolate – I find that sandwiching two Florentine cookies together with the thinnest smear of 70% dark chocolate is perfect for me. (I love the bitterness from the chocolate to balance out the sweet cookies.) However, feel free to play with it to find what you like! You can simply drizzle a little chocolate on top if you prefer. And you don’t have to use dark chocolate; use your favorite!

Florentines Recipe Frequently Asked Questions
Florentine cookies, also called Florentine biscuits, Florentine lace cookies, Florentine almond cookies, and just simply Florentines, are a confection made of sugar, butter, cream, and nuts (traditionally almonds). They also occasionally contain dried fruit. And frequently, they are either drizzled with chocolate or sandwiched together with chocolate.
The name of these cookies makes you think they’re from Florence, Italy, right?
As a lover of history and culture, and the connection between culture and cuisine, I’ve done a bit of research but I haven’t been able to find a definitive answer as to why Florentine cookies are named as such.
There’s a debate as to whether these cookies are Italian or French. I’ve heard it said that Catherine de’Medichi who became queen consort of France in 1547 when she married King Henry II, brought her own chefs to France when she moved there. And in doing so, brought a number of Italian dishes as well.
If you know more about the origin of and history behind Florentine cookies, please let me know!
These delicate cookies have a buttery, nutty, caramel flavor. They’re most crisp on the same day they’re made; after that, they soften a bit and become slightly chewy.
More Festive Cookie Recipes to Make
Let’s Connect

Did you make this recipe? Please rate it and leave a comment below. You can also tag @anediblemosaic on social media.
To stay up-to-date, follow me on Facebook, Instagram, Pinterest, and Twitter!

Florentines Recipe
Email This Recipe
Get this recipe link emailed straight to your inbox!
Ingredients
- 1 1/4 cups blanched slivered almonds
- 1/2 cup pecans or use more sliced blanched almonds
- 3 tablespoons all-purpose flour
- 1/4 teaspoon salt
- 3/4 cup granulated white sugar
- 2 tablespoons heavy cream
- 2 tablespoons light corn syrup
- 5 tablespoons unsalted butter
- 1/2 teaspoon pure vanilla extract
- Water as necessary to “save” the batter
- 4 ounces bittersweet chocolate or any type of chocolate you like (optional)
Instructions
- Prep. Position a rack in the center of the oven. Preheat the oven to 350F. Line 2 large baking trays with silicone baking mats or parchment paper.
- Chop the nuts. Add the almonds and pecans to a food processor and pulse until finely chopped, but not pasty. (TIP: Don't over-process the nuts. You want them finely chopped and a little powdery, but don't go too far or you'll end up with nut butter!)
- Make the batter. Stir together the finely chopped nuts, flour, and salt in a large bowl. Set aside for now.Add the sugar, cream, corn syrup, and butter to a medium saucepan over medium heat. Stir occasionally until the sugar is dissolved. Once it comes to a rolling boil, let it boil for 1 minute. Turn off the heat and stir in the vanilla.Pour the liquid sugar mixture into the dry almond mixture and stir just to combine.
- Cool and then add water if necessary. Set aside until the batter is cool enough to handle. (TIP: At this point, you will likely need to add boiling water so the batter takes on a “Cream of Wheat consistency”. The amount of water needed will vary, so you have to use a bit of finesse; see the photos in the post above for guidance.)
- Scoop and roll the batter. Use a 1/2-teaspoon scoop to measure out the batter. Roll each into a ball and flatten it slightly. Arrange the flattened batter balls on the prepared baking sheets. (TIP: 11 cookies on each half sheet pan works well to avoid overcrowding.)
- Bake and cool. Bake the cookies 1 tray at a time until they’re thin and golden brown, about 8 to 10 minutes, rotating the tray after 5 minutes. Once the cookies are out of the oven, let them cool completely before using a thin metal spatula to remove them. Continue cooking the batter this way until all the cookies are baked.
- Sandwich the cookies together with chocolate (optional). When the cookies are cooled, melt the chocolate. Sandwich 2 cookies together with a thin smear of chocolate in the center. (TIP: Don’t use too much chocolate or it will ooze out of the holes in the cookies.) Alternatively, you can drizzle a little chocolate on the tops. Let the chocolate set completely before serving or storing these cookies.
Notes
- Recipe Yield and Serving Size: This recipe makes about 65 sandwich cookies. Each cookie is about 2 to 2 1/2-inches in diameter. Nutrition information is given for each cookie sandwich, including the chocolate.
- Recipe Inspiration: Recipe adapted from the Food Network’s recipe for Florentines.
- Room temperature: Up to 3 days.
- Fridge: About 3 weeks.
- Freezer: Up to 3 months. Let them thaw in the fridge overnight before serving.
Nutrition
Nutritional information is automatically calculated and should be used as an approximate.
Share it with me on Instagram and leave a comment to let me know your thoughts!

This post was first published on An Edible Mosaic on December 10, 2009 and updated on December 17, 2025.


I’m the writer, recipe developer, photographer, and food stylist behind this blog. I love finding the human connection through something we all do every day: eat! Food is a common ground that we can all relate to, and our tables tell a story. It’s my goal to inspire you to get in the kitchen, try something new, and find a favorite you didn’t know you had.
Free Bonus


The recipe looks promising! I wanted to make these but I do bot have corn syrup. Can I substitute glucose syrup instead?
Celine, Yes, you can use glucose syrup instead of light corn syrup in this recipe. Due to a potential difference in viscosity, you may need to add a bit of water to get the consistency right (see Instructions #6 in the recipe card, as well as the step-by-step images in the post). Happy baking!
I remember these cookies from my childhood. My grandmother made them once war-time rations were past! I remember them as being carefully rolled, immediately after cooking, into a tube shape. Once the tubes were cooled (or when ready to serve) they were filled with cream.
Delicious! Easy to follow, thorough recipe.
Excellent, ADD a touch of cinnamon for true holiday scent and flavor
Thank you for the tips. Your Florentine cookies look amazing, especially the brown caramel color. I’m going to try this in my kitchen :)
Hi, love this recipe, can I reduce the a mount of sugar? They are little bit sweet for me
Luz, I haven’t tried this recipe with less sugar. You may be able to use a couple tablespoons less sugar, but I wouldn’t try the recipe with less sugar than that because the sugar caramelization (and the flavor and texture it lends) is what makes these cookies unique. If you experiment with the recipe, let me know how it goes!
Thanks for this beautiful post and recipe. I plan to make these Florentine cookies for a First Communion party. I want them to be as perfect as possible. Question: Are you using a 1/2 tsp cookie scoop or measuring spoon? I can’t seem to find a scoop that small. If you’re using a measuring spoon does it just slide.out onto the Silpat or do you have to use your finger to slide it out? Thanks for your help.
Lisa, Thank you so much for your kind comment. I used a 1/2 teaspoon measuring spoon, and slid it out with my finger. I hope the cookies are a hit at the party! :)
I made them and they came out perfectly. I used a small espresso spoon to slide the dough out of the 1/2 tsp measuring spoon and I ended up trimming some of the cookies with cooking shears to give them that uniform look. Thanks again. They tasted so good.
Lisa, I’m so happy you enjoyed them, thank you so much for letting me know!
Use the small portion rubber cup cake molds it pops out so easy and every one is equally round thin dip one side in milk chocolate
These cookies are amazing. This recipe was so easy to follow too. After I put the first batch on the cookie sheet the batter started getting dry/crumbly, I used your boiling water tip and it worked like a charm. I definitely look forward to having an excuse to make these again.
No candy thermometer. Used old fashioned drop-a-glob into water and hard crack is when it (duh!) gets hard immediately! Also, used a small 2 tsp cookie scoop as soon as it was off heat to scoop out cookies onto parchment lined sheet. Worked beautifully. All flat, round, same size. LOVE this recipe, especially because my daughter-in-law is allergic to eggs so this is a Christmas cookie SHE can enjoy! Thank you!
Just got done with a recipe I found in a book, not worth making at all so I searched and found yours. All comments are positive and they all say how amazing these are so I’m about to make them right now. Before I do, I have some family members allergic to nuts. Can I omit them from this recipe?
Amber, I’ve made this recipe without nuts 2 different ways: 1) use pumpkin seeds instead, or 2) use unflavored oats instead (if you use old-fashioned rolled oats, pulse in a food processor like the recipe says for the nuts). Let me know how it goes if you give it a try!
So good! Whatever you do, as soon as it reaches the rolling boil do not let it cook past one minute! If you do the batter will be dry & not form discs & no amount of boiling water will fix it. I use disposable food prep gloves & like a bigger cookie so used 1teaspoon vs 1/2 to form the discs. I did not wait for the mixture to cool & I had no problem forming the discs. Have your parchment covered pans ready & I recommend having a large piece of parchment paper on the counter so you can measure out all your cookie discs when the mixture is hot. Following those steps, they came out perfectly! I painted one cookie w/ melted chocolate & sprinkled some pulverized coconut flakes on that, topped with another cookie & then drizzled the sandwich cookie with chocolate as well! Very pretty, crispy & worthy of gift giving!!
I made these today – and they are wonderful. Easy to make for someone like me who is not great in the kitchen.
Hello!
I am going to make these in a few days and I cannot wait. They look and sound delicious. Do you think they could be frozen if sandwiched with the chocolate? I assume so, but thought I would ask.
Thank you!
Hi Wendy, Yay, I hope you enjoy them! :)
Yes, they freeze well. I give instructions on how to store these cookies at room temperature, in the fridge, and in the freezer in the post.
I was searching for Florentine cookie recipes, found a few and decided to test them out this past weekend (one of which was the FN recipe). I was doing other things at the time and the dough sat for longer than the 30 minutes called for. Well, let me tell you,, that thing was a brick. I decided to add some water, maybe a couple of tablespoons, and I started chopping up the brick. Then I mashed it with a fork and managed to incorporate the water and ended up with a very scoopable dough. I liked the texture of these very much. I may omit the orange as well as I don’t think it added much and actually detracted from the caramel flavor.
In my quest to research some more, I just found this blog post today and couldn’t believe that someone had the exact same experience I did–it was as if I was reading my own account from this weekend. So funny! Appreciate the comments that clarified it was supposed to be a 30 SECOND wait time, not MINUTES!
These are amazing cookies. I have a recipe that calls for quick oats and regular oats brown surgar vanilla etc. it makes a huge batch. Something like12 dozen or more. They freeze really well. Takes a bit of time but worth it. They are also really delicate.
I made this cookie for the holiday and it was a big hit. I checked out the original recipe on Food Network and read the comments. This comment has an excellent insight into why the dough is dry and must be doctored: the original FN recipe poster meant to say “combine wet and dry, mix, and let dough sit for 30 SECONDS, not 30 minutes. (I’ll copy comment below). I let the dough rest for 30 seconds and was able to get the spoonfuls of dough on the sheets with no problem. Hope this helps and happy new year!
Food Network reader comment:
“Kara Synhorst1482 days ago
I was surprised that no one else mentioned the two problems I ran into. First, it says to pre-heat the oven, then make the boiled almond mixture, then let the mixture set for 30 minutes. I read between the lines and realized it meant 30 seconds, luckily. (When I let it sit for ten minutes or so to wait for a free oven rack before I made the next balls, it became a sold, completely unmalleable mass that I had to warm up again to use.) Then later, it says “halfway through baking time, 10 or 11 minutes.” I pulled the cookies out at 11 minutes, thinking it meant that was the whole baking time (I’m an English teacher, so trust me on the grammar). I realized they looked woefully underdone and put them back in. It wasn’t until later that I realized the cook time is 20 minutes. Or maybe I’m crazy, because other commenters thought they were done at 7 minutes. The recipe, in my opinion, could really use some clarity.
The finished cookies are fine, if not quite what I was hoping for.”
I just had the exact problem with the Food Network recipe about two hours ago.
The edges turned caramel color, but I had to flatten them with an offset spatula halfway through baking. I kept microwaving the batter/concrete as it cooled. The first time it helped, the second time, not so much. I’m thinking each “reheat” cooked the sugars. I never really got the perforated “lace” effect.
I am going to try this adapted version … as soon as I get more almonds.
There are some recipes which call for oatmeal, a cheaper alternative to almonds.
I’ve only got roasted almonds. Can these be substituted in place of blanched?
Pauline, I haven’t tried this recipe using roasted almonds, so I’m not sure. It might work, but I can see 2 potential issues: 1) Since the almonds are already roasted and will get toasted even more as these cookies bake, I wonder if they would get bitter (as almonds can do when they’re over-toasted). 2) I wonder if the oil content is different in roasted almonds vs. non-toasted almonds, and if so, how it might affect the batter. If you feel like experimenting, it might be fun to test though. If you try it, please let me know how it goes!
Such pretty and delicious treats, and a nice change up from my usual cookie exchange contribution. Thanks for the recipe.
PS…I made a double batch and had to add water to the dough several times as it took a long time to bake them one pan at a time. Worked perfectly. The dough is very forgiving.
I just searched the internet and chose your recipe (over Giada and Food Network recipes!) to give to one of my readers, because I can’t find the one I always make :) They look perfect and love that you give substitutions for the corn syrup! Looking forward to perusing the rest of your blog! CC
Christina, You are so sweet, thanks so much for your kind words and for stopping by!
Thank you for this recipe i followed the recipe exactly..they laces came out delicious!!!!..perfect balance of sugar and almonds!…I think I’ve found the solution to the problem you had of the mixture drying out sou needed to add h20…… Instead of leaving the mixture to cool for thirty miutes..(this is what drys it out)…… I just used the mixture up straight away with out letting it cool because the mixture is still porridge consistency ….just be careful.I used 1/2 tsp of mixture to make my cookies
..I hope this helps..thank you again I love your blog!!..x
Thank you for posting your comments about the consistency of the cookies. I followed the recipe and after 20 minutes, the dough was rock hard. I starting adding water and with some elbow grease it became the consistency of cream of wheat and when baked were very delicious. Thank you again for that tip. It stopped me from freaking out.
I guess sometimes you do need to exercise your own judgement and not follow a recipe blindly. I have never made florentines before, yours look absolutely perfect
I made these in much larger batches in a retail bake shop in NY, many years ago. They are fabulous and one of my favorites! Watch the bake time (may vary) and allow them to cool completly.
What beautiful photos of one of my favorite cookies. My sister-in-law rolls these around the handle of a wooden spoon while still warm and dips one end in melted chocolate. Very tempting whether flat or rolled!
I just made a batch of these today, and I had the same problem with the batter settling too much, but I followed your instructions and they came out wonderful! Thanks!
Christopher, I’m glad I’m not alone…I wonder why the batter does that! Anyway, I’m happy you liked these cookies! :)
wow they are beautiful! Love the sound of the texture..yum!
I love it when mistakes work out! These cookies look delicious!
I don’t like the orange/chocolate combo either, so I think that the cookies are better off without the orange. They look amazing. You made my mouth water…
PS: the recipe for the oysters rockefeller is up!!
Gorgeous lacy cookies! And how clever of you to add the water to fix the recipe! Wouldn’t these be great with tea?
these are one of my favorite companion for coffee and tea! I used to order coffee after a meal in a restaurant just to get these! :D soooo good! you’re such a great cooker! :)
I have never had a Florentine Lace Cookie. They look fabulous, crispy and delicious!
Those look so delicate and pretty! Yum!
How cool Faith! I’ve never made these but I’ve eaten plenty (hey’re so moreish that lovely texture) so thankyou for the recipe! :D
Oh I’m so glad you were able to save your yummy cookies! I haven’t had these in ages! They look so delicious!
They look so fragile and delicate. I can’t remember ever eating these, although I’m sure I must have! They are really pretty and I would love to try them!
These delicate cookies sound and look scrumptious!! Love all the photos! Thanks for sharing your baking mishap….glad to hear you didn’t have to dump the batter. Sometimes it is hard to get the timing right…but such a joy when you can fix! Need to try these.
These are so beautiful! I love that you didn’t get frustrated with the batter. I would have probably cursed and then threw it all way….haha. I guess the water did the trick. I had cookies like this the other day and someone added little pieces of toffee and then filled them with chocolate to make little sandwiches. Awesome! Oh I also love that picture of you holding the cookie up. It’s so pretty :)
Those are beautiful and ever so tempting! Nice way of saving those cookies…
Cheers,
Rosa
I can just see those with a ribbon strung through them hanging from a tree…just waiting for nibbling! :)
Good save on the batch of cookies. It’s so annoying when something doesn’t work out and the ingredients have to be thrown away. Lace cookies are a fave of mine….so light and crisp!
these are so thin and dainty and delicate! they’re the type of thing that i couldn’t resist cracking into with my teeth…again and again and again. :)
Absolutely beautiful. I am in awe of your baking talent.
They are gorgeous! Love the photo of the one in front of the window, it beautifully showcases its lace detail! You are so clever for saving your batter! I will give this a try, thank you for another fabulous recipe sweet friend!!
So beautiful and lacy. Thanks for the tip on rescuing the cookies batter, I wouldn’t have thrown it out, but just eaten it raw!
Mimi
Holy cow those are pretty!! I think I’d probably add the oj zest and omit the chocolate if I had to choose one ;) but either way…I definitely want to try these!
These look wonderful! See in a situation like that where I would never think to just add water–I’d think they were ruined and probably throw all of the batter away! :( Good save!
A friend and I are baking our gifts for friends and coworkers this year…hopefully I can pull off something that looks at least half as delicious as all of your treats!