This post may contain affiliate links, view our disclosure.
Want those dreamy speckled robin’s egg blue Easter eggs made with natural egg coloring? Learn how easy it is to make natural blue dye with red cabbage and brown paint with cocoa powder; no artificial stuff, just pure Easter magic!
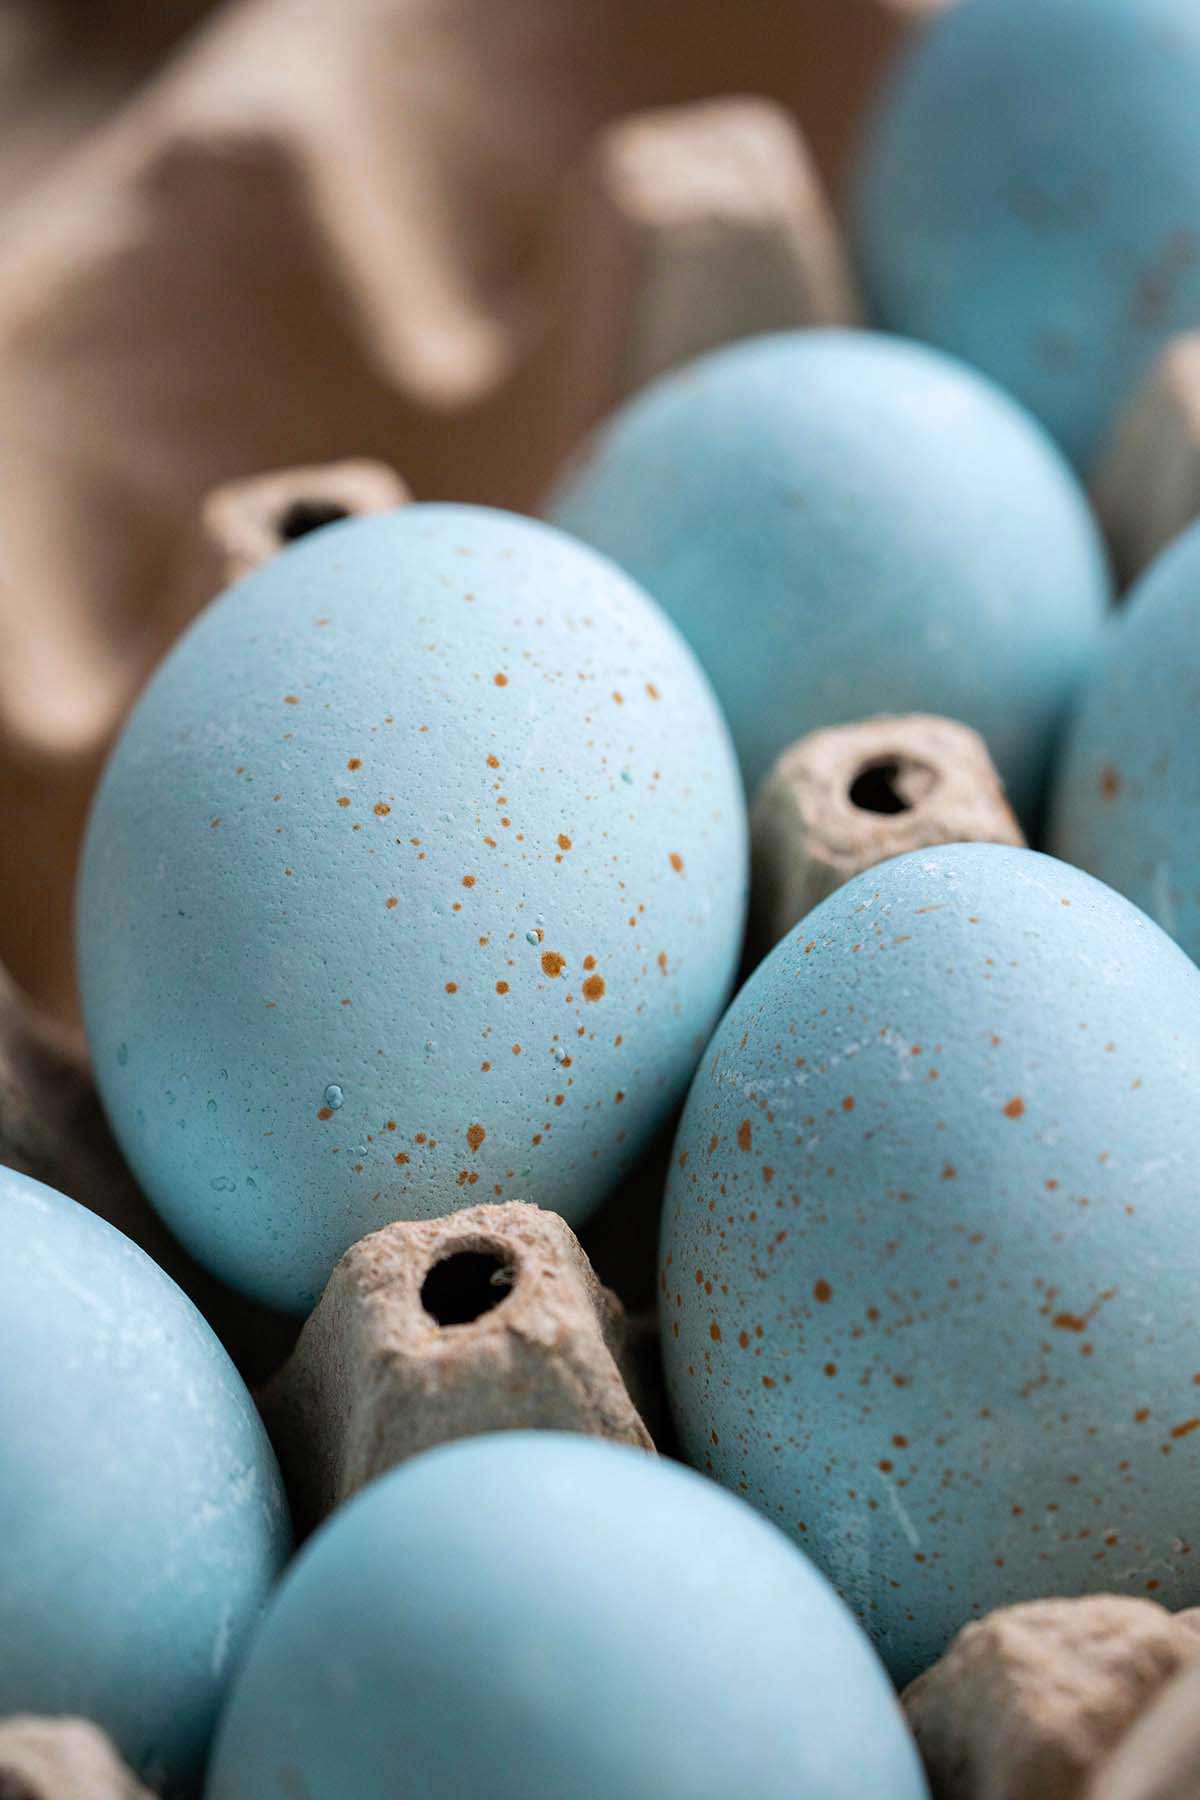
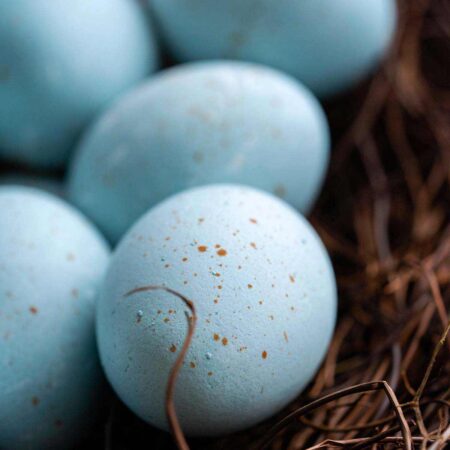
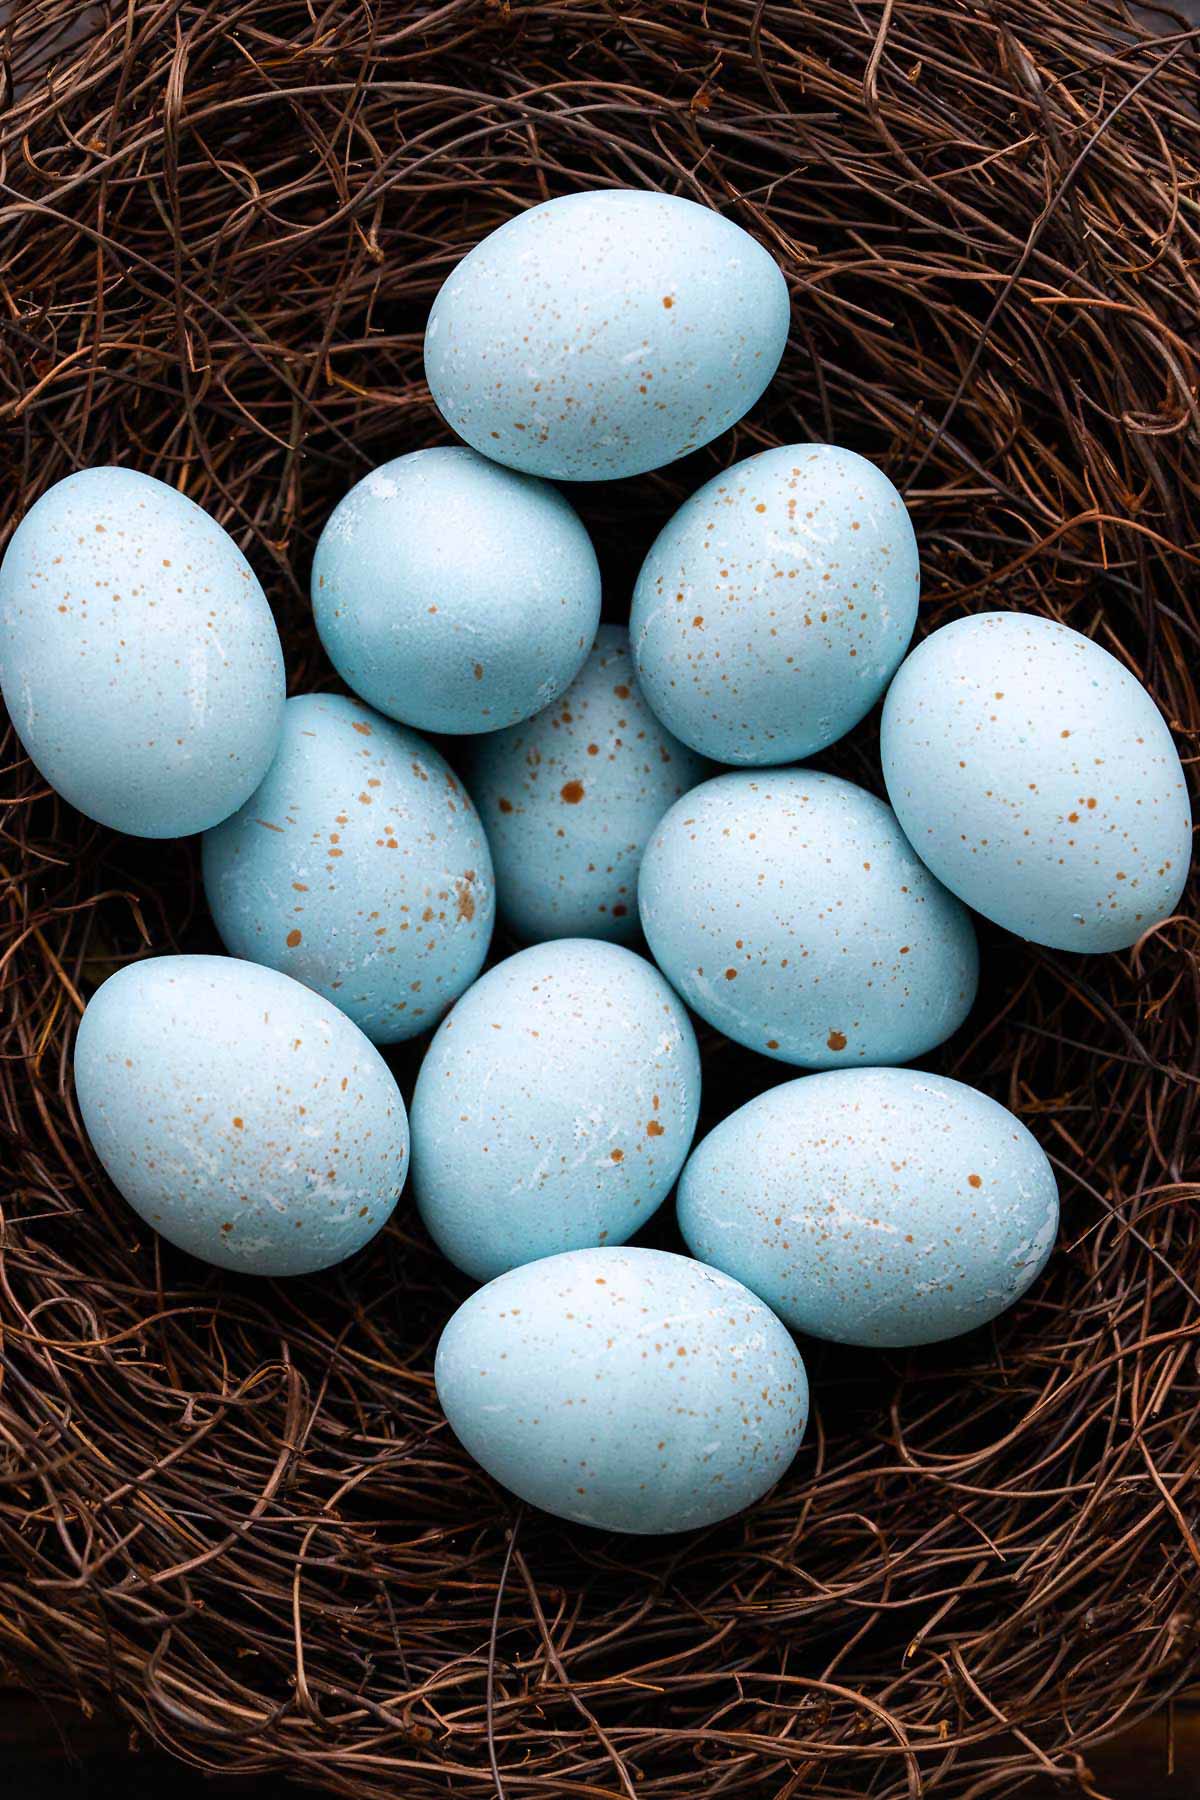
Looking for a natural way to dye Easter eggs a beautiful robin’s egg blue? Skip the synthetic stuff and head to your kitchen instead! You can create stunning, speckled blue eggs using red cabbage! Yep, that humble veggie holds the secret to some beautiful springtime magic.
Here I’ll walk you through how to make natural blue dye, how to transform your eggs into that dreamy robin’s egg shade of blue, and how to speckle your eggs for a truly nest-worthy finish. This project is the perfect blend of holiday-themed art and science. It’s a fun (and all-natural) Easter project to do with the kiddos!
Whether you’re making colorful Easter baskets or a spring tablescape centerpiece, robin’s egg blue adds a ton of charm.
Side Note: If you’ve been following my blog for a while (first of all, thank you!), you might remember I used red cabbage to make food coloring for cupcake frosting over a decade ago! Time sure flies, doesn’t it?
Why Use Natural Egg Coloring for Easter Eggs?
Using natural dyes for Easter eggs is not only eco-friendly, but it’s also a fun science experiment. You get to play with nature’s color palette, avoid synthetic dyes (which is especially helpful if you plan to eat the eggs), and create beautifully unique hues that store-bought kits can’t replicate.
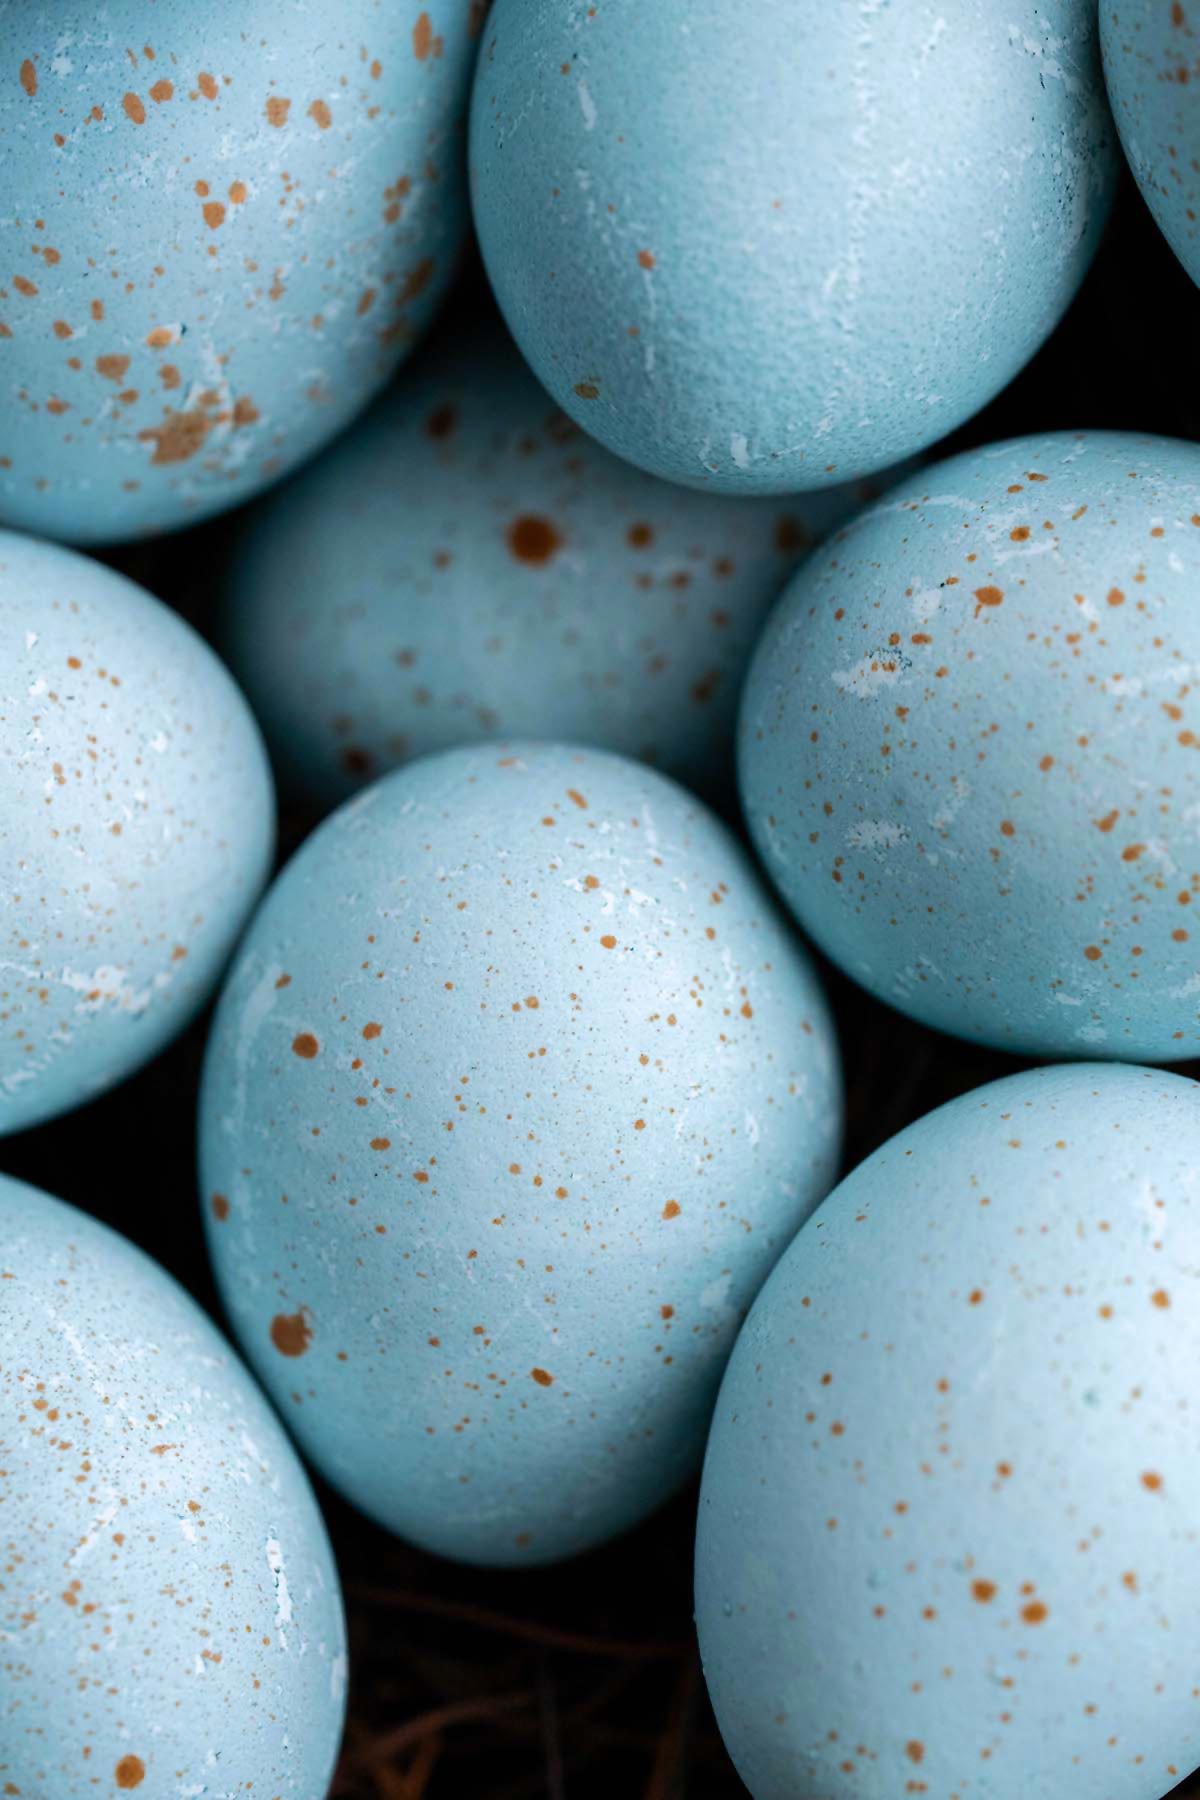
And that robin’s egg blue? It’s soft and absolutely stunning, especially with speckles. The secret ingredient? Red cabbage.
Side Note: If you want an all-natural dark blue/purple food coloring for eggs, check out my Halloween deviled eggs post! I share a step-by-step guide for how to make blueberry food dye.
Ingredients & Supplies
Breaking It Down
Ingredients Explained
In this section I explain the ingredients and give substitution ideas where applicable. For the full recipe (including the ingredient amounts), see the recipe card below.

Natural Blue Dye Ingredients
- Red cabbage – We use 1 medium head of red cabbage, weighing around 1 3/4 pounds, and yielding about 8 cups chopped.
- Water – When cooking the cabbage, its color leeches out into the water to create the natural dye.
- Salt – Salt helps pull out the color of the cabbage as it cooks.
- Distilled white vinegar – Vinegar helps the dye set on the egg shells (and nope, you won’t be able to taste it). You’ll need 1 tablespoon per 1 cup of liquid, so about 7 tablespoons.
Other Ingredients
- Hard-boiled eggs – This recipe makes about 7 cups of dye, which is enough to color 12 hard-boiled eggs at one time in a large bowl (the eggs need to be fully submerged in the liquid). You can reuse this dye for at least one more batch of a dozen eggs after dying the first batch. Also, note that I dyed white eggs; brown or other egg colors will also work, but will yield different results than pictured here.
Natural Brown Speckles Ingredients
- Vodka – Here we use vodka as the solvent to dissolve cocoa powder to make edible brown paint. Vodka evaporates quickly, and you’re left with speckles.
- Unsweetened cocoa powder – This provides the brown pigment for the food-grade “paint” we make. After making the brown paint, we use a clean paint brush (or unused toothbrush) to flick it onto the eggs to add a speckled effect. Tip: If you want black speckles instead of brown speckles, use black cocoa powder.
How Red Cabbage Makes Blue Dye
Here’s the cool (and a bit nerdy) part. Red cabbage contains anthocyanins, which are pH-sensitive pigments. In water alone, red cabbage produces a deep purple dye. But add an acid like vinegar, and the dye transforms into various shades of blue.
Science + nature = Easter magic.
Step-by-Step Instructions
How to Make Natural Blue Dye for Easter Eggs

- Chop the cabbage.
- Add the chopped cabbage, water, and salt to a large pot with a lid.
- Bring to a boil, then cover the pot, and turn the heat down so it doesn’t boil over. Cook for 30 minutes.
- Drain the cabbage, reserving the liquid.
- Measure how many cups of cabbage liquid you have (it should be about 7), and add it to a large bowl.
- Stir in 1 tablespoon distilled white vinegar for each 1 cup of liquid. Cool to room temperature, about 1 hour.
How to Use Natural Coloring to Dye Hard-Boiled Eggs Blue

- Add the hard-boiled eggs to the liquid, making sure they’re submerged. Transfer the bowl to the fridge and let the eggs soak until they reach your desired shade (the color gets darker the longer they soak). The eggs pictured here soaked for 4 hours, but you can go as long as 24 hours for more intense color.
- Once the eggs reach your desired shade, use tongs to transfer them to a paper towel-lined tray to dry completely before adding brown speckles. Once the eggs are dry on the first side, flip them over and let them dry on the second side.
Pro Tip: How to Get Deep Blue with Natural Egg Coloring
Just like when you use a store-bought Easter egg coloring kit, the longer these eggs soak in the dye, the deeper and more intense the blue!
How to Create the Speckled “Robin’s Egg” Effect

- Once the eggs are dry, stir together the vodka and cocoa powder in a small dish.
- Dip a clean paintbrush (or unused toothbrush) into the liquid and flick it onto the eggs to create a speckled look.
- Let the speckles dry before serving. (Once dry, you can flip the eggs over and add speckles to the other side if desired.)
Storage
Store hard-boiled eggs in the fridge for up to one week. (Remember to pop the bowl of eggs and dye into the fridge as they soak!)
Tips For Beautiful Naturally Dyed Robin’s Eggs
- Start with white eggs for the look shown in these photos – Brown eggs will give you different results (often more muted, but still lovely!).
- Polish with a little oil – After drying, you can rub a bit of vegetable oil, coconut oil, or light olive oil onto the eggs to make them shine.
- Mix and match dyes – Try making other natural food colorings using turmeric, onion skins, beet juice, etc. for more natural dyes to pair with your blue eggs.

Frequently Asked Questions
Yes, if you’ve used food-safe ingredients and stored the eggs properly (in the fridge), your naturally dyed eggs are totally safe to eat. Red cabbage, vinegar, and water are all perfectly edible, so snack away!
Just remember to keep them refrigerated and eat them within one week of boiling.
Yes, but it may slightly affect the final color. White vinegar is best for the clearest results.
For a light blue, soak for 4 hours. For a deeper, more saturated color, soak overnight. (Don’t forget to pop the bowl with the eggs and dye into the fridge to soak.)
Yes! Store it in the fridge and reuse within a few days. It may lose some potency over time.

Let’s Connect

Did you make this recipe? Please rate it and leave a comment below. You can also tag @anediblemosaic on social media.
To stay up-to-date, follow me on Facebook, Instagram, Pinterest, and Twitter!

How to Make Natural Blue Dye For Coloring Easter Eggs (Robin’s Egg Blue!)
Email This Recipe
Get this recipe link emailed straight to your inbox!
Ingredients
For the Natural Blue Dye:
- 1 medium head red cabbage chopped (about 1 3/4 pounds/800 grams/8 cups chopped)
- 8 cups water
- 1 tablespoon salt
- Distilled white vinegar you’ll need 1 tablespoon per 1 cup of liquid, so about 7 tablespoons
Other:
- 12 hard-boiled eggs see Notes
For the Natural Brown Speckles:
- 1 tablespoon vodka
- 1/2 teaspoon unsweetened cocoa powder see Notes
Instructions
- Make the dye. Add the chopped cabbage, water, and salt to a large pot with a lid. Bring to a boil, then cover the pot, and turn the heat down so it doesn't boil over. Cook for 30 minutes. Drain the cabbage, reserving the liquid. Measure how many cups of cabbage liquid you have (it should be about 7), and add it to a large bowl. Stir in 1 tablespoon distilled white vinegar for each 1 cup of liquid. Cool to room temperature, about 1 hour.
- Dye the eggs. Add the hard-boiled eggs to the liquid, making sure they’re submerged. Transfer the bowl to the fridge and let the eggs soak until they reach your desired shade (the color gets darker the longer they soak). The eggs pictured here soaked for 4 hours, but you can go as long as 24 hours for more intense color.
- Air dry the eggs. Once the eggs reach your desired shade, use tongs to transfer them to a paper towel-lined tray to dry completely before adding brown speckles. Once the eggs are dry on the first side, flip them over and let them dry on the second side.
- Add brown speckles. Once the eggs are dry, stir together the vodka and cocoa powder in a small dish. Dip a clean paintbrush (or unused toothbrush) into the liquid and flick it onto the eggs to create a speckled look. Let the speckles dry before serving. (Once dry, you can flip the eggs over and add speckles to the other side if desired.)
Notes
- Eggs: Any color of eggs will work; however, use white eggs for the color pictured here.
- Cocoa Powder: If you want black speckles instead of brown speckles, use black cocoa powder.
- Amount of Dye Made: This recipe makes about 7 cups of dye, which is enough to color 12 hard-boiled eggs at one time in a large bowl (the eggs need to be fully submerged in the liquid). You can reuse this dye for at least one more batch of a dozen eggs after dying the first batch.
- Storage: Store hard-boiled eggs in the fridge for up to one week. (Remember to pop the bowl of eggs and dye into the fridge as they soak!)
Nutrition
Nutritional information is automatically calculated and should be used as an approximate.
Share it with me on Instagram and leave a comment to let me know your thoughts!


I’m the writer, recipe developer, photographer, and food stylist behind this blog. I love finding the human connection through something we all do every day: eat! Food is a common ground that we can all relate to, and our tables tell a story. It’s my goal to inspire you to get in the kitchen, try something new, and find a favorite you didn’t know you had.
Free Bonus