

This post may contain affiliate links, view our disclosure.
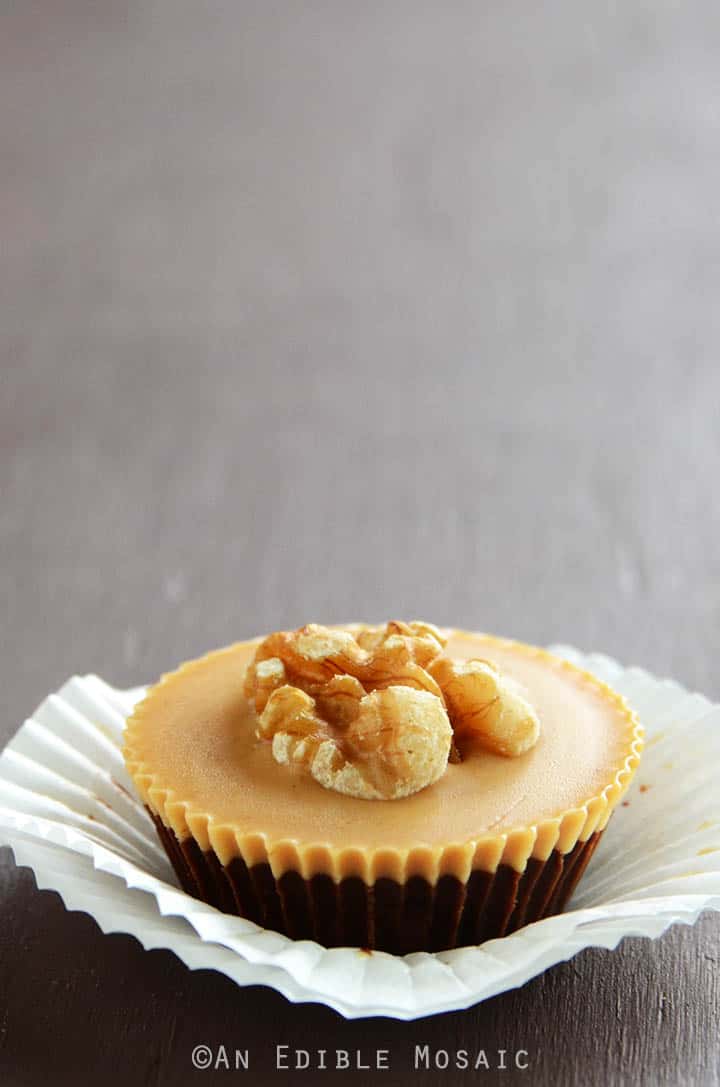
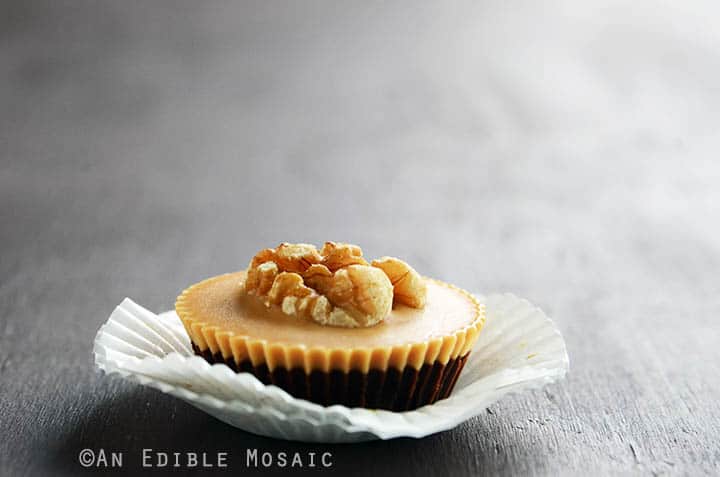
Healthy-Enough-for-Breakfast Chocolate Peanut Butter Cups are a decadent-tasting treat with a healthy ingredient list that will surprise you!
Do you remember a couple months ago when I made Mini Vanilla-Almond Cupcakes and gushed about Lisa’s blog? (The cupcakes were healthy enough to be breakfast – really, how could I not be smitten?)
Well, this treat is another of Lisa’s creations. When I swooned over her recipe for Double Peanut Butter Chocolate Cups a while back and noticed that she mentioned they were healthy enough for breakfast, I knew it would not be long before they graced my kitchen.
I only made a couple changes to Lisa’s original recipe: (1) I used powdered stevia (in packets) because that’s what I had on hand, and (2) I added a walnut half to the top of each candy (mostly for the crunch factor, but also because it looks pretty). If you have liquid stevia on hand you can follow Lisa’s recipe; if you want to play around with a sweetener other than stevia, here is a guideline on how sweet 1 packet of stevia is: the amount of stevia in 1 packet measures 1/2 teaspoon, which is about as sweet as 2 to 3 teaspoons of regular sugar.
Lisa had mentioned in her post that she likes using Tropical Traditions coconut oil to make these treats, so I was pretty excited when Tropical Traditions recently contacted me asking if I wanted to try this product. I’ve been using coconut oil for a few years now but this is the first time I’ve tried Tropical Traditions and I have to say, it’s a fantastic product. In my opinion, its pure, rich coconut flavor is second to none. Plus I love how they really take pride in their product…on their website it says “[Our coconut oil] is made by families who are coconut farmers using old-fashioned traditional methods that have been used in the Philippines for hundreds of years.”
If you’re wondering what you can use coconut oil in, I use it to make everything from fried eggs, to pan-seared fish, and to sauté veggies. I also like to play around with it in my baked goods (like muffins), and a little drizzle on a bowl of oatmeal or frozen yogurt is heaven. It’s an incredibly versatile product. If you want to try it for yourself, scroll down the bottom of this post for the giveaway!
- 2 tablespoons melted coconut oil (I used Tropical Traditions Organic Gold Label Virgin Coconut Oil)
- 4 tablespoons smooth peanut butter
- 1 teaspoon pure vanilla extract
- ¼ cup unsweetened cocoa powder
- 2 packets powdered stevia
- 2 tablespoons melted coconut oil
- 4 tablespoons smooth peanut butter
- ½ teaspoon pure vanilla extract
- 1 packet powdered stevia
- 10 walnut halves (optional)
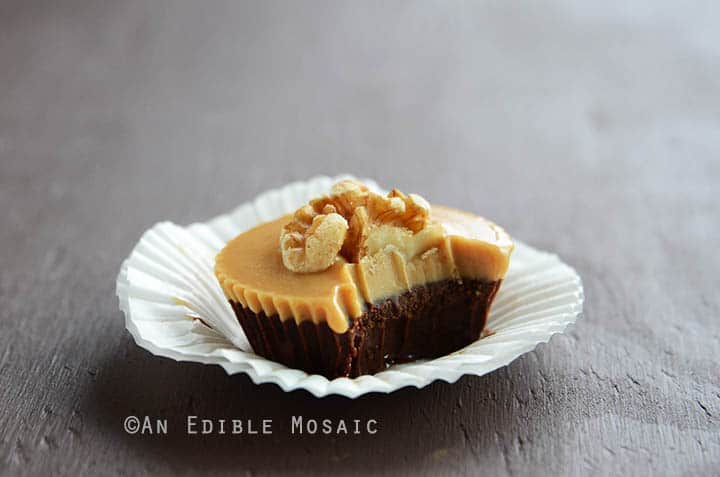
- Line a mini muffin tray with 10 paper liners. Stir all ingredients for the bottom layer together until smooth, and divide between the 10 mini muffin wells (each should be about half full). (Try not to dribble on the sides since it will give your candy a streaked look.) Put the tray in the freezer on a flat surface and freeze until solid (about 15 minutes, give or take a little while depending how cold your freezer is).
- Stir all ingredients for the top layer together until smooth, and divide on top of the set chocolate mixture. Transfer back to the freezer and freeze until partially solid (about 5 minutes), and then lightly press 1 walnut half into the top of each candy. Return to the freezer and freeze until solid.
- Store the treats in the fridge in an air-tight container in the fridge between layers of wax paper.
:: GIVEAWAY ::
 Win 1 quart of Gold Label Virgin Coconut Oil!
You do not need to have a blog to enter this giveaway! To participate, subscribe to the Tropical Traditions Newsletter and leave a comment here letting me know. If you want to earn additional entries, you can do any of the following (please leave a separate comment for each so I can count them as separate entries):
- Leave a comment telling me your favorite kind of candy (healthy or not!).
- Share this giveaway on Facebook and leave a comment here.
- “Like” Tropical Traditions on Facebook and leave a comment here.
- Share this giveaway on Twitter and leave a comment here.
- Follow Tropical Traditions on Twitter and leave a comment here.
- Pin something from this post on Pinterest and leave a comment here.
- Follow Tropical Traditions on Pinterest and leave a comment here.
This giveaway ends Saturday, July 21st at 9PM EST; after that the winner will be randomly selected and notified by email. Good luck to all!
Disclosure: I received the coconut oil that I used in this recipe for free from Tropical Traditions, and they are also providing the coconut oil for this giveaway. I was under no obligation to review this product, and as always, opinions stated are my own.


I’m the writer, recipe developer, photographer, and food stylist behind this blog. I love finding the human connection through something we all do every day: eat! Food is a common ground that we can all relate to, and our tables tell a story. It’s my goal to inspire you to get in the kitchen, try something new, and find a favorite you didn’t know you had.
Free Bonus


I have a quick question, and as always, I am late to the party!
I assume you are talking about the conversion of liquid stevia to your packet since that is what this recipe came from, but when I look at the whole sentence I think you might be talking about just weights and measures. Can you clear this up for me? Are you talking about a measurement or comparing it to the liquid Stevia? I have a package of Stevia in the Raw, 9.7 ounces. How much of that do I use?
You say:
” here is a guideline on how sweet 1 packet of stevia is: the amount of stevia in 1 packet measures 1/2 teaspoon, which is about as sweet as 2 to 3 teaspoons of regular sugar.”
I was really hoping to make these now. In fact, I have everything on my kitchen table, but I will pack it away and await your answer. I am dying to make these, especially with no sugar, they are almost a diet food!
Lauri, I’m glad you’re thinking of making these – they are so yummy!
I wasn’t talking about converting liquid stevia to powdered stevia – in my post above, I refer people to Lisa’s original recipe if they want to use liquid stevia instead of powdered.
I gave the amount of stevia per packet so that people who have a larger bag of stevia (instead of packets) can measure out the amount. As I noted, 1 packet of stevia is 1/2 teaspoon powdered stevia, so where the recipe calls for 2 packets of stevia, you would add 1 teaspoon of powdered stevia (or 2 packets of stevia).
I also noted about how sweet stevia is so that people can make adjustments according to their personal taste preferences if they want to.
I hope this helps and I hope you enjoy these if you give them a try! :)
I think they would be healthier without the hydrogenated oil. Would it work to use natural PB instead of the regular which is full of unhealthy ingredients?
Tara, I haven’t made this recipe using natural peanut butter. If you give it a try, please let me know how it goes.
My favorite candy is the Zero bar.
G’day Faith! I am craving for one of these right now, true!
Mouth watering photo and can’t wait to try these with xylitol too! Thank you!
Cheers! Joanne
Viewed as part of Candy Recipe Round Up by Cravings of a Lunatic
I love the old time favorite Hershey’s candy bar. I am very interested in trying this new coconut oil. I have tried the new agave nectar and with diabetes I love to try the new alternative sweeteners and the new oils that come out.
Faith – thanks so much for the response and good advice. You are probably right about powder vs. liquid. I don’t bake much, so I did not think of that! I’ll try it with xylitol first, and if that doesn’t work the experiments will begin!
These look delicious, but Stevia gives me crushing headaches and triggers hot flashes. Would Agave Nectar be an acceptable substitute?
Hi Kimberly, I haven’t tried this recipe with agave nectar, so I don’t know for sure; my only concern is that it might prevent the candy from hardening properly. If there’s another powdered sweetener that you use, I’d try that first, otherwise, if you decide to experiment using agave, please let me know how it goes!
Thanks!! I’ll let you know how they turn out! :)
how much is a packet of stevia? I don’t know if I’ll find any in my small town grocery and might need to substitute sugar
Jamie, Here is a guideline on how sweet 1 packet of stevia is: the amount of stevia in 1 packet measures 1/2 teaspoon, which is about as sweet as 2 to 3 teaspoons of regular sugar. Hope you enjoy the peanut butter cups if you make them! :)
These look amazing! But did you really mean to put peanut butter in the bottom layer as well? Just checking, thanks!
Kirsten, Thank you! :) Yes, peanut butter goes in both layers to help the candy set. Hope you enjoy them if you make them!
Boy am I sorry I missed this! I just started using organic extra virgin coconut oil and love it and would love to try that oil. Will have to buy it! Anyway, these candies sound utterly delicious and I love the photos-they totally drew me in, esp with the bite missing. YUM!
Shared the giveaway on FB. Your blog is too fantastic to miss!
Liked TT on Facebook. Unfortunately, don’t have Twitter or Pintrest…
Those chocolate PB cups look sooo good! Even better knowing you use stevia!! I must try these! My favorite candy is no where near as healthy… See’s walnut squares. Don’t know why they are called squares, since they are rectangles. :) Just walnuts, held together with caramel, bottom half dipped in dark chocolate. Two bites of goodness.
Thanks for the tip on the newsletter – now subscribed!
I subscribe to the Tropical Traditions newsletter, too!
I follow Tropical Traditions on Twitter!
I shared it on Twitter! (KDozeman)
I like Tropical Traditions on Facebook!
I shared this giveaway on Facebook!
My favorite candy is Lindor dark chocolate mint truffles!
I liked Tropical Traditions on face book!
And I’ve liked TT on fb :)
I liked Tropical Traditions on FB
shared on FB!
Just one favorite??? Hershey almond.
I’ve subscribed to the newsletter
My favorite candy is Recesses Pieces
My favorite candy is a Mounds bar, I liked the TT facebook page!
Following tropical traditions on pinterest :)
I repinned. These sound amazing!
i must make these!!! fabulous. i’m always more of a chocolate-pb girl, so of course these were my favorites growing up :)
a better substitution to the store bought peanut butter cups. Thanks for sharing Faith
I followed TT on Pinterest: http://pinterest.com/juanispr/following/
i Pinned TT on pinterest: http://pinterest.com/juanispr/try-it/
i followed TT on Twitter
i shared this giveaway on twitter https://twitter.com/JuanisPR/status/222938692648566784
I like tropical traditions on Facebook!
I love mounds!
I subscribe to tropical traditions news letter!
I just read the page and I think “Healthy-Enough-For-Breakfast Chocolate Peanut Butter Cups” just became my favorite treat!
I liked TT on facebook!
I shared TT on facebook: http://www.facebook.com/juanisp
I Love Brownies!!!
Homemade peanut butter cups.
Chocolate peanut caramel clusters.
Stunning photo. I’d have to make 1,000 cups and take 1,000 pix of each to get one shot like that.
My favorite candy (hard to choose a favorite) would be Milky Ways
I am subscribed to their newsletter!
Following TT on Pinterest
Pinned this at http://pinterest.com/pin/202873158184829972/
Tweeted at https://twitter.com/InezbyDesign/status/223099964337823744
Following TT on Twitter
Liked TT on FB
Shared on my FB at http://www.facebook.com/InezbyDesign/posts/170706169721346
One of my favourite candies is Maple Cream Fudge…followed by Chocolate Coffee Cream Chocolates! mmmm
I have subscribed to TT Newsletters
i Followed Tropical Traditions on Twitter
i shared this giveaway on Twitter
I liked Tropical Traditions on fb
i shared this giveaway on fb
I love brownies, its my fav!!!! :D
I like peanut butter cups so I am sure I would like this recipe.
I subscribed to the Tropical Traditions newsletter.
I follow Tropical Traditions on Pinterest!
Pinterest- Courtney Tucker http://pinterest.com/gothlyric/
Pinned Peanut Butter Cup Recipe!
http://pinterest.com/pin/279152876873455601/
I follow Tropical Traditions and Tropical Traditions Special Deals on Twitter under the name Courtney Tucker @Gothlyric!
Tweet!
https://twitter.com/Gothlyric/status/222879380093927425
I like Tropical Traditions on Facebook with the profile name of Courtney Tucker
Jolly Rancher Sours are my favorite candy!
I am subscribed to Tropical Traditions newsletter with the email [email protected]!
I love truffles
I am a DB fan of TT.
I subscribe to TT.
TWEETED https://twitter.com/agodlyhomemaker/status/222748378734407680
I PINNED ON PINTEREST
I FOLLOW TT ON TWITTER
I FOLLOW TT ON PINTEREST
I LIKE TT ON FB
shared on fb
I LOVE ALL CANDY, ESPECIALLY ROCHE.
i sub to TT
I love reeces peices! Thanks for the chance to win!
gina.m.maddox (at) gmail (dot) com
I must try these peanut butter cups in my continuing effort to win my daughters over to healthier snacking!
I Like TT on FB
rollerbeth at gmail dot com
My favourite candy is dark chocolate. The darker the better.
rollerbeth at gmail dot com
I’m subscribed to TT’s newsletter
rollerbeth at gmail dot com
I pinned an image from this page to Pinterest.
My favorite candy is Mounds and Almond Joy!
I am now following Tropical Traditions on Pinterest.
Liked on FB!
Shared on FB!
I am now following Tropical Traditions on Twitter.
I shared the giveaway on Twitter.
I shared the giveaway on Facebook.
I liked Tropical Traditions on Facebook.
I’ll have to agree with Christiana on the candy questions: “definitely chocolate, the darker the better.”
I subscribed to the Tropical Traditions newsletter.
I Follow Tropical Traditions on Pinterest.
I pinned your chocolate peanut butter cup recipe on Pinterest.
I “Like” Tropical Traditions on Facebook.
I subscribed to the Tropical Traditions Newsletter.
favorite candy — anything with nuts and chocolate
I ‘follow’ Tropical Traditions on Pinterest.
I ‘follow’ Tropical Traditions on Twitter.
I ‘like’ Tropical Traditions on Facebook.
My favorite candy is anything sour. :)
And my favourite candy is definitely chocolate, the darker the better.
I subscribed to Tropical Traditions newsletter. I’m pretty excited because I just made an order from them recently for some of their palm oil. I’d love to try their coconut oil too!
peanut butter cups are by far my favorite. i love dark chocolate covered espresso beans too!
Pinned: pinterest.com/pin/124482377171009645/
I tweeted: twitter.com/joshandsaradav/status/222575971109318656
I follow them on Twitter
I follow them on Pinterest
I “Like” Tropical Traditions
My favorite candy is the Butterfinger Crunch bar
I subscribed to their newsletter. Thank you for doing the giveaway! :)
I’d eat this breakfast every day of the week! What a way to start the day with a big smile on your face.
Pinned!!
Almond Joys are my favorite candy!!
My favorite candy IS Peanut Butter cups, so these are already planned for making tomorrow!
Subscribed to the newsletter.
I subscribed to the Tropical Traditions Newsletter. Thanks.
Liked TT on Facebook.
Thanks from [email protected]!
Following TT on Twitter as Amber Gillespie.
Thanks from [email protected]!
Subscribe to the TT newsletter at [email protected]!
These look so awesome! I do the sugar free thing, so I am excited to try these. I might try Splenda though since I have that here. My fav candy is dark chocolate on anything, but especially on peanut butter!
These look delicious! Who doesn’t love a peanut butter cup, especially one so healthy! Thank you for creating this great recipe, we can’t wait to pass these goodies around the office!
You know, you don’t have to twist my arm very hard to get me to eat a candy for breakfast. Looks awesome.
Oh favorite candy. Coffee Crisp?
I also liked Tropical Traditions on Facebook.
My favorite candy is marshmallow fudge!
Wow, these look super yummy! Can’t wait to make them!
One of my favorite kinds of candy has to be a Baby Ruth candy bar! Yummm!
been wanting to try coconut oil, so why not start with trying the best? or someone whose blog I enjoy thinks is best? anyway, favorite type of candy….chocolate, the darker the better. from cheap to the most decadent…I’m happy!
I love dark chocolate.
Following on Pinterest!
Pinned from this post
Following Tropical Traditions on Twitter
Shared on Twitter
Like Tropical Traditions on FB
Shared on FB!!!
Fav candy… just about anything chocolate! lol
I “liked” tropical traditions on FB!
My favorite candy is dk chocolate covered ginger!
I’m following Tropical Traditions on Pinterest!
I’m following Tropical Traditions on Twitter!
I love divinity…my mom makes the best Christmas candy!
I just found your blog. My favorite candy is caramel.
I have begun to see recipe’s with coconut oil and after coming to your site I found out much more information about coconut oil that prompted me to become even more informed. Thanks for the information and I look forward to trying this recipe. I love peanut butter and chocolate, the healthier means better for me :)
I love dark chocolate covered cashews!
I would probably have to say Snickers is my favorite store-bought candy bar. I’ve made homemade Samoa bars that are pretty good, but there is something guiltily delicious about a snickers that I love. BTW, you must have a different definition of healthy breakfast than I do. With around 150 calories, 14 total grams of fat and 7 grams of saturated fat for each peanut butter cup, I do not think these will be replacing my oatmeal anytime soon.
You can never go wrong with a Reese’s PB cup!
I love a good dark chocolate peanut butter cup!
My favorite candy is a hard thing to choose because I love candy, but I would have to go with Milky Way
I “Like” Tropical Traditions on Facebook
Chocolate covered nuts, especially almonds!
[email protected]
my favourite type of candy is dark chocolate! mmm. Chocolove is my brand of choice!
These look scrumptious. My husband loves peanut butter cups so it looks like I will be trying these.
I haven’t used stevia before so thanks for the comparison tips.
My all time favorite candies are ( I can’t choose just one), malted milk balls and Sixlets. I’ve eaten both since I was a child and still crave them. In fact I ate malted milk balls the entire time I was pregnant with my daughter and gained a whopping 15 pounds during pregnancy. I ate very healthy otherwise. To this day her favorite candies are malted milk balls. Makes me wonder!
Heath bars, mmm :)
Milk chocolate covered peanuts.
Homemade Chocolate Caramel Pecan Clusters.
Pinned it!
Just “liked” tropical traditions on facebook
PB cups are definitely my favorite candy!!! Dark chocolate bars come in as a close second!
Yum! Pretty, yummy, and healthy too. You can’t beat the peanut butter and chocolate combo!
I love a Zagnut bar in all of its crunchy peanut buttery glory. But it’s definitely not healthy enough for breakfast, so these lovely peanut butter cups surely would have a place in my heart as well. :)
Follow Tropical Traditions on Pinterest
“Like” Tropical Traditions on Facebook
Pinned to Pinterest
My favorite candies are those chocolate covered raspberry jelly rings/bars.
my favorite kind of candy changes weekly, if not daily. right now i’m loving riesen chocolate chews. :)
Oh I bet these are good! I love anything with peanut butter and chocolate!
These are just gorgeous, and no doubt equally delicious…Wow!
I repinned the chocolate PB cups! Mmmm (:
Following on Twitter!
Following on Pinterest!
Liked on Facebook!
Pinned!
I love anything chocolate. My favorite fudge is coconut oil and palm sugar with chia seeds!
I follow Tropical Traditions on Twitter! (:
I follow Tropical Traditions on Facebook!
I liked Tropical Traditions on Facebook!
I LOVE dark chocolate peanutbutter cups from Trader Joe’s. I also adore Pretzel M&Ms(Not so healthy!) But anything chocolate is my favorite! (:
I love snickers!!!
Faith–I’m so glad you tried these and liked them! They really are my fave dessert/breakfast that I’ve made! I love how even non-stevia lovers think these are great! My only problem with them is eating them all in one day :-)
ps: just pinned these and will try them next weekend!
my favorite candy bars were zero bars…i have no idea if they still make them…but i can practically taste the yumminess~
just “liked” tropical traditions on fb! i adore coconut oil…for everything!
I have a question…
Do you use cocoa in BOTH layers? It didn’t seem like you would and I checked out the original recipe and she only uses it in the chocolate layer. Just checking.
Also, my favorite candy bar is Cadbury’s Fruit and Nut bar or just plain old chocolate covered marzipan.
Citymouse, Thanks so much, you are right — the cocoa is only in the bottom layer! I just fixed it.
These look wonderful. I’m a huge fan of coconut oil and have been using it a lot recently. I think my favorite candy is just good chocolate (preferably with a little peanuts, peanut butter, and/or sea salt.
These look divine!
My favorite candy is Heath Bar.
My favorite kind of candy is Reese’s, hands down! So I’m UBER thrilled that you made these. Any excuse to eat those delicious PB choc cups for breakfast!
OMG, this is the best breakfast treat ever! Terific.
Cheers,
Rosa
i follow tropical traditions on pinterest!
i pinned your pb cups! :)
I like tropical traditions on fbook!
PB cups are definitely my favorite candy!!! pb + chocolate = heaven!
Faith – these look incredible! I’m a huge fan of coconut oil and use it for popping popcorn. My kids would love it if I gave them one of these treats for breakfast.
Our favorite candy is Reese’s cups so this recipe is perfect for us!
I pinned it!
My favorite candy is an almost frozen Almond Joy :)
Also pinned. I can’t wait to make these.
These look delicious. This is my first time visiting your blog. My favorite candy…there are too many! But, for the purpose of winning that yummy coconut oil, which I use profusely, I’ll narrow it down to a 5th Avenue bar.
I follow Tropical Traditions on Pinterest!
My favorite kind of candy is a simple Snicker’s bar, but it has to be frozen!
Just pinned!
I’m pretty simple so a square of dark chocolate usually hits the spot.