


This post may contain affiliate links, view our disclosure.
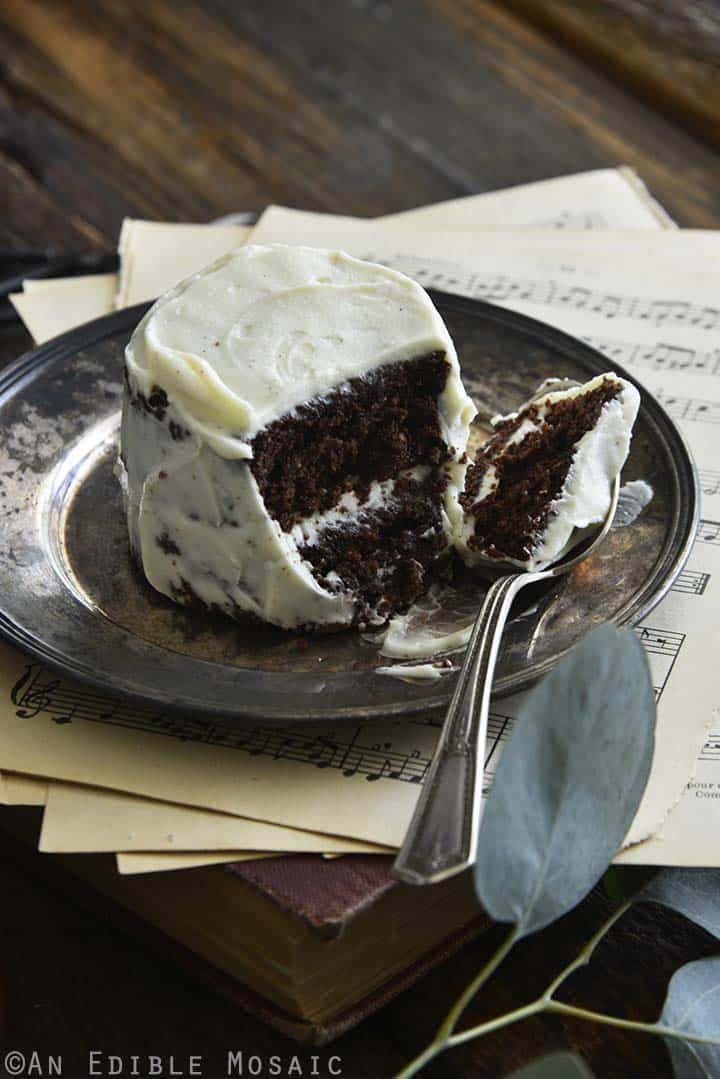
Perfect for date night or Valentine’s Day dessert, this small chocolate cake recipe uses one layer of rich, moist chocolate cake that’s cut into four pieces and stacked with silky-smooth chocolate buttercream to make two decadent bakery-quality slices of cake.

Get ready to blow your mind with what is about to come out of your kitchen. Skip a trip to the bakery this Valentine’s Day (or on your next date night). You just found your new favorite chocolate cake recipe with chocolate buttercream for just two people.
I’m telling you, if I can make this, so can you!
This recipe makes two completely luscious slices of rich, moist, tender chocolate cake layered with silky smooth chocolate buttercream and topped with buttercream roses. It’s something you would pay $10 per slice for (or more!) at a high-end bakery.
Even though this is bakery-quality, making this treat at home is of course cheaper than buying it. But more than that, baking from scratch really shows that someone special just how much they mean to you.
And this recipe is even more meaningful because it supports a good cause. This year I’m participating in the Good Cookies Food Bloggers’ Valentines Event organized by Julie of The Little Kitchen! Cancer is the leading cause of children’s disease-related death in the U.S. Right now, 40,000 children here are actively battling cancer. And less than 4% of the National Cancer Institute’s budget goes to childhood cancer. This is why Julie got involved.
Our goal is to raise $3000 by March 15. The three event sponsors (Dixie Crystals, MediaVine, and OXO) have each agreed to match the donations up to $3,000, which means when we raise $1, it turns into $4! Please consider donating here (edited: this event ended and we exceeded our goal!).
A Note For My Readers: I have so much respect for Julie for her incredible work supporting such a great cause. And thank you, Dear Readers, for reading and considering donating. Please do what you can, even if it’s just helping to spread the word about childhood cancer awareness. xoxo, Faith

The Inspiration for This Recipe: Quick Chocolate Cake (aka Crazy Cake or Wacky Cake)
I wanted to share my inspiration for this cake recipe because it’s a story in its own right. During the Great Depression, my grandmother made what she called “quick chocolate cake”, which different families have their own name for. I’ve also heard it called crazy cake (this is what my mom always called it), wacky cake, and Depression cake.
Because of food scarcity, the recipe doesn’t have eggs, butter, or milk. And surprisingly, it comes out incredibly moist and flavorful. Growing up, it was the chocolate cake my mom always made when an occasion called for chocolate cake. It really is that good!
As an adult, I’ve played with the traditional crazy cake recipe many times to make different things, and it always comes out great. Here, I tweaked my grandmother’s crazy chocolate cake to transform it into a decadent Valentine’s Day cake that’s worthy of a special occasion.
This recipe makes two large slices of rich chocolate layer cake, so it’s really enough for four people. But it’s a heck of a lot better than having a whole cake on hand if what you really want is just a slice for you and a slice for your sweetheart.
Why You’ll Love This Valentine’s Day Chocolate Cake
- It’s romantic. Two gorgeous slices of moist chocolate cake layered with silky smooth frosting, and topped with beautiful piped chocolate buttercream roses. I can’t think of a sweeter (pun intended) way to celebrate Valentine’s Day (or any date night) with your sweetie!
- It’s easy. This cake is impressive looking, but what’s equally impressive is how easy it is. Even the roses on top, I promise! And this one-bowl cake recipe is low maintenance, so there’s minimal clean-up too.
- It looks and tastes like something that came from a bakery. You can easily fool your sweetheart into thinking you bought this from a local bakery – it’s that good! But when they find out you took the time and put in the effort to make it from scratch, they’ll definitely swoon even more.
Ingredients
Breaking It Down
Ingredients Explained
In this section I explain the ingredients and give substitution ideas where applicable. For the full recipe (including the ingredient amounts), see the recipe card below.
Small Batch Chocolate Cake Ingredients

- Flour – Just regular all-purpose flour is the base of this recipe.
- Sugar – Use regular granulated white sugar.
- Unsweetened cocoa powder – Make sure you’re using unsweetened cocoa powder because otherwise your cake will be too sweet.
- Light brown sugar – This adds subtle flavor complexity in the background. If you don’t have brown sugar, you can use white sugar instead and add 1/4 teaspoon molasses.
- Baking soda – The leavening agent in this cake recipe.
- Salt – Just a little bit of salt goes a long way and helps balance the flavors in this cake.
- Vanilla extract – Vanilla enhances the chocolate flavor and creates a nuanced, deeper flavor profile.
- Distilled white vinegar – This sounds like a strange addition to cake, but it’s important for a few reasons: 1) it reacts with the baking soda to help make our cake rise, 2) it reacts with the proteins in the flour to create a fluffy, moist cake, and 3) its sharp flavor helps create a balanced flavor profile for this cake. If you don’t have distilled white vinegar, you can use apple cider vinegar, white wine vinegar, or red wine vinegar instead.
- Canola oil – Using oil as the fat source in this cake helps make it moist! If you don’t have canola oil, you can use another neutral-flavored oil, or even a mild-flavored oil, such as avocado oil or light olive oil.
- Water – You can get fancy and replace the water with milk or coffee (or a mix of both), but this recipe really doesn’t need it.
Chocolate Buttercream Ingredients

- Unsalted butter – Slightly soften the butter so it whips up well, but be careful not to fully melt it.
- Powdered sugar – This sweetens and adds body, volume, and stability to our buttercream. Sift it before adding so your buttercream is lump-free.
- Unsweetened cocoa powder – Be careful to use unsweetened!
- Vanilla extract – Vanilla is one of those flavor notes that when paired with chocolate, helps deepen the flavor profile.
- Espresso powder – Like vanilla, just a hint of espresso powder helps enhance the flavor of chocolate. You won’t be able to pull out the flavor of coffee or espresso, but it will taste like a very flavorful chocolate buttercream. On the other hand, if you want to be able to taste the espresso, feel free to add more for a mocha flavor.
- Salt – Just a touch of salt helps balance the flavors here so the buttercream isn’t too sweet.
- Milk – This will bring everything together so it’s smooth, creamy buttercream bliss. You can substitute with half and half or cream. And you might need to add more or less to get it to a spreadable buttercreamy consistency.
- 70% dark chocolate – A little melted chocolate adds richness and heightens the flavor profile of our buttercream. Make sure you fully beat it into the buttercream so there are no streaks.

Step-by-Step Instructions: How to Make Two Slices of Chocolate Layer Cake
Check out my video showing how to make this cake in the recipe card below!
Step 1: Make the Chocolate Cake
- Prep. Preheat the oven to 350F. Butter and flour a 9-inch round cake pan. Place a piece of parchment paper that’s been trimmed to fit inside in the bottom of the prepared pan, and then lightly spray it with cooking spray.
- Make the batter. Whisk together the flour, granulated sugar, cocoa powder, brown sugar, baking soda, and salt in a large bowl. Add the vanilla, vinegar, oil, and water, and whisk to combine, being careful not to over-mix.
- Bake. Pour the batter into the prepared pan. Bake until a toothpick inserted in the center comes out clean, about 20 minutes.
- Cool. Put the cake pan on a wire rack and cool for 15 minutes, and then turn it out onto a parchment paper-lined cooling rack. Let the cake cool to room temperature (about 30 minutes), and then cover with plastic wrap and chill in the fridge for 4 hours (or overnight).
PRO TIP: Make the cake the night before you want to serve it and let it chill in the fridge overnight so you’re not waiting for it.
Step 2: Make the Chocolate Buttercream
Add the butter, powdered sugar, cocoa powder, vanilla, espresso powder, salt, and milk to a large bowl. Use a handheld mixer to beat until well-combined. Add the melted chocolate and beat again until well-mixed.
Step 3: Frost and Assemble the Cake
- Frost the cake round. Spoon 2/3 of the buttercream onto the cake round, and spread it out as evenly as you can.
- Make it a layer cake. Cut the cake in half, and place one half on top of the other. Cut the stacked cake in half again, and place one half on top of the other. You should now have a 4-stack of layer cake.
- Frost the back. Lightly frost the back of the cake with some of the remaining buttercream. If desired, lightly press chocolate sprinkles into the buttercream on the back of the cake before it stiffens.
- Decorate the top. Transfer the rest of the buttercream to a piping bag fitted with a star tip. Pipe stars or flowers on the top.
Step 4: Serve
Cut the cake in half for 2 large pieces. Each piece is 2 servings, so share it with someone you love!

Storage
Store this cake wrapped well in the fridge for up to 1 week. Let it sit at room temperature for 15 minutes before serving so the buttercream can soften.
Tips For Making the Best Mini Chocolate Cake
- Be careful not to over-mix the cake batter. Otherwise, the cake can be gummy or rubbery. In this recipe, it’s better to have a few lumps or streaks in the batter than it is to over-mix it.
- The cake needs to be fully chilled before you frost it. There are a few reasons for this. Like any other cake, this helps make sure that the frosting doesn’t melt on warm cake. But it’s even more important with this cake in particular. Because we’re cutting this cake in half and stacking it, we need the cake to be more set than it would be at room temperature. Chilling the cake in the fridge is the way we get the job done! I like to bake this cake in the evening the day before I want to serve it. I let it cool to room temperature, and then pop it in the fridge to chill overnight so I’m not stuck waiting for it.
- If you accidentally melt the butter too much for the buttercream, just pop it in the freezer for a couple minutes to stiffen it up a little. Otherwise, it’ll make the frosting too loose.

Frequently Asked Questions
Anything chocolate flavored or red velvet flavored are good choices for Valentine’s Day dessert.
Also, red desserts are considered romantic because of the association with the color red to love. (Side Note: The psychology behind color is very interesting! The color red is often associate with Valentine’s Day and love because it evokes passion, lust, and excitement. This is why red-colored desserts are common for Valentine’s Day. You can read more about the psychology behind the color red on Karen Haller.)
Additionally, small batch dessert recipes (especially recipes that make just two servings) are perfect for you and your sweetie. And this is true whether it’s Valentine’s Day or any date-night! What could be more sensual and sweet than sharing a decadent piece of cake with your partner with two forks and one plate?
When I lived in a cold climate, I stored frosted chocolate cake wrapped at room temperature for up to 5 days. Now that I live in a hot climate, I store it wrapped in the fridge if there are leftovers on the same day it’s made. Otherwise, the buttercream gets too soft and runny!
Depending on the climate where you live, you can store chocolate cake with chocolate buttercream wrapped at room temperature for up to 5 days or in the fridge for up to 1 week. Note that if you store your cake in the fridge the frosting will stiffen. Just let it sit at room temperature for 15 minutes before serving to soften the frosting.
Different buttercreams need to be stored differently. For example, some types of buttercream can spoil or separate if they’re left out, so they need to be stored in the fridge. This chocolate buttercream is fine to be stored covered at room temperature for up to 5 days. Note that it will be soft at room temperature, but it will stiffen when it’s cold.
More Valentine’s Day Dessert Ideas
- Red Velvet Cupcakes with Cream Cheese Frosting
- Black Forest Hot Chocolate
- Yellow Cupcakes with Chocolate Frosting for Two
- Drinking Chocolate (French Hot Chocolate)
- Healthy Dark Chocolate Fondue Recipe (Two Ingredients)
- Fudgy Dark Chocolate Cookie Sandwiches with Raspberry Buttercream For Two

Let’s Connect

Did you make this recipe? Please rate it and leave a comment below. You can also tag @anediblemosaic on social media.
To stay up-to-date, follow me on Facebook, Instagram, Pinterest, and Twitter!

Small Chocolate Cake Recipe (Makes Two Large Layer Cake Slices)
Email This Recipe
Get this recipe link emailed straight to your inbox!
Equipment
Ingredients
Chocolate Cake:
- 2/3 cup all-purpose flour
- 1/2 cup granulated white sugar
- 1/4 cup unsweetened cocoa powder
- 2 tablespoons light brown sugar lightly packed
- 1/2 teaspoon baking soda
- 1/4 teaspoon salt
- 1 teaspoon pure vanilla extract
- 1/2 teaspoon distilled white vinegar
- 2 1/2 tablespoons canola oil
- 1/2 cup cold water
For the Pan:
- Unsalted butter
- All-purpose flour
- Cooking spray
Chocolate Buttercream:
- 1/3 cup unsalted butter very slightly softened
- 1 1/4 cups powdered sugar sifted
- 3 tablespoons unsweetened cocoa powder
- 1 teaspoon pure vanilla extract
- 1/8 teaspoon instant espresso powder
- 1/16 teaspoon salt
- 2 tablespoons milk or more as needed
- 2 ounces 70% dark chocolate melted and cooled slightly
Other:
- Chocolate sprinkles for decoration
Instructions
For the Chocolate Cake:
- Prep. Preheat the oven to 350F. Butter and flour a 9-inch round cake pan. Place a piece of parchment paper that’s been trimmed to fit inside in the bottom of the prepared pan, and then lightly spray it with cooking spray.
- Make the batter. Whisk together the flour, granulated sugar, cocoa powder, brown sugar, baking soda, and salt in a large bowl. Add the vanilla, vinegar, oil, and water, and whisk to combine, being careful not to over-mix.
- Bake. Pour the batter into the prepared pan. Bake until a toothpick inserted in the center comes out clean, about 20 minutes.
- Cool. Put the cake pan on a wire rack and cool for 15 minutes, and then turn it out onto a parchment paper-lined cooling rack. Let the cake cool to room temperature (about 30 minutes), and then cover with plastic wrap and chill in the fridge for 4 hours (or overnight).
For the Chocolate Buttercream:
- Add the butter, powdered sugar, cocoa powder, vanilla, espresso powder, salt, and milk to a large bowl. Use a handheld mixer to beat until well-combined.Add the melted chocolate and beat again until well-mixed.
To Frost and Assemble the Cake:
- Frost the cake round. Spoon 2/3 of the buttercream onto the cake round, and spread it out as evenly as you can.
- Make it a layer cake. Cut the cake in half, and place one half on top of the other. Cut the stacked cake in half again, and place one half on top of the other. You should now have a 4-stack of layer cake.
- Frost the back. Lightly frost the back of the cake with some of the remaining buttercream. If desired, lightly press chocolate sprinkles into the buttercream on the back of the cake before it stiffens.
- Decorate the top. Transfer the rest of the buttercream to a piping bag fitted with a star tip. Pipe stars or flowers on the top.
To Serve:
- Cut the cake in half for 2 large pieces. Each piece is 2 servings, so share it with someone you love!
Video
Notes
- Cool Time: The cake needs to be fully chilled before you frost it. There are a few reasons for this. Like any other cake, this helps make sure that the frosting doesn’t melt on warm cake. But it’s even more important with this cake in particular. Because we’re cutting this cake in half and stacking it, we need the cake to be more set than it would be at room temperature. Chilling the cake in the fridge is the way we get the job done! I like to bake this cake in the evening the day before I want to serve it. I let it cool to room temperature, and then pop it in the fridge to chill overnight so I’m not stuck waiting for it.
- Storage: Store this cake wrapped well in the fridge for up to 1 week. Let it sit at room temperature for 15 minutes before serving so the buttercream can soften.
Nutrition
Nutritional information is automatically calculated and should be used as an approximate.
Share it with me on Instagram and leave a comment to let me know your thoughts!

Check Out What the Other Participating Bloggers Made
- Heart Shaped Thumbprint Cookies from Julie of The Little Kitchen
- Red Velvet Cheesecake Swirl Brownies from Melissa of Persnickety Plates
- Little Debbie Strawberry Shortcake Rolls Ice Cream from Rose of Rose Bakes
- Salted Dark Chocolate Pistachio Cookie Bars from Jessica of A Kitchen Addiction
- Red Velvet Swirl Cheesecake Brownies from Julie of Back To My Southern Roots
- Dark Chocolate Covered Strawberry Latte from Lisa of Taste Cook Sip
- Iced Sugar Cookies from Nina of Crazy for Cookies and More
- Valentine’s Fudge from Raquel of Organized Island
- Pink Gin Fizz from Caroline of Caroline’s Cooking
- Cherry Chocolate Chip Cake from Stefanie of Stef’s Eats and Sweets
- Flourless Chunky Peanut Butter Blossoms from Colleen of Faith, Hope, Love, & Luck Survive Despite a Whiskered Accomplice
- Valentine’s Day Oatmeal M&M Cookies from Kelly of Kelly Lynn’s Sweets and Treats
- Gluten Free Peanut Butter Cookies from Holly of A Baker’s House
- Gluten Free Vanilla Cake with Pink Buttercream Frosting from Elaine of Small Farm Big Life
- Small Batch Chocolate Chip Cookies from Courtney of Courtney’s Sweets
- Small Batch Chocolate Cupcakes from Lisa of Blogghetti
- Valentine’s Day M&M Cookie Bars from Jaclyn of Crayons & Cravings
- Soft Iced Pumpkin Cookies from Laura of Untwisted Vintage
- Guava Pink Peppercorn Margaritas from Courtney of Cook Like a Champion
- Sugar Cookie Cups from Kelsey of Dance Around the Kitchen
- Chewy Buckwheat Chocolate Chunk Cookies with Sea Salt from Lisa of Garlic & Zest
- Shortbread Hearts of Love from TammyJo of The Chocolate Cult
- Valentine Sugar Cookies from Gwynn of Swirls of Flavor
- Best Stout Beer Tiramisu from Linda of Ketchup with Linda
- Creamed Chipped Beef from Rebekah of Kitchen Gidget
- Bakery Style Peanut Butter Cookies from Becca of The Salted Cookie
- Peanut Butter Buckeyes from Nicole of For the Love of Food
This post was first published on An Edible Mosaic on February 11, 2022 and updated on February 4, 2026.


I’m the writer, recipe developer, photographer, and food stylist behind this blog. I love finding the human connection through something we all do every day: eat! Food is a common ground that we can all relate to, and our tables tell a story. It’s my goal to inspire you to get in the kitchen, try something new, and find a favorite you didn’t know you had.
Free Bonus


Question: Is the cake cut iced once then cut horizontally 2X and then totally iced?
MJ, Nope, the cake is frosted, cut in half, and then stacked. The stack of 2 layers is cut in half again, and then stacked again (so you end up with a 4-layer wedge of cake that’s enough for 2 large slices). After that, I frosted the back of the cake and pressed in some sprinkles.
To show exactly how it’s made, I included a video in the recipe card. :)
Yummy! What Valentine sweetheart could say no to such a beautiful and romantic gesture?! ❤️🌹